POWER DISTRIBUTION MAIN BODY ECU INSTALLATION
CAUTION / NOTICE / HINT
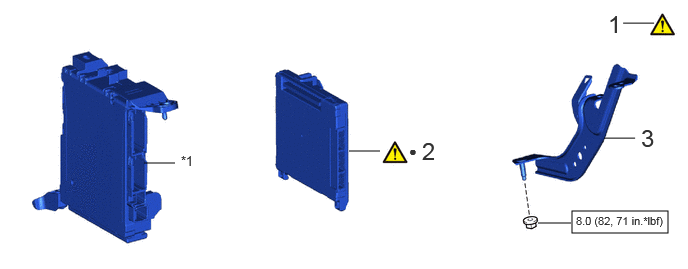
| Procedure | Part Name Code | 
|

|

|
|
|---|---|---|---|---|---|
| 1 | PRECAUTION | - | ( ) |
- | - |
| 2 | MAIN BODY ECU (MULTIPLEX NETWORK BODY ECU) | 89221 | ()
|
- | - |
| 3 | WIRING HARNESS CLAMP BRACKET | 82715 | - | - | - |
| *1 | DRIVER SIDE JUNCTION BLOCK ASSEMBLY | - | - |

|
N*m (kgf*cm, ft.*lbf): Specified torque | ● | Non-reusable part |
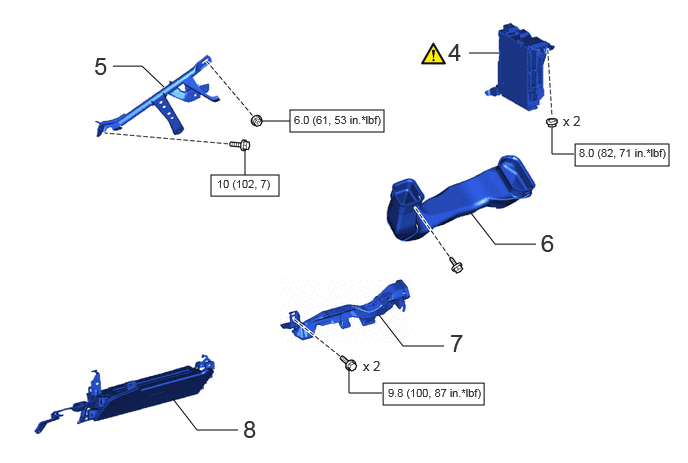
| Procedure | Part Name Code |
|
|
|
|
|---|---|---|---|---|---|
| 4 | DRIVER SIDE JUNCTION BLOCK ASSEMBLY WITH MAIN BODY ECU | - | ()
|
- | - |
| 5 | NO. 3 INSTRUMENT PANEL TO COWL BRACE SUB-ASSEMBLY | 55308B | - | - | - |
| 6 | NO. 2 HEATER TO REGISTER DUCT | 55844 | - | - | - |
| 7 | AIR DUCT SUB-ASSEMBLY | - | - | - | - |
| 8 | LOWER NO. 1 INSTRUMENT PANEL AIRBAG ASSEMBLY | 73900 | - | - | - |
|
|
N*m (kgf*cm, ft.*lbf): Specified torque | - | - |
CAUTION / NOTICE / HINT
- HINT:
- ·
Use the same procedure for RHD and LHD vehicles.
·The procedure listed below is for LHD vehicles.
·A bolt without a torque specification is shown in the standard bolt chart.
Click hereGeneral>SPECIFICATIONS>STANDARD BOLT>SPECIFIED TORQUE FOR STANDARD BOLTS
PROCEDURE

 1. PRECAUTION
|
|
|
89221
2.INSTALL MAIN BODY ECU (MULTIPLEX NETWORK BODY ECU)
|
|
|
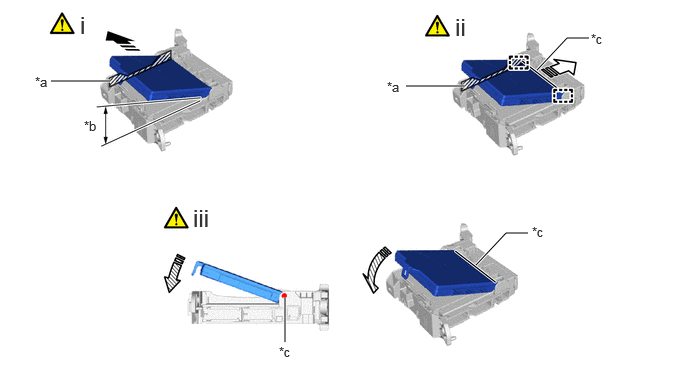
| *a | Housing Sidewall | *b | 20° or more |
| *c | Driver Side Junction Block Assembly Side A | - | - |

|
Set in this Direction | 
|
Slide in this Direction |

|
Install in this Direction | - | - |
Press the main body ECU (multiplex network body ECU) to the housing sidewall as shown in the illustration.
- HINT:
-
Make sure the angle between the driver side junction block assembly and the main body ECU (multiplex network body ECU) is 20° or more.
Slide the main body ECU (multiplex network body ECU) along the housing sidewall in the direction of the arrow (driver side junction block assembly side A) and insert the guide as shown in the illustration.
- NOTICE:
-
Do not press against the main body ECU (multiplex network body ECU) sidewall too hard.
Rotate the main body ECU (multiplex network body ECU) about its edge which contacts with the driver side junction block assembly side A as shown in the illustration.
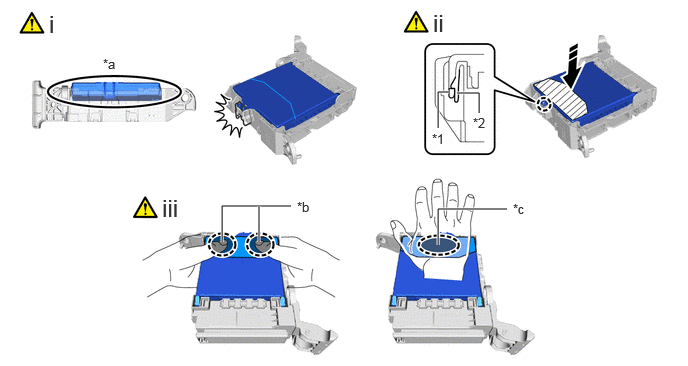
| *1 | Driver Side Junction Block Assembly | *2 | Main Body ECU (Multiplex Network Body ECU) |
| *a | Before Locking | *b | Press the 2 sides of the main body ECU (multiplex network body ECU) with both hands. |
| *c | Press the center of the main body ECU (multiplex network body ECU) with one hand. | - | - |

|
Place fingers or the palm of your hand here |
|
Install in this Direction |

|
Pressing Area | - | - |
Rotate it until the main body ECU (multiplex network body ECU) enters the lock of the driver side junction block assembly.
Press the push area, attach the claw, and install the main body ECU (multiplex network body ECU).
- NOTICE:
- ·
Be sure to press only the push area.
·Do not insert with a force of 98 N (10 kgf, 22.0 lbf) or higher to prevent it from being damaged.
·Check the engagement of the main body ECU (multiplex network body ECU) and the power distribution box assembly by the locking sound.
·Do not put your weight on the main body ECU (multiplex network body ECU) when engaging the main body ECU (multiplex network body ECU) to prevent it from being damaged.
- HINT:
-
If a locking sound cannot be heard, visually check the lock part engagement. Or check that the height of the main body ECU (multiplex network body ECU) and the power distribution box assembly are the same.
Press it in one of the ways as shown in the illustration.
82715
3.INSTALL WIRING HARNESS CLAMP BRACKET
- Torque:
- 8.0 N*m (82 kgf*cm, 71 in.*lbf)
4.INSTALL DRIVER SIDE JUNCTION BLOCK ASSEMBLY WITH MAIN BODY ECU
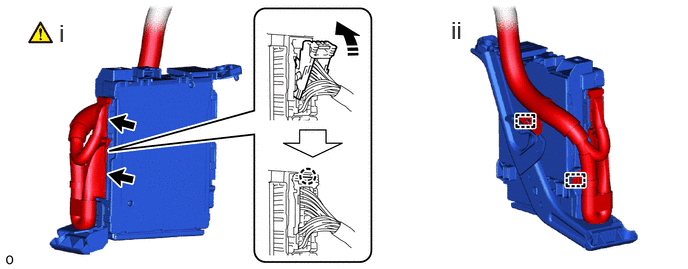
|
|
Install in this Direction | - | - |
Attach the claw to connect the 2 lever connectors.
- NOTICE:
-
Be sure to connect the lever connector securely.
Attach the clamp.
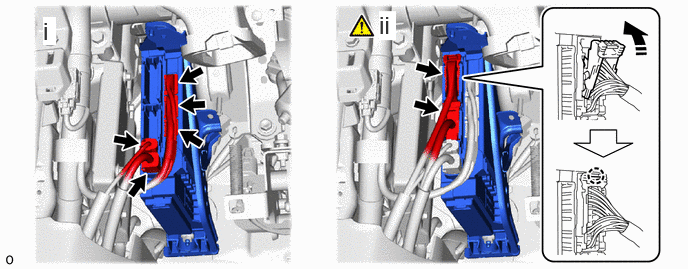
|
|
Install in this Direction | - | - |
Connect the 5 connectors.
Attach the claw to connect the 2 lever connectors.
- NOTICE:
-
Be sure to connect the lever connector securely.

Install the driver side junction block assembly with main body ECU with the 2 nuts.
- Torque:
- 8.0 N*m (82 kgf*cm, 71 in.*lbf)
for RHD:

Connect the ECU with the 2 nuts.
55308B
5.INSTALL NO. 3 INSTRUMENT PANEL TO COWL BRACE SUB-ASSEMBLY
55844
6.INSTALL NO. 2 HEATER TO REGISTER DUCT
7.INSTALL AIR DUCT SUB-ASSEMBLY
73900
8.INSTALL LOWER NO. 1 INSTRUMENT PANEL AIRBAG ASSEMBLY