HEATING / AIR CONDITIONING CONDENSER INSTALLATION
CAUTION / NOTICE / HINT
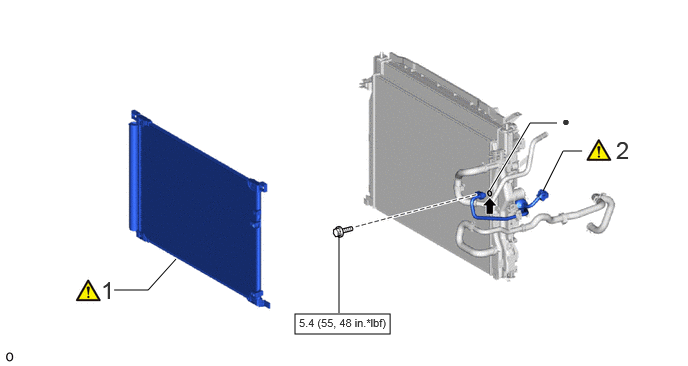
| Procedure | Part Name Code | 
|

|

|
|
|---|---|---|---|---|---|
| 1 | COOLER CONDENSER ASSEMBLY | 884A0 | ( ) |
- | - |
| 2 | NO. 1 DISCHARGE HOSE SUB-ASSEMBLY | 88703A | ()
|
- | - |

|
N*m (kgf*cm, ft.*lbf): Specified torque | ● | Non-reusable part |

|
Compressor oil ND-OIL 11 or equivalent | - | - |
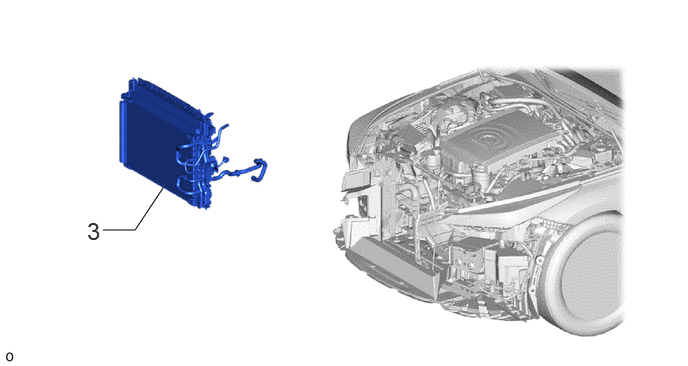
| Procedure | Part Name Code |
|
|
|
|
|---|---|---|---|---|---|
| 3 | RADIATOR WITH CONDENSER ASSEMBLY | - | - | - | - |
CAUTION / NOTICE / HINT
- HINT:
- ·
Use the same procedure for RHD and LHD vehicles.
·The procedure listed below is for LHD vehicles.
PROCEDURE

 884A0
1.INSTALL COOLER CONDENSER ASSEMBLY
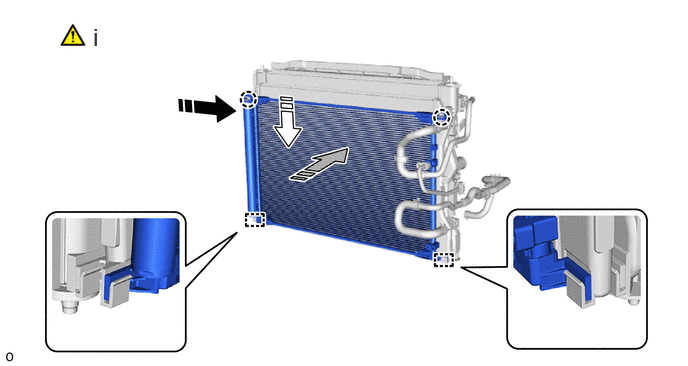

|
Install in this Direction (1) | 
|
Install in this Direction (2) |

|
Install in this Direction (3) | - | - |
Attach the guide and claw and install the cooler condenser assembly as shown in the illustration.
- NOTICE:
-
Do not damage the cooler condenser assembly and radiator assembly when removing the cooler condenser assembly.
- HINT:
-
If a new cooler condenser assembly is installed, add compressor oil to the condenser as follows.
- Capacity:
Add 40 cc (1.35 fl. oz)
- Compressor Oil:
ND-OIL 11 or equivalent
88703A
2.INSTALL NO. 1 DISCHARGE HOSE SUB-ASSEMBLY
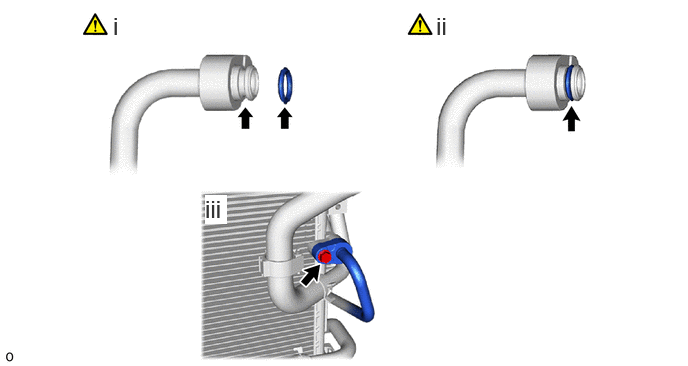
Remove the vinyl tape from the No. 1 discharge hose sub-assembly and connecting part of the cooler condenser assembly and then sufficiently apply compressor oil to a new O-ring and the fitting surface of the No. 1 discharge hose sub-assembly.
- Compressor Oil:
ND-OIL 11 or equivalent
Install the O-ring to the No. 1 discharge hose sub-assembly.
- NOTICE:
-
Keep the O-ring and O-ring fitting surface free of foreign matter.
Connect the No. 1 discharge hose sub-assembly to the cooler condenser assembly with the bolt.
- Torque:
- 5.4 N*m (55 kgf*cm, 48 in.*lbf)
3.INSTALL RADIATOR WITH CONDENSER ASSEMBLY