Home › Vehicle Exterior › LIGHTING (EXT) › HEADLIGHT ASSEMBLY › 2020.11–2021.08
RM37H0E _59 Vehicle Exterior _093353 LIGHTING (EXT) _0448240 HEADLIGHT ASSEMBLY A

LIGHTING (EXT)  HEADLIGHT ASSEMBLY  REASSEMBLY  


CAUTION / NOTICE / HINT
COMPONENTS (REASSEMBLY)
E476436N04
1.531,2.146 4.104,3.552 2.573,1.406 4.208,2.146 7.01,3.563 2.802,1.417 1.833,5.083 2.865,5.083 false 4.396,1.115 3.958,1.115 false 4.344,4.375 5.073,4.375 false 4.073,1.823 4.563,1.823 false 2.333,2.865 2.635,2.865 false 4.948,2.823 5.115,2.823 false 3.833,2.917 3.833,3.229 3.833,3.229 3.594,3.229 false 3.615,2.26 3.896,2.26 3.896,2.26 3.896,2.583 false 6.698,2.469 6.698,2.771 false 4.552,0.438 5.042,0.438 false 6.323,2.521 6.323,2.854 false 6.865,0.615 7.125,0.771 0.26,0.156 10 false x 9 3.375,4.969 3.573,5.25 0.198,0.281 18 false 6 5.438,4.323 5.615,4.5 0.177,0.177 10 false ● 5.667,4.26 5.865,4.542 0.198,0.281 18 false 5 2.052,2.719 2.365,3.031 0.313,0.313 18 false 3 4.958,1.688 5.156,1.969 0.198,0.281 18 false 4 3.76,1.052 4.031,1.313 0.271,0.26 10 false *1 3.875,3.313 4.333,3.51 0.458,0.198 10 false x 2 5.885,2.615 6.344,2.813 0.458,0.198 10 false x 2 1.604,2.198 1.979,2.438 0.375,0.24 12 false *A 4.281,2.219 4.656,2.458 0.375,0.24 12 false *B 4.667,2.719 4.979,3.031 0.313,0.313 18 false 3 3.417,3.094 3.729,3.406 0.313,0.313 18 false 1 6.281,2.885 6.594,3.198 0.313,0.313 18 false 2 4.396,0.313 4.708,0.625 0.313,0.313 18 false 7 3.458,2.146 3.771,2.458 0.313,0.313 18 false 2 6.625,2.802 6.938,3.115 0.313,0.313 18 false 1 3.531,2.625 3.99,2.823 0.458,0.198 10 false x 2

Procedure Part Name Code
Z101186

Z101188

Z101187

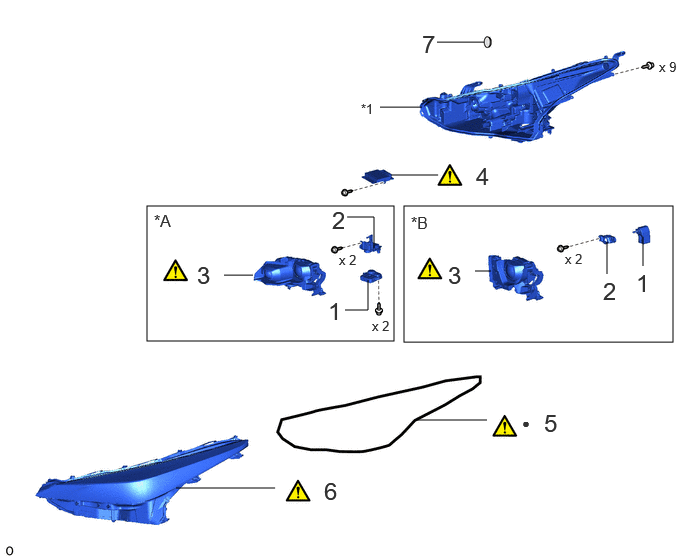
1 HEADLIGHT LEVELING MOTOR LH 85691 - - -
2 HEADLIGHT BRACKET LH 81158 - - -
3 HEADLIGHT UNIT LH 81171A (Click here) - -
4 LIGHT CONTROL LED ECU LH 85967D (Click here) - -
5 HEADLIGHT LENS GASKET 81132B (Click here) - -
6 HEADLIGHT LENS SUB-ASSEMBLY LH 8110B (Click here) - -
7 NO. 1 HEADLIGHT COVER 81144 - - -

*A w/ Adaptive High Beam System *B w/o Adaptive High Beam System
*1 HEADLIGHT HOUSING SUB-ASSEMBLY LH - -
● Non-reusable part - -

E463001N03
3.625,2.823 5.302,4.24 1.677,1.417 4.302,3.521 4.813,3.521 false 4.177,3.167 4.688,3.167 false 5.313,3.542 5.563,3.542 false 2.354,2.802 2.865,2.802 false 2.844,1.281 3.229,1.281 false 5.719,3.406 6.177,3.865 0.458,0.458 18 false 11 4.875,3.01 5.271,3.406 0.396,0.396 18 false 10 4.885,3.438 5.198,3.635 0.313,0.198 10 false *1 2.958,2.667 3.24,3.021 0.281,0.354 18 false 8 2.646,1.135 2.927,1.49 0.281,0.354 18 false 9 2.458,1.156 2.615,1.354 0.156,0.198 10 false ● 4.75,3.073 4.906,3.271 0.156,0.198 10 false ● 1.469,2.906 1.927,3.104 0.458,0.198 10 false x 3

Procedure Part Name Code
Z101186

Z101188

Z101187

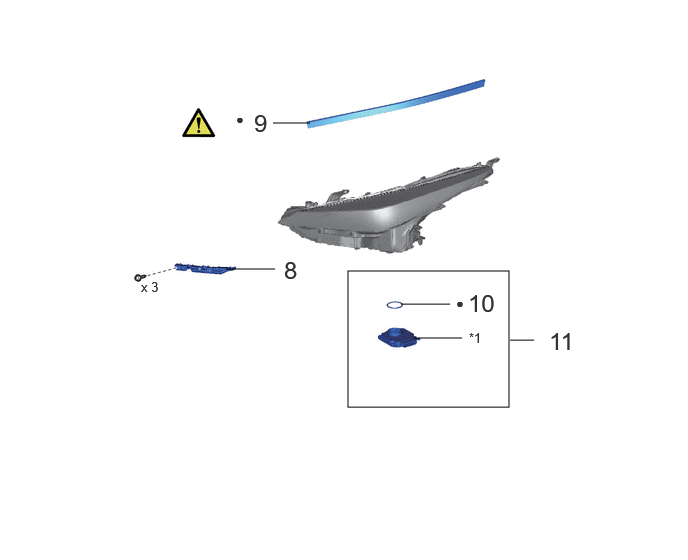
8 FRONT NO. 2 BUMPER RETAINER BRACKET 52534 - - -
9 NO. 1 HEADLIGHT PROTECTOR LH 81176 (Click here) - -
10 HEADLIGHT GASKET 81134 - - -
11 HEADLIGHT ECU SUB-ASSEMBLY LH 81056A - - -

*1 Main Headlight ECU Sub-assembly - -
● Non-reusable part - -

CAUTION / NOTICE / HINT

HINT:
·

Use the same procedure for the RH and LH sides.

·

The procedure listed below is for the LH side.


PROCEDURE

Hide 85691 1.INSTALL HEADLIGHT LEVELING MOTOR LH

Hide 81158 2.INSTALL HEADLIGHT BRACKET LH

Hide 81171A 3.INSTALL HEADLIGHT UNIT LH

Z101186

NOTICE:
·

Prevention of static electricity is required during this procedure.

·

Use static electricity countermeasures SST (desktop antistatic mat set) and observe all precautions to prevent damage to the system by electrostatic discharge (ESD).

·

Perform work using clean rubber gloves.

·

Do not touch the inner surface of the lens and metallic surfaces as much as possible, or they may become dirty.

·

Do not allow metallic surfaces to become dirty, as such surfaces become damaged even if they are only lightly wiped with a soft cloth.

·

Do not use solvent to clean components. Only clean them with a dry cloth.


SST
09890-47010  (09891-04020, 09891-04010, 09891-04030, 09891-04040)
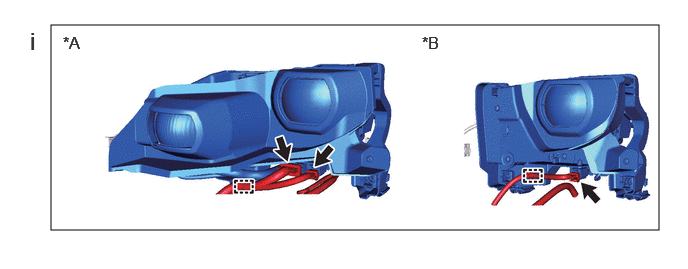
a.
E462975C02
0.531,0.26 6.865,2.396 6.333,2.135 0.656,0.344 1.031,0.583 0.375,0.24 12 false *A 4.396,0.344 4.771,0.583 0.375,0.24 12 false *B 0.313,0.281 0.594,0.635 0.281,0.354 18 false i
*A w/ Adaptive High Beam System *B w/o Adaptive High Beam System


i.

w/ Adaptive High Beam System:

Connect the 2 connectors and attach the wire harness clamp.


ii.

w/o Adaptive High Beam System:

Connect the connector and attach the wire harness clamp.
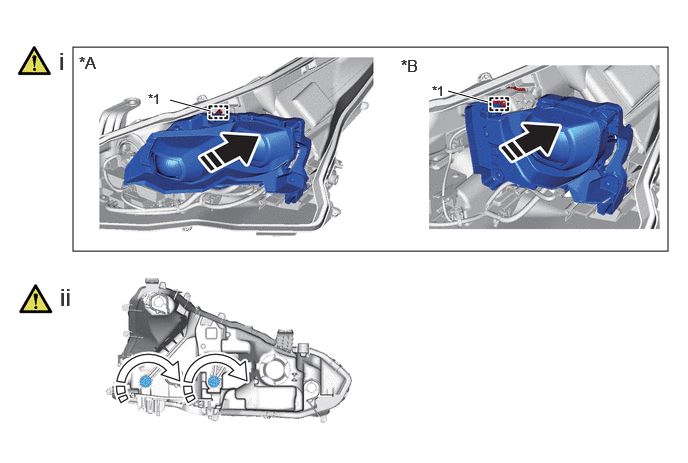


b.
E462976C01
0.76,0.49 6.958,2.615 6.198,2.125 1.771,1.042 2.188,1.156 true 4.667,0.948 5.083,1.063 true 0.823,0.552 1.198,0.792 0.375,0.24 12 false *A 4.177,0.583 4.552,0.823 0.375,0.24 12 false *B 0.615,0.49 0.896,0.844 0.281,0.354 18 false i 0.625,2.948 0.906,3.302 0.281,0.354 18 false ii 1.542,0.948 1.854,1.146 0.313,0.198 10 false *1 4.5,0.865 4.813,1.063 0.313,0.198 10 false *1
*A w/ Adaptive High Beam System *B w/o Adaptive High Beam System
*1 Pivot Collar - -
V113147

Install in this Direction
V113148

Turn in this Direction


i.

Attach the pivot and temporarily install the headlight unit assembly LH to the headlight housing sub-assembly LH as shown in the illustration.


ii.

Hold the headlight unit assembly LH with one hand to prevent it from tipping over, alternately tighten the aiming screws for the beam axis horizontal and vertical adjustments in the direction indicated by the arrow shown in the illustration, and align the dimensions with the recorded values at removal.


Hide 85967D 4.INSTALL LIGHT CONTROL LED ECU LH

Z101186

Click here(Click here)

Hide 81132B 5.INSTALL HEADLIGHT LENS GASKET

Z101186

NOTICE:
·

Prevention of static electricity is required during this procedure.

·

Use static electricity countermeasures SST (desktop antistatic mat set) and observe all precautions to prevent damage to the system by electrostatic discharge (ESD).

·

Perform work using clean rubber gloves.

·

Do not touch the inner surface of the lens and metallic surfaces as much as possible, or they may become dirty.

·

Do not allow metallic surfaces to become dirty, as such surfaces become damaged even if they are only lightly wiped with a soft cloth.

·

Do not use solvent to clean components. Only clean them with a dry cloth.


a.
E458148C01
5.063,0.563 5.365,0.302 false 4.844,1.344 5.146,1.083 false 0.542,0.229 0.823,0.583 0.281,0.354 18 false i 3.938,0.229 4.219,0.583 0.281,0.354 18 false ii 6.5,1.146 6.781,1.5 0.281,0.354 18 false iii 1.854,2.021 2.135,2.375 0.281,0.354 18 false vii 4.615,3.271 4.896,3.625 0.281,0.354 18 false v 3.094,4.042 3.375,4.396 0.281,0.354 18 false vi 1.667,3.865 1.948,4.219 0.281,0.354 18 false iv 5.417,0.219 5.729,0.417 0.313,0.198 10 false *b 4.625,1.344 4.938,1.542 0.313,0.198 10 false *a 5.396,0.635 5.708,0.833 0.313,0.198 10 false 1 4.396,0.76 4.708,0.958 0.313,0.198 10 false 2 2.375,4.083 2.688,4.281 0.313,0.198 10 false *c
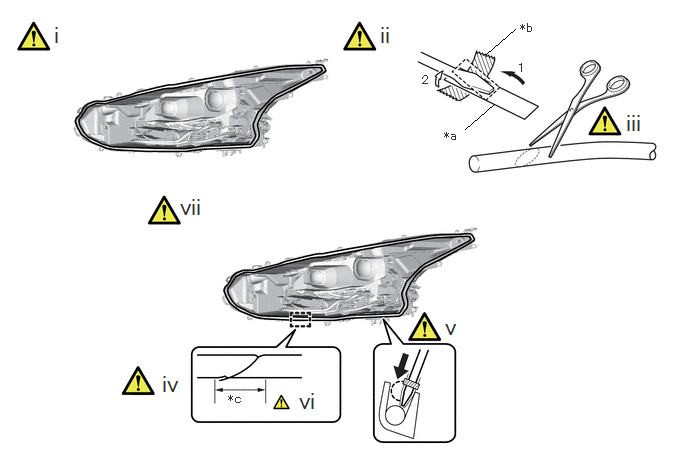
*a Peeling Paper *b Tape
*c 10 mm (0.394 in.) +/- 5 mm (0.197 in.) - -


i.

Clean the headlight lens gasket installation groove.


ii.

Cut the peeling paper and secure with tape to the tip of a screwdriver in the order shown in the illustration.

NOTICE:

Use the peeling paper attached to the new headlight gasket.


iii.

Using scissors, cut the end of the headlight gasket at a 45° angle.


iv.

Insert the headlight gasket into the groove of the headlight assembly LH so that the joint comes to the bottom.


v.

Using a screwdriver with the tip wrapped with peeling paper, push in the headlight gasket to the groove bottom of the headlight assembly LH.

NOTICE:
·

Gently set the headlight gasket into place without pulling on it.

·

If the headlight gasket is set while pulled, the gasket will be lifted up at the corner groove.


vi.

After completely pushing in the headlight gasket, install it so that the edge overlaps itself by 10 mm (0.394 in.) +/- 5 mm (0.197 in.) or more.


vii.

Check the installation condition of the headlight gasket.

NOTICE:
·

Do not allow the headlight gasket to lift up or protrude.

·

Do not allow gaps where the headlight gasket overlaps.

·

Check the corner groove carefully since the gasket can easily become


Hide 8110B 6.INSTALL HEADLIGHT LENS SUB-ASSEMBLY LH

Z101186

NOTICE:
·

Prevention of static electricity is required during this procedure.

·

Use static electricity countermeasures SST (desktop antistatic mat set) and observe all precautions to prevent damage to the system by electrostatic discharge (ESD).

·

Perform work using clean rubber gloves.

·

Do not touch the inner surface of the lens and metallic surfaces as much as possible, or they may become dirty.

·

Do not allow metallic surfaces to become dirty, as such surfaces become damaged even if they are only lightly wiped with a soft cloth.

·

Do not use solvent to clean components. Only clean them with a dry cloth.


a.
E458149C01
0.708,0.219 0.99,0.573 0.281,0.354 18 false i 4.135,0.365 4.417,0.719 0.281,0.354 18 false ii 2.333,2.448 3.292,2.792 0.958,0.344 18 false iii, iv 5.073,3.104 5.385,3.302 0.313,0.198 10 false *a
V100155

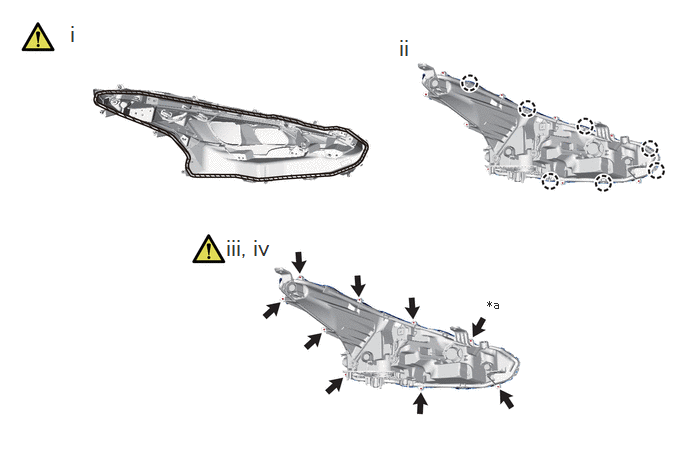
Cleaning Area
V100135

Screw
*a TORX Screw - -


i.

Be sure to clean the headlight gasket contact surface of the headlight lens sub-assembly LH.


ii.

Attach the claw and install the headlight lens sub-assembly LH.


iii.

Install the 8 screws.


iv.

Using a T20H TORX driver, install the TORX screw.


Hide 81144 7.INSTALL NO. 1 HEADLIGHT COVER

Hide 52534 8.INSTALL FRONT NO. 2 BUMPER RETAINER BRACKET

Hide 81176 9.INSTALL NO. 1 HEADLIGHT PROTECTOR LH
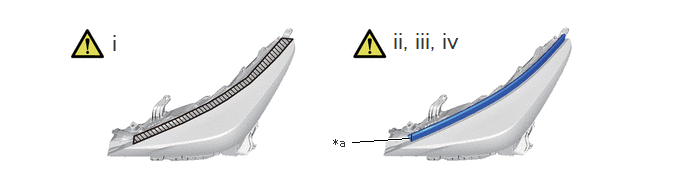
a.
E458152C01
3.667,1.479 4.25,1.438 true 1.146,0.313 1.427,0.667 0.281,0.354 18 false i 4.073,0.292 5.75,0.74 1.677,0.448 18 false ii, iii, iv 3.469,1.417 3.781,1.615 0.313,0.198 10 false *a
V100155

Cleaning Area *a Mark-off line


i.

Clean the application area shown in the illustration.


ii.

Align with the mark-off line and set the headlight bracket LH into place.


iii.

Align the headlight bracket LH with the curve and set only the part where the peeling type tape was removed from into place.


iv.

Press the set portion of the part with your finger to secure it.

NOTICE:

Do not slide your finger horizontally, as doing so may stretch the part unnecessarily.


Hide 81134 10.INSTALL HEADLIGHT GASKET

Hide 81056A 11.INSTALL HEADLIGHT ECU SUB-ASSEMBLY LH