ADVANCED DRIVER ASSISTANCE SYSTEM ADAPTIVE HIGH BEAM SYSTEM B2492 Left Headlight Driver Module Circuit B2493 Right Headlight Driver Module Circuit
DESCRIPTION
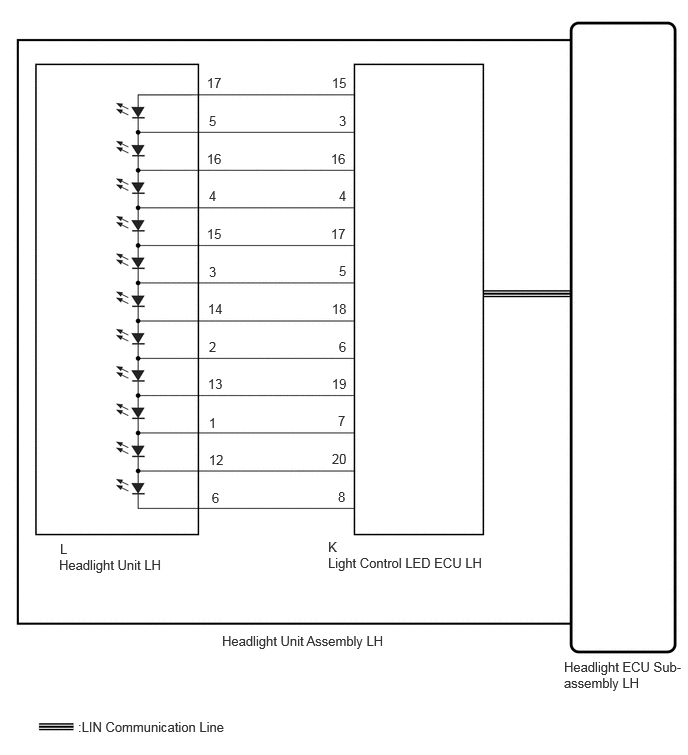
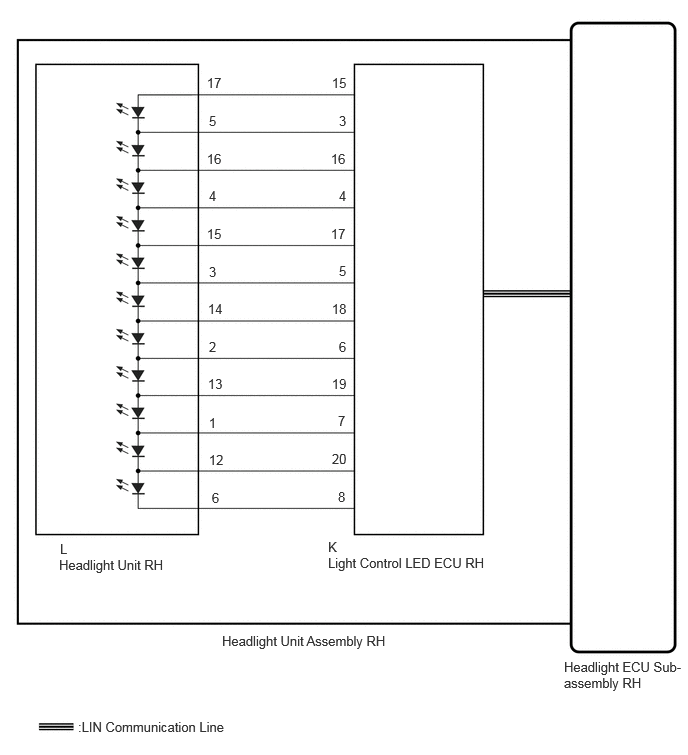
The headlight ECU sub-assembly sends control signals to the light control LED ECU via LIN communication and controls the additional LEDs using the drive circuit inside the light control LED ECU.
The light control LED ECU applies voltage, which is boosted inside the light control LED ECU to maintain the current applied to the additional LEDs at a constant level, to the additional LEDs and turns on/off each LED based on adaptive high beam system control.
The light control LED ECU also monitors the applied voltage value to detect current application malfunctions.
The light control LED ECU also detects malfunctions in the switching circuit that performs the adaptive high beam system illumination pattern inside the light control LED ECU.
| DTC No. | Detection Item | DTC Detection Condition | Trouble Area | DTC Output from | Priority |
|---|---|---|---|---|---|
| B2492 | Left Headlight Driver Module Circuit | Detection Condition:
Ignition switch is ON and high beam headlight is illuminated Malfunction Status:
Adaptive high beam system circuit malfunction signals are received from light control LED ECU LH -
Additional LED malfunction -
Light control LED ECU LH malfunction -
Open or short in adaptive high beam system Malfunction duration:
- |
·
Headlight unit LH ·
Headlight unit assembly LH ·
Light control LED ECU LH |
AFS | A |
| B2493 | Right Headlight Driver Module Circuit | Detection Condition:
Ignition switch is ON and high beam headlight is illuminated Malfunction Status:
Adaptive high beam system circuit malfunction signals are received from light control LED ECU RH -
Additional LED malfunction -
Light control LED ECU RH malfunction -
Open or short in adaptive high beam system Malfunction duration:
- |
·
Headlight unit RH ·
Headlight unit assembly RH ·
Light control LED ECU RH |
AFS | A |
WIRING DIAGRAM
for LH Side:
for RH Side:
PROCEDURE
Pre-procedure1
Clear the DTCs.
- Body Electrical > AFS > Clear DTCs
- 50002 165
Turning the ignition switch ON and illuminating the high beam headlights using the light control switch.
Procedure1
Check for DTCs.
- Body Electrical > AFS > Trouble Codes
- 50001 165
- Result:
Result Proceed to B2492 and B2493 are not output A B2492 is output B B2493 is output C
Post-procedure1
None
A
Click hereGeneral>INTRODUCTION>HOW TO TROUBLESHOOT ECU CONTROLLED SYSTEMS>HOW TO PROCEED WITH TROUBLESHOOTING
B
C
Pre-procedure1
Remove the headlight unit LH.
- HINT:
-
Click hereVehicle Exterior>LIGHTING (EXT)>HEADLIGHT ASSEMBLY>DISASSEMBLY
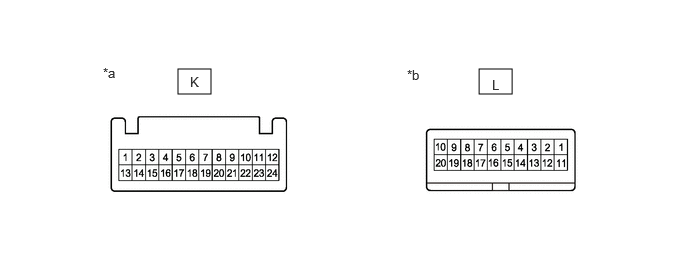
| *a | Component without harness connected
(Light Control LED ECU LH) |
*b | Component without harness connected
(Headlight Unit LH) |
Procedure1
Measure the resistance according to the value(s) in the table below.
- Standard Resistance:
Tester Connection Condition Specified Condition K-15 - L-17 Always Below 1 Ω K-3 - L-5 Always Below 1 Ω K-16 - L-16 Always Below 1 Ω K-4 - L-4 Always Below 1 Ω K-17 - L-15 Always Below 1 Ω K-5 - L-3 Always Below 1 Ω K-18 - L-14 Always Below 1 Ω K-6 - L-2 Always Below 1 Ω K-19 - L-13 Always Below 1 Ω K-7 - L-1 Always Below 1 Ω K-20 - L-12 Always Below 1 Ω K-8 - L-6 Always Below 1 Ω
- Result:
Proceed to OK NG
Post-procedure1
None
OK
NG
Pre-procedure1
Remove the headlight unit LH.
- HINT:
-
Click hereVehicle Exterior>LIGHTING (EXT)>HEADLIGHT ASSEMBLY>DISASSEMBLY
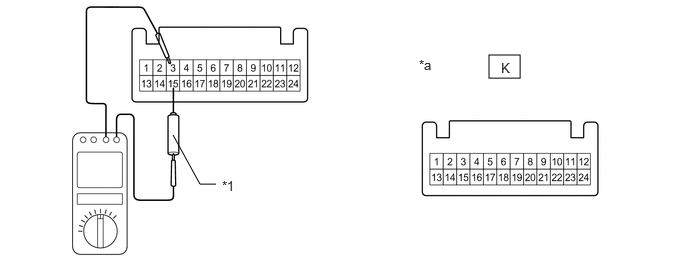
| *1 | Dry Cell Battery | - | - |
| *a | Component without harness connected
(Light Control LED ECU LH) |
- | - |
Set the Toyota Electrical Tester to diode check mode.
- HINT:
-
If the tester display is below 3 V, replace the dry cell batteries inside the tester.
Procedure1
Add 1 dry cell battery (about 1.5 V) between the Toyota Electrical Tester and inspection terminal and check if the LED illuminates.
- OK:
Tester Connection Specified Condition Tester positive (+) - K-15
Tester negative (-) - K-3LED illuminates Tester positive (+) - K-3
Tester negative (-) - K-16LED illuminates Tester positive (+) - K-16
Tester negative (-) - K-4LED illuminates Tester positive (+) - K-4
Tester negative (-) - K-17LED illuminates Tester positive (+) - K-17
Tester negative (-) - K-5LED illuminates Tester positive (+) - K-5
Tester negative (-) - K-18LED illuminates Tester positive (+) - K-18
Tester negative (-) - K-6LED illuminates Tester positive (+) - K-6
Tester negative (-) - K-19LED illuminates Tester positive (+) - K-19
Tester negative (-) - K-7LED illuminates Tester positive (+) - K-7
Tester negative (-) - K-20LED illuminates Tester positive (+) - K-20
Tester negative (-) - K-8LED illuminates
- Result:
Proceed to OK NG
Post-procedure1
None
OK
NG
Pre-procedure1
Remove the headlight unit RH.
- HINT:
-
Click hereVehicle Exterior>LIGHTING (EXT)>HEADLIGHT ASSEMBLY>DISASSEMBLY
| *a | Component without harness connected
(Light Control LED ECU RH) |
*b | Component without harness connected
(Headlight Unit RH) |
Procedure1
Measure the resistance according to the value(s) in the table below.
- Standard Resistance:
Tester Connection Condition Specified Condition K-15 - L-17 Always Below 1 Ω K-3 - L-5 Always Below 1 Ω K-16 - L-16 Always Below 1 Ω K-4 - L-4 Always Below 1 Ω K-17 - L-15 Always Below 1 Ω K-5 - L-3 Always Below 1 Ω K-18 - L-14 Always Below 1 Ω K-6 - L-2 Always Below 1 Ω K-19 - L-13 Always Below 1 Ω K-7 - L-1 Always Below 1 Ω K-20 - L-12 Always Below 1 Ω K-8 - L-6 Always Below 1 Ω
- Result:
Proceed to OK NG
Post-procedure1
None
OK
NG
Pre-procedure1
Remove the headlight unit RH.
- HINT:
-
Click hereVehicle Exterior>LIGHTING (EXT)>HEADLIGHT ASSEMBLY>DISASSEMBLY
| *1 | Dry Cell Battery | - | - |
| *a | Component without harness connected
(Light Control LED ECU RH) |
- | - |
Set the Toyota Electrical Tester to diode check mode.
- HINT:
-
If the tester display is below 3 V, replace the dry cell batteries inside the tester.
Procedure1
Add 1 dry cell battery (about 1.5 V) between the Toyota Electrical Tester and inspection terminal and check if the LED illuminates.
- OK:
Tester Connection Specified Condition Tester positive (+) - K-15
Tester negative (-) - K-3LED illuminates Tester positive (+) - K-3
Tester negative (-) - K-16LED illuminates Tester positive (+) - K-16
Tester negative (-) - K-4LED illuminates Tester positive (+) - K-4
Tester negative (-) - K-17LED illuminates Tester positive (+) - K-17
Tester negative (-) - K-5LED illuminates Tester positive (+) - K-5
Tester negative (-) - K-18LED illuminates Tester positive (+) - K-18
Tester negative (-) - K-6LED illuminates Tester positive (+) - K-6
Tester negative (-) - K-19LED illuminates Tester positive (+) - K-19
Tester negative (-) - K-7LED illuminates Tester positive (+) - K-7
Tester negative (-) - K-20LED illuminates Tester positive (+) - K-20
Tester negative (-) - K-8LED illuminates
- Result:
Proceed to OK NG
Post-procedure1
None
OK
NG