LIGHTING (EXT) HEADLIGHT ASSEMBLY DISASSEMBLY
CAUTION / NOTICE / HINT
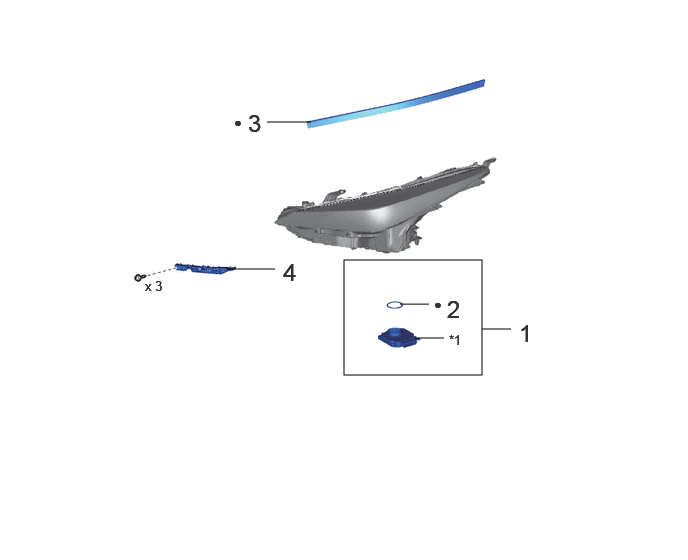
| Procedure | Part Name Code | 
|

|

|
|
|---|---|---|---|---|---|
| 1 | HEADLIGHT ECU SUB-ASSEMBLY LH | 81056A | - | - | - |
| 2 | HEADLIGHT GASKET | 81134 | - | - | - |
| 3 | NO. 1 HEADLIGHT PROTECTOR LH | 81176 | - | - | - |
| 4 | FRONT NO. 2 BUMPER RETAINER BRACKET | 52354 | - | - | - |
| *1 | Headlight ECU LH | - | - |
| ● | Non-reusable part | - | - |
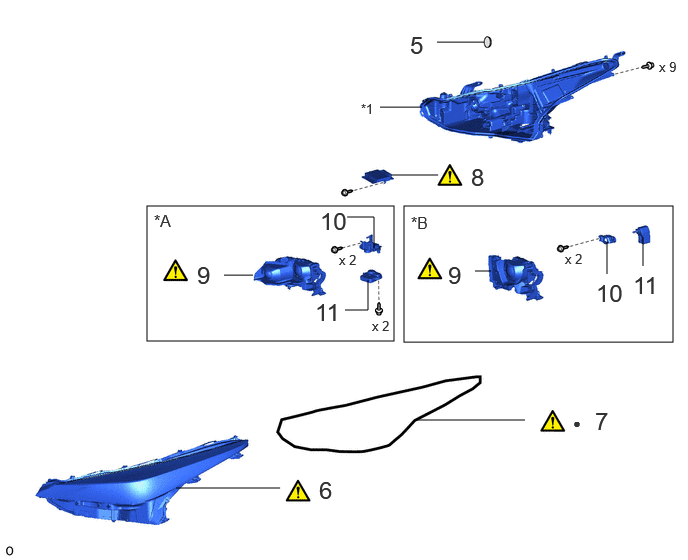
| Procedure | Part Name Code |
|
|
|
|
|---|---|---|---|---|---|
| 5 | NO. 1 HEADLIGHT COVER | 81144 | - | - | - |
| 6 | HEADLIGHT LENS SUB-ASSEMBLY LH | 8110B | ( ) |
- | - |
| 7 | HEADLIGHT LENS GASKET | 81132B | ()
|
- | - |
| 8 | LIGHT CONTROL LED ECU LH | 85967D | ()
|
- | - |
| 9 | HEADLIGHT UNIT LH | 81171A | ()
|
- | - |
| 10 | HEADLIGHT BRACKET LH | 81158 | - | - | - |
| 11 | HEADLIGHT LEVELING MOTOR LH | 85691 | - | - | - |
| *A | w/ Adaptive High Beam System | *B | w/o Adaptive High Beam System |
| *1 | HEADLIGHT HOUSING SUB-ASSEMBLY LH | - | - |
| ● | Non-reusable part | - | - |
- HINT:
- ·
Use the same procedure for the RH and LH sides.
·The procedure listed below is for the LH side.
PROCEDURE

 81056A
1.REMOVE HEADLIGHT ECU SUB-ASSEMBLY LH
81134
2.REMOVE HEADLIGHT GASKET
81176
3.REMOVE NO. 1 HEADLIGHT PROTECTOR LH

52534
4.REMOVE FRONT NO. 2 BUMPER RETAINER BRACKET

81144
5.REMOVE NO. 1 HEADLIGHT COVER


|
Remove in this Direction | - | - |
8110B
6.REMOVE HEADLIGHT LENS SUB-ASSEMBLY LH
|
|
|
- SST
- 09890-47010 (09891-04020, 09891-04010, 09891-04030, 09891-04040)
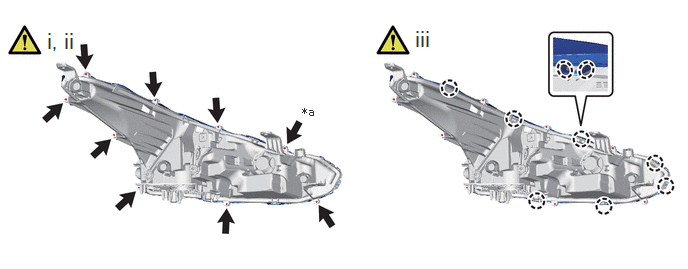
| *a | TORX Screw | - | - |

|
Place Hand Here | 
|
Screw |
Remove the 8 screws.
Using a T20H TORX driver, remove the TORX screw.
Place your hands at the positions shown in the illustration and detach the claw.
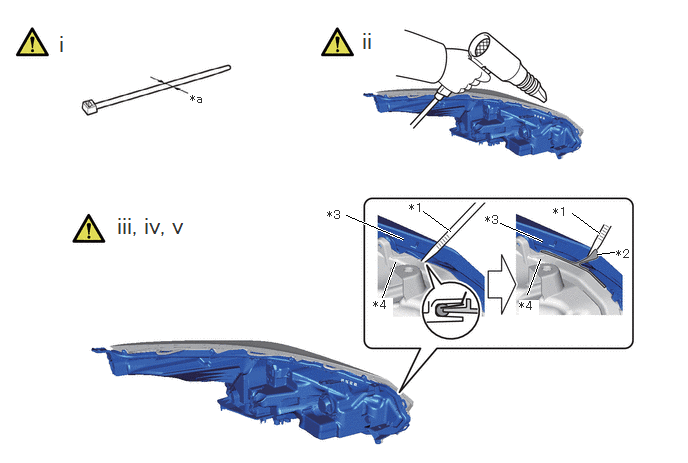
| *1 | Cable Tie | *2 | Headlight Lens Gasket |
| *3 | Headlight Lens LH | *4 | Headlight Housing Sub-assembly LH |
| *a | 7.6 mm (0.299 in.) | - | - |
Prepare the cable tie of approximately 7.6 mm (0.299 in.) in width.
- HINT:
-
It will be difficult to pull out the headlight lens gasket with a cable tie with a narrow width (2.5 mm (0.0984 in.), etc.).
Use a heat light to heat the headlight lens gasket near the location where the cable tie is inserted from the backside of the headlight housing sub-assembly LH.
- NOTICE:
-
To prevent the headlight housing sub-assembly LH from deformation or damage, do not heat one part intensively and do not heat with a temperature of 120°C or higher.
- HINT:
-
When the headlight lens gasket is heated, it softens and becomes easier to pull out.
Insert the cable tie until it sticks into the headlight lens gasket as shown in the illustration.
- NOTICE:
-
Do not damage the groove of the headlight housing sub-assembly LH gasket or the headlight lens.
Pull out the cable tie and headlight lens gasket together.
Pull out the headlight lens gasket until there is no contact between the headlight lens sub-assembly LH and the headlight housing sub-assembly LH.
- HINT:
-
If the headlight lens gasket disconnects while it is pulled out, insert the cable tie again and pull out the headlight lens gasket.

Disonnect the connector.
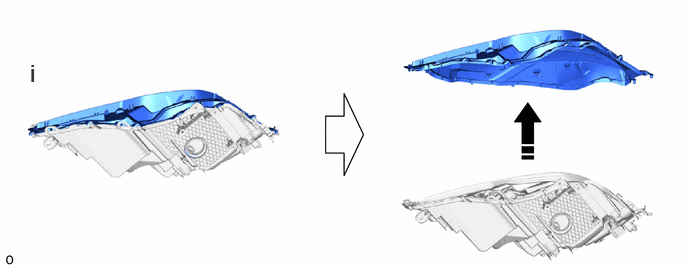
|
|
Remove in this Direction | - | - |
Remove the headlight lens sub-assembly LH as shown in the illustration.
81132B
7.REMOVE HEADLIGHT LENS GASKET
|
|
|
- SST
- 09890-47010 (09891-04020, 09891-04010, 09891-04030, 09891-04040)

85967D
8.REMOVE LIGHT CONTROL LED ECU LH
|
|
Click here()
|
81171A
9.REMOVE HEADLIGHT UNIT LH
|
|
|
- SST
- 09890-47010 (09891-04020, 09891-04010, 09891-04030, 09891-04040)
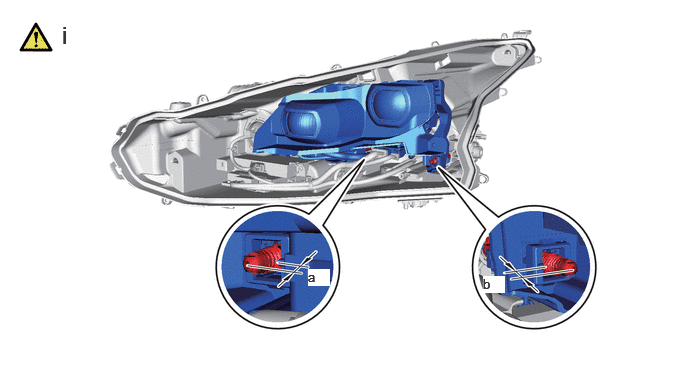
Using a vernier caliper, record the dimensions of a and b shown in the illustration.
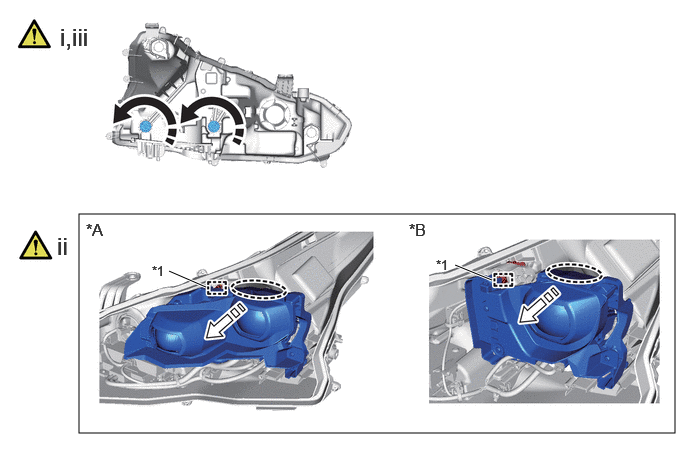
| *A | w/ Adaptive High Beam System | *B | w/o Adaptive High Beam System |
| *1 | Pivot Collar | - | - |
|
|
Place Hand Here |
|
Place Hand Here |

|
Turn in this Direction | - | - |
Loosen the aiming screws for beam axis vertical and horizontal adjustments counterclockwise by 10 turns.
Place your hand in a protective glove at the position in the illustration, pull in the direction shown in the illustration, and disconnect the pivot collar.
Hold the headlight unit assembly LH with one hand to prevent it from tipping over and loosen the aiming screws for beam axis vertical and horizontal adjustments counterclockwise until the headlight unit assembly LH is disconnected.
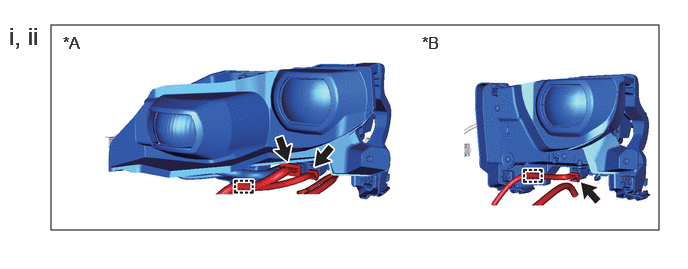
| *A | w/ Adaptive High Beam System | *B | w/o Adaptive High Beam System |
w/ Adaptive High Beam System:
Disconnect the 2 connectors and detach the wire harness clamp and remove the headlight unit LH.
w/o Adaptive High Beam System:
Disconnect the connector and detach the wire harness clamp and remove the headlight unit LH.
81158
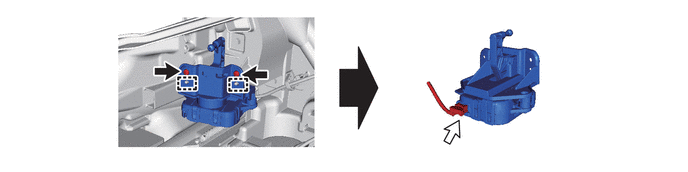
10.REMOVE HEADLIGHT BRACKET LH
w/ Adaptive High Beam System:
|
|
Screw | 
|
Connector |
w/o Adaptive High Beam System:

|
|
Screw |
|
Connector |
85691
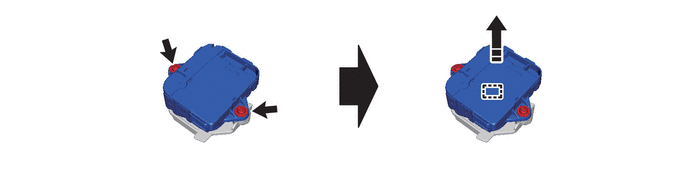
11.REMOVE HEADLIGHT LEVELING MOTOR LH
w/ Adaptive High Beam System:
|
|
Remove in this Direction |
|
Screw |
w/o Adaptive High Beam System: