MIRROR (EXT) POWER MIRROR CONTROL SYSTEM(w/ Reverse Shift-linked Mirror) Power Mirror Surface Position is not Memorized or does not Return to Memorized Position
DESCRIPTION
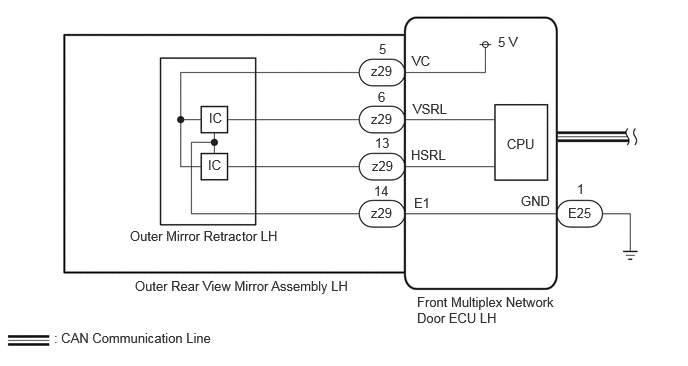
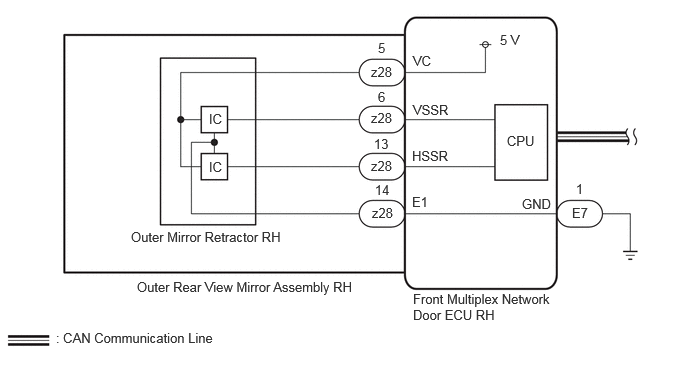
The front multiplex network door ECU LH and front multiplex network door ECU RH memorize the mirror position when a memorization request signal is received, and move the mirror to the memorized position when a recall request signal is received.
WIRING DIAGRAM
for LH Side:
for RH Side:
CAUTION / NOTICE / HINT
- NOTICE:
- ·
The power mirror control system uses the CAN communication system. First, confirm that there is no malfunction in the CAN communication system. Refer to the How to Proceed with Troubleshooting procedure.
Click herePower Source / Network>NETWORKING>CAN COMMUNICATION SYSTEM>HOW TO PROCEED WITH TROUBLESHOOTING
·Check that the memory and reactivation function of front power seat system is normal before performing the following procedure.
PROCEDURE
Check the problem symptoms.
- Result:
Result Proceed to LH side power mirror surface position is not memorized or does not return to memorized position A RH side power mirror surface position is not memorized or does not return to memorized position B
A
B
Read the Data List according to the display on the GTS.
- Body Electrical > Front Left Door > Data List
-
Tester Display Measurement Item Range Normal Condition Diagnostic Note Mirror Vertical Sensor Vol Vertical mirror position MIN: 0, MAX: 5 V 0 to 5 V - Mirror Horizontal Sensor Vol Horizontal mirror position MIN: 0, MAX: 5 V 0 to 5 V -
- Body Electrical > Front Left Door > Data List
-
Tester Display Mirror Vertical Sensor Vol Mirror Horizontal Sensor Vol - 50003 225 8,9
- OK:
The sensor voltage changes depending on the mirror surface position.
- Result:
Proceed to OK NG
OK
NG
Remove the outer rear view mirror assembly LH.
Click hereVehicle Exterior>MIRROR (EXT)>OUTER REAR VIEW MIRROR>REMOVAL
Connect 3 dry cell batteries (1.5 V) in series.
- NOTICE:
-
Do not use rechargeable batteries as they may not output a voltage of 1.5 V.
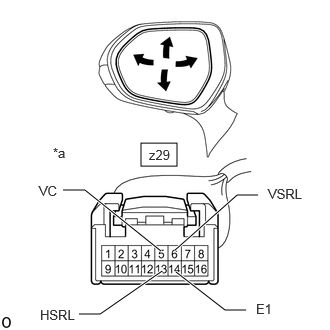
| *a | Component without connector connected
(Outer Rear View Mirror Assembly LH) |
Connect the positive (+) end of a series of batteries to terminal 5 (VC) and the negative (-) end to terminal 14 (E1), and check that the voltage between the terminals change as shown in the table below depending on the position of the mirror surface.
- NOTICE:
-
Do not apply a voltage of 6 V or higher between the terminals.
Measure the voltage according to the value(s) in the table below.
- Standard Voltage:
Tester Connection Mirror Surface Position Specified Condition Click Location & Routing(z29)Location & Routingewd_type=routing;type=c;code=z29
Click Connector(z29)Body>other>Outer Rear View Mirror Assembly LH , Front Multiplex Network Door ECU LHewd_type=component;type=c;code=z29;pinno=6,14,13
z29-6 (VSRL) - z29-14 (E1) Down ←→ Up 0 to 4.5 V z29-13 (HSRL) - z29-14 (E1) Out ←→ In 0 to 4.5 V
- OK:
The voltage changes depending on the mirror surface position.
- Result:
Proceed to OK NG
OK
NG
Read the Data List according to the display on the GTS.
- Body Electrical > Front Right Door > Data List
-
Tester Display Measurement Item Range Normal Condition Diagnostic Note Mirror Vertical Sensor Vol Vertical mirror position MIN: 0, MAX: 5 V 0 to 5 V - Mirror Horizontal Sensor Vol Horizontal mirror position MIN: 0, MAX: 5 V 0 to 5 V -
- Body Electrical > Front Right Door > Data List
-
Tester Display Mirror Vertical Sensor Vol Mirror Horizontal Sensor Vol - 50003 224 8,9
- OK:
The sensor voltage changes depending on the mirror surface position.
- Result:
Proceed to OK NG
OK
NG
Remove the outer rear view mirror assembly RH.
Click hereVehicle Exterior>MIRROR (EXT)>OUTER REAR VIEW MIRROR>REMOVAL
Connect 3 dry cell batteries (1.5 V) in series.
- NOTICE:
-
Do not use rechargeable batteries as they may not output a voltage of 1.5 V.
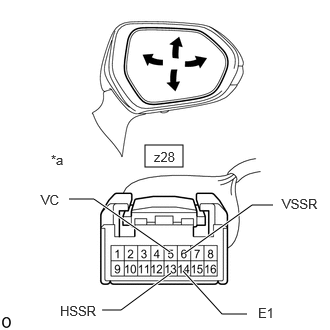
| *a | Component without connector connected
(Outer Rear View Mirror Assembly RH) |
Connect the positive (+) end of a series of batteries to terminal 5 (VC) and the negative (-) end to terminal 14 (E1), and check that the voltage between the terminals change as shown in the table below depending on the position of the mirror surface.
- NOTICE:
-
Do not apply a voltage of 6 V or higher between the terminals.
Measure the voltage according to the value(s) in the table below.
- Standard Voltage:
Tester Connection Mirror Surface Position Specified Condition Click Location & Routing(z28)Location & Routingewd_type=routing;type=c;code=z28
Click Connector(z28)Body>other>Outer Rear View Mirror Assembly RH , Front Multiplex Network Door ECU RHewd_type=component;type=c;code=z28;pinno=6,14,13
z28-6 (VSSR) - z28-14 (E1) Down ←→ Up 0 to 4.5 V z28-13 (HSSR) - z28-14 (E1) Out ←→ In 0 to 4.5 V
- OK:
The voltage changes depending on the mirror surface position.
- Result:
Proceed to OK NG
OK
NG