HEATING / AIR CONDITIONING AIR CONDITIONING UNIT(for RHD) REASSEMBLY
CAUTION / NOTICE / HINT
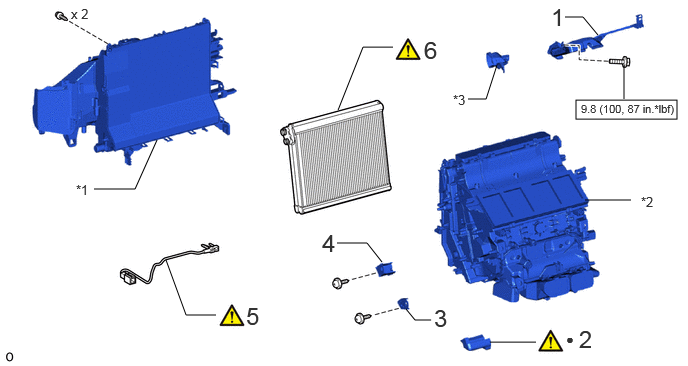
| Procedure | Part Name Code | 
|

|

|
|
| 1 | NO. 2 AIR DUCT SUB-ASSEMBLY | 87201B | |||
| 2 | NO. 1 COOLING UNIT PACKING | 88578B | ( ) |
- | - |
| 3 | NO. 2 COOLING UNIT BRACKET | 88536A | - | - | - |
| 4 | NO. 1 COOLING UNIT BRACKET | 88536 | - | - | - |
| 5 | NO. 1 COOLER THERMISTOR | 88625 | ()
|
- | - |
| 6 | NO. 1 COOLER EVAPORATOR SUB-ASSEMBLY | 88501 | ()
|
- | - |
| *1 | HEATER CASE (for Front Side) | *2 | HEATER CASE (for Rear Side) |
| *3 | NO. 1 AIR DUCT SUB-ASSEMBLY | - | - |
| ● | Non-reusable part | - | - |
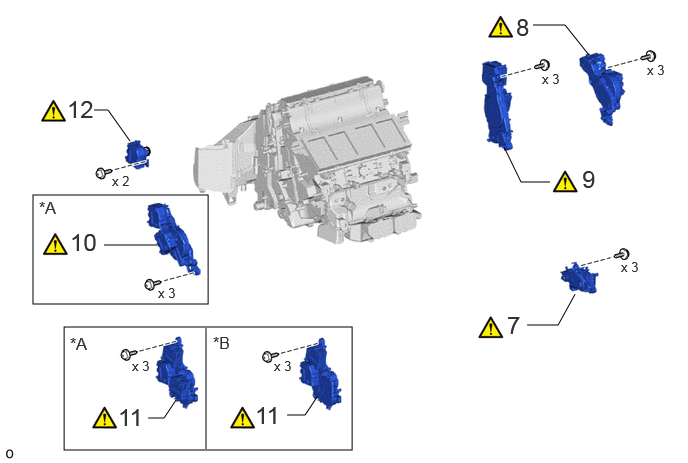
| Part Name Code | Part Name Code |
|
|
|
|
| 7 | NO. 5 AIR CONDITIONING RADIATOR DAMPER SERVO SUB-ASSEMBLY | 87050G | ()
|
- | - |
| 8 | NO. 3 AIR CONDITIONING RADIATOR DAMPER SERVO SUB-ASSEMBLY | 87050E | ()
|
- | - |
| 9 | NO. 1 AIR CONDITIONING RADIATOR DAMPER SERVO SUB-ASSEMBLY | 87050C | ()
|
- | - |
| 10 | NO. 6 AIR CONDITIONING RADIATOR DAMPER SERVO SUB-ASSEMBLY | 87050H | ()
|
- | - |
| 11 | NO. 2 AIR CONDITIONING RADIATOR DAMPER SERVO SUB-ASSEMBLY | 87050D | ()
|
- | - |
| 12 | NO. 4 AIR CONDITIONING RADIATOR DAMPER SERVO SUB-ASSEMBLY | 87050F | ()
|
- | - |
| *A | for 3 Zone Type | *B | for Dual Type |
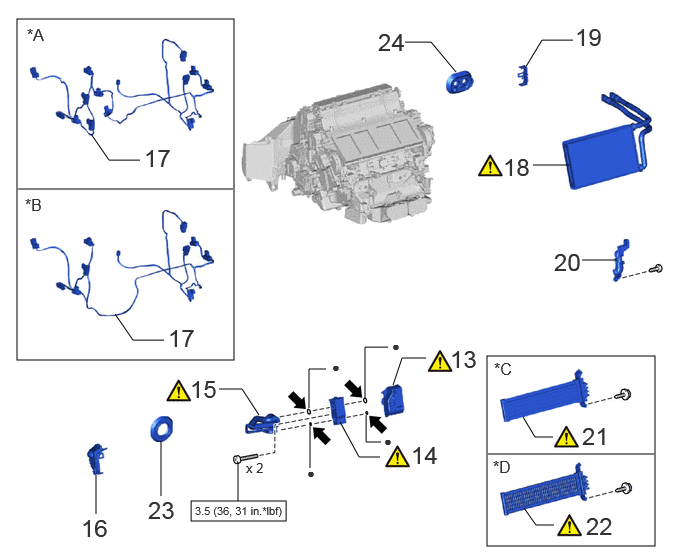
| Procedure | Part Name Code |
|
|
|
|
| 13 | NO. 1 COOLER COVER | 88891S | ()
|
- | - |
| 14 | COOLER EXPANSION VALVE | 88515 | ()
|
- | - |
| 15 | AIR CONDITIONING TUBE AND ACCESSORY ASSEMBLY | 88710H | ()
|
- | - |
| 16 | NO. 2 COOLER COVER | 88H92 | - | - | - |
| 17 | AIR CONDITIONING HARNESS ASSEMBLY | 82210K | - | - | - |
| 18 | HEATER RADIATOR UNIT SUB-ASSEMBLY | 87107B | ()
|
- | - |
| 19 | HEATER CLAMP | 87124C | - | - | - |
| 20 | NO. 3 COOLING UNIT BRACKET | 88536B | - | - | - |
| 21 | QUICK HEATER ASSEMBLY | 87710G | ()
|
- | - |
| 22 | HEATER COVER | 87114B | ()
|
- | - |
| 23 | COOLING UNIT PARTS | 88H99 | - | - | - |
| 24 | HEATER GROMMET | 87128 | - | - | - |
| *A | for 3 Zone Type | *B | for Dual Type |
| *C | w/ PTC Heater | *D | w/o PTC Heater |

|
N*m (kgf*cm, ft.*lbf): Specified torque | ● | Non-reusable part |

|
Compressor oil ND-OIL 11 or equivalent | - | - |
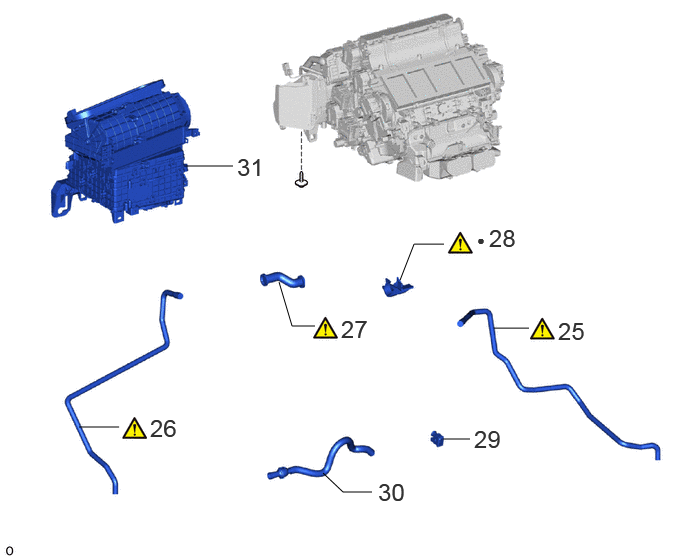
| Procedure | Part Name Code |
|
|
|
|
| 25 | NO. 4 COOLER UNIT DRAIN HOSE | 88539N | ()
|
- | - |
| 26 | NO. 3 COOLER UNIT DRAIN HOSE | 88539E | ()
|
- | - |
| 27 | NO. 1 COOLER UNIT DRAIN HOSE | 88539 | ()
|
- | - |
| 28 | NO. 2 COOLING UNIT PACKING | 88578C | ()
|
- | - |
| 29 | COOLER THERMISTOR (ROOM TEMPERATURE SENSOR) | 88625Q | - | - | - |
| 30 | ASPIRATOR | 88897P | - | - | - |
| 31 | BLOWER ASSEMBLY | 87130D | - | - | - |
| ● | Non-reusable part | - | - |
PROCEDURE

 87201B
1.INSTALL NO. 2 AIR DUCT SUB-ASSEMBLY
- Torque:
- 9.8 N*m (100 kgf*cm, 87 in.*lbf)
88578B
2.INSTALL NO. 1 COOLING UNIT PACKING
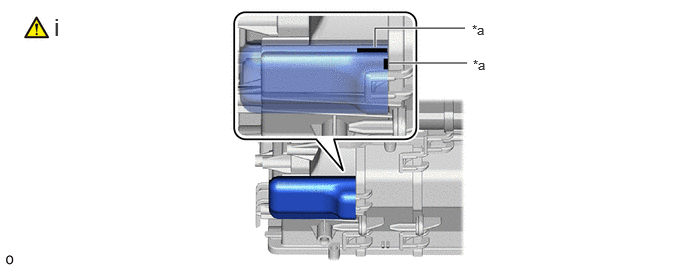
| *a | Specified Application Position for Packing | - | - |
Install a new No. 1 cooling unit packing in the position shown in the illustration.
- NOTICE:
-
Check that any remaining No. 4 cooling unit packing has been completely removed from the heater case.
88536A
3.INSTALL NO. 2 COOLING UNIT BRACKET
88536
4.INSTALL NO. 1 COOLING UNIT BRACKET
88625
5.INSTALL NO. 1 COOLER THERMISTOR
|
|
Click here()
|
88501
6.INSTALL NO. 1 COOLER EVAPORATOR SUB-ASSEMBLY
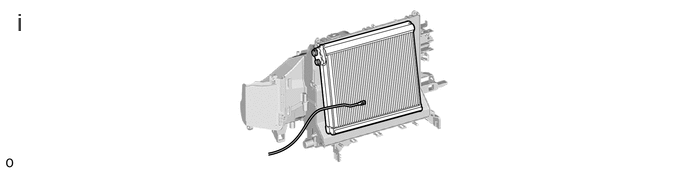
Install the No. 1 cooler evaporator sub-assembly to the heater case.
- NOTICE:
-
When the No. 1 cooler evaporator sub-assembly is removed, make sure to install a new one. The No. 1 cooler evaporator sub-assembly cannot be reused.
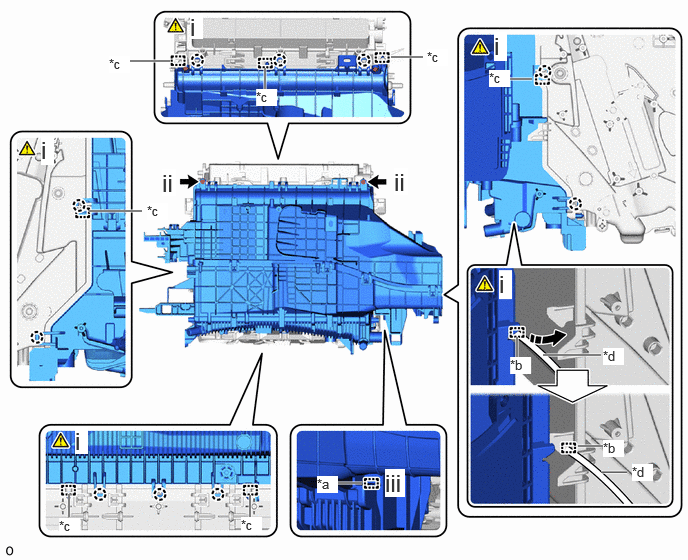
| *a | Clamp | *b | Guide |
| *c | Guide Pin | *d | No. 1 Cooler Thermistor Lead Wire |

|
Secure the Lead Wire between Guide | - | - |
While inserting the No. 1 cooler thermistor into the guide, insert the guide pin and attach the claw as shown in the illustration.
Attach the clamp.
Install the heater case with the 2 screws.
87050G
7.INSTALL NO. 5 AIR CONDITIONING RADIATOR DAMPER SERVO SUB-ASSEMBLY
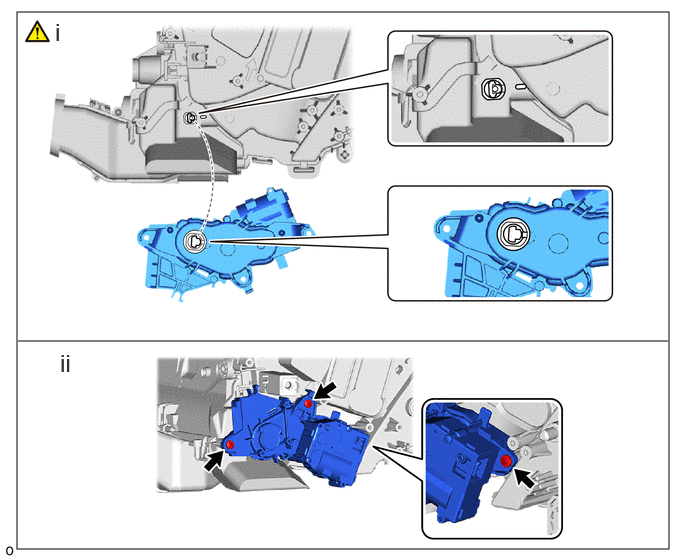
Align the direction of the fitting on the heater case to the fitting on the No. 5 air conditioning radiator damper servo sub-assembly as shown in the illustration.
Install the No. 5 air conditioning radiator damper servo sub-assembly with the 2 screws.
87050E
8.INSTALL NO. 3 AIR CONDITIONING RADIATOR DAMPER SERVO SUB-ASSEMBLY
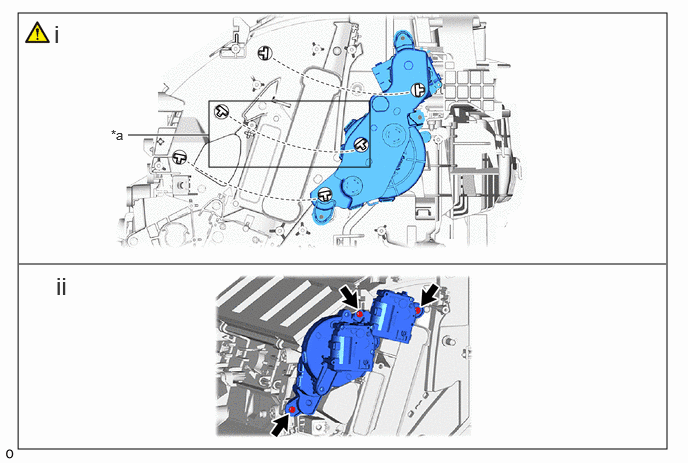
| *a | for Dual Type | - | - |
Align the direction of the fitting on the heater case to the fitting on the No. 3 air conditioning radiator damper servo sub-assembly as shown in the illustration.
Install the No. 3 air conditioning radiator damper servo sub-assembly with the 3 screws.
87050C
9.INSTALL NO. 1 AIR CONDITIONING RADIATOR DAMPER SERVO SUB-ASSEMBLY
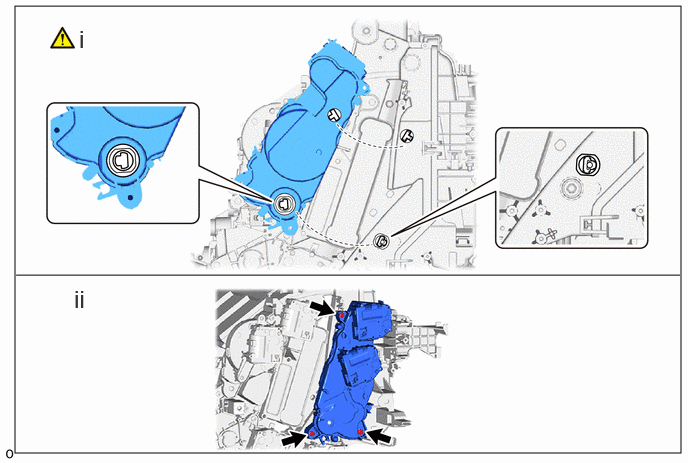
Align the direction of the fitting on the heater case to the fitting on the No. 1 air conditioning radiator damper servo sub-assembly as shown in the illustration.
Install the No. 1 air conditioning radiator damper servo sub-assembly with the 3 screws.
87050H
10.INSTALL NO. 6 AIR CONDITIONING RADIATOR DAMPER SERVO SUB-ASSEMBLY (for 3 Zone Type)
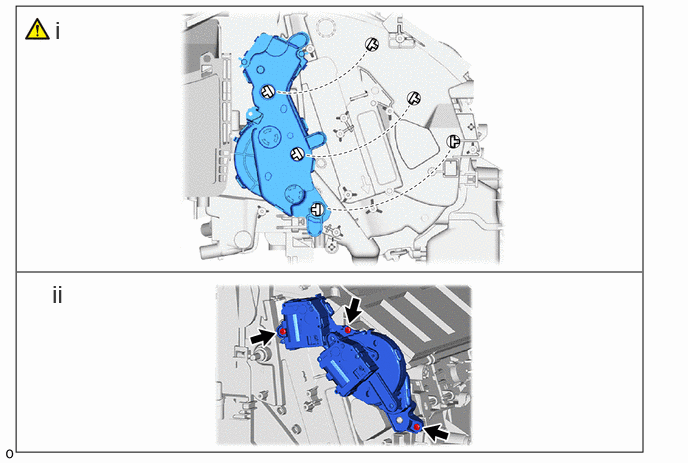
Align the direction of the fitting on the heater case to the fitting on the No. 6 air conditioning radiator damper servo sub-assembly as shown in the illustration.
Install the No. 6 air conditioning radiator damper servo sub-assembly with the 3 screws.
87050D
11.INSTALL NO. 2 AIR CONDITIONING RADIATOR DAMPER SERVO SUB-ASSEMBLY
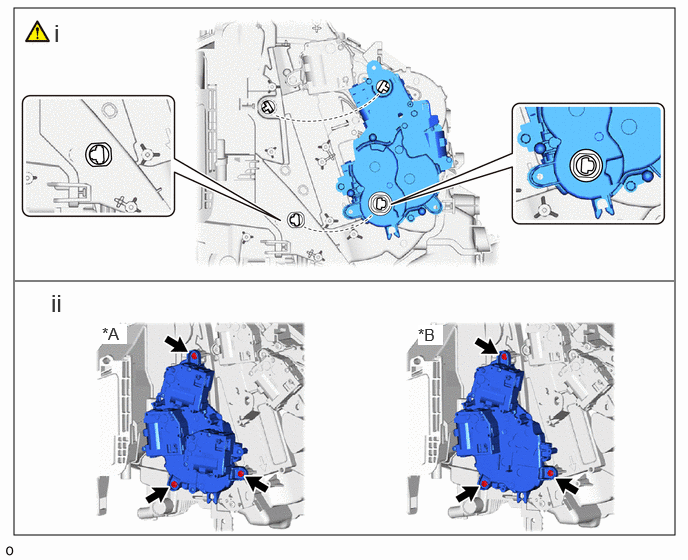
| *A | for 3 Zone Type | *B | for Dual Type |
Align the direction of the fitting on the heater case to the fitting on the No. 2 air conditioning radiator damper servo sub-assembly as shown in the illustration.
Install the No. 2 air conditioning radiator damper servo sub-assembly with the 3 screws.
87050F
12.INSTALL NO. 4 AIR CONDITIONING RADIATOR DAMPER SERVO SUB-ASSEMBLY
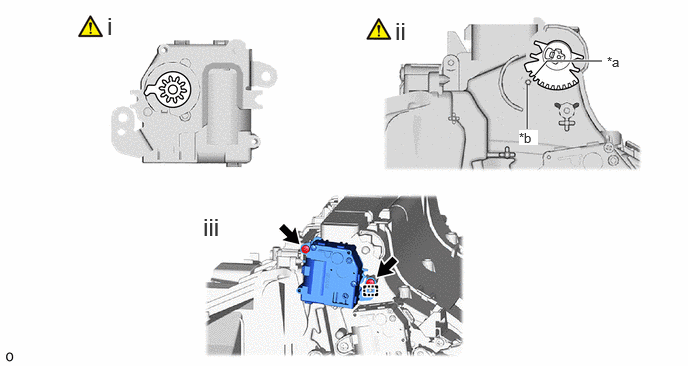
| *a | Matchmarks | *b | Pin |
Make sure that the servo motor gear is installed at the position shown.
Align with the matchmarks on the gear as shown in the illustration.
Align the guide and install the No. 4 air conditioning radiator damper servo sub-assembly with the 2 screws.
88891S
13.INSTALL NO. 1 COOLER COVER
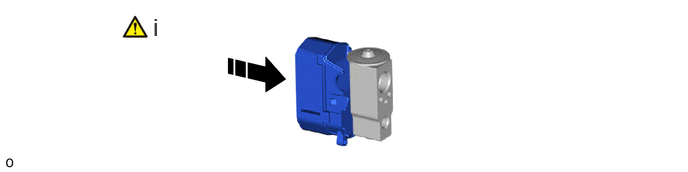
|
|
Install in this Direction | - | - |
Remove the vinyl tape from the cooler expansion valve and then install the No. 1 cooler cover to the cooler expansion valve.
88515
14.INSTALL COOLER EXPANSION VALVE
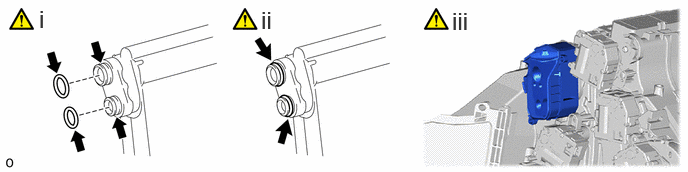
Remove the vinyl tape from the No. 1 cooler evaporator sub-assembly and then apply a sufficient amount of compressor oil to 2 new O-rings and the fitting surface with the No. 1 cooler evaporator of the cooler expansion valve.
- Compressor Oil:
ND-OIL 11 or equivalent
Install the 2 O-rings to the No. 1 cooler evaporator sub-assembly.
- NOTICE:
-
Keep the O-rings and O-ring fitting surfaces free of foreign matter.
Install the cooler expansion valve together with the No. 1 cooler cover.
- NOTICE:
-
Make sure not to cut the O-ring while installing it. (Cut O-rings cannot be installed.)
88710H
15.INSTALL AIR CONDITIONING TUBE AND ACCESSORY ASSEMBLY
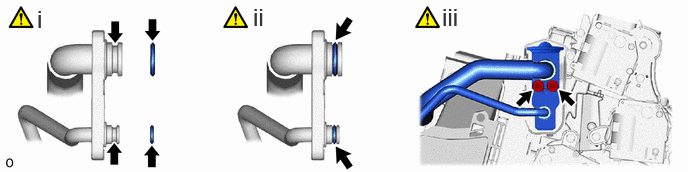
Remove the vinyl tape from the air conditioning tube assembly and then apply a sufficient amount of compressor oil to 2 new O-rings and the fitting surface of the cooler expansion valve and air conditioning tube assembly.
- Compressor Oil:
ND-OIL 11 or equivalent
Install the 2 O-rings to the air conditioning tube assembly.
- NOTICE:
-
Keep the O-rings and O-ring fitting surfaces free of foreign matter.
Using a 4 mm hexagon socket wrench, install the air conditioning accessory assembly with the 2 hexagon bolts.
- Torque:
- 3.5 N*m (36 kgf*cm, 31 in.*lbf)
- NOTICE:
-
Make sure not to cut the O-ring while installing it. (Cut O-rings cannot be installed.)
88H92
16.INSTALL NO. 2 COOLER COVER
82210K
17.INSTALL AIR CONDITIONING HARNESS ASSEMBLY
87107B
18.INSTALL HEATER RADIATOR UNIT SUB-ASSEMBLY
|
|
|
87124C
19.INSTALL HEATER CLAMP
88536B
20.INSTALL NO. 3 COOLING UNIT BRACKET
87710G
21.INSTALL QUICK HEATER ASSEMBLY (w/ PTC Heater)
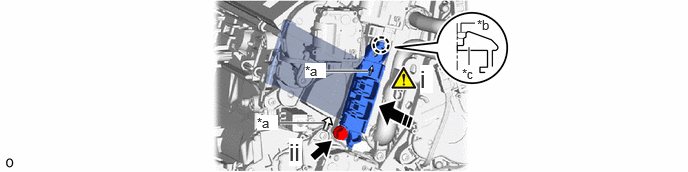
| *a | Matchmarks | *b | Heater Case Fitting Surface |
| *c | Quick Heater Claw | - | - |
|
|
Install in this Direction | - | - |
Align the matchmark on the quick heater assembly with the matchmark on the heater case as shown in the illustration, insert the quick heater assembly into the heater case and attach the claw.
- NOTICE:
- ·
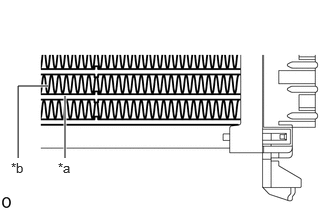 0.677,1.646 0.677,1 true 0.188,1.646 0.188,0.896 0.188,0.896 0.5,0.896 true 0.604,1.667 0.917,1.865 0.313,0.198 10 false *a 0.115,1.667 0.427,1.865 0.313,0.198 10 false *b
*a Element *b Fin
Do not hold the quick heater assembly by the element or fin. Also, do not damage the quick heater assembly.
·Foul odors may occur due to oil adhering to the quick heater assembly.
·Check that the heights of the claw fitting surface on the heater case and the claw of the quick heater assembly are aligned.
- HINT:
-
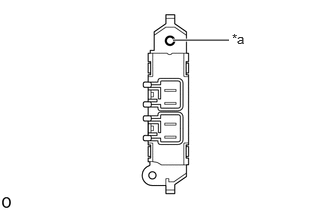 1.802,0.417 2.385,0.417 true 2.417,0.323 2.729,0.521 0.313,0.198 10 false *a
*a Screw Insertion Hole
-
If the claws of the quick heater assembly are damaged, install the quick heater assembly with screw (90159-60431).
Install the quick heater assembly with the screw.
87114B
22.INSTALL HEATER COVER (w/o PTC Heater)
Use the same procedure as for the quick heater assembly.
88H99
23.INSTALL COOLING UNIT PARTS
87128
24.INSTALL HEATER GROMMET
88539N
25.INSTALL NO. 4 COOLER UNIT DRAIN HOSE
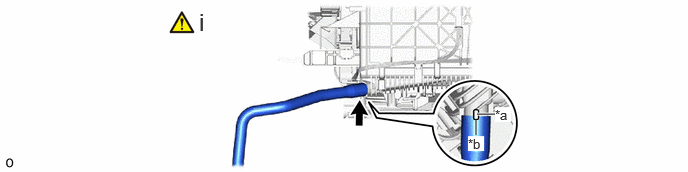
| *a | Protrusion | *b | Cutout |
Align the cutout of the No. 4 cooler unit drain hose with the protrusion of the heater case and install the No. 4 cooler unit drain hose.
88539E
26.INSTALL NO. 3 COOLER UNIT DRAIN HOSE
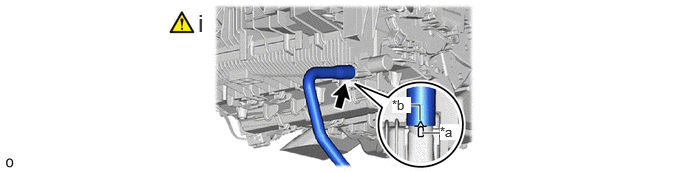
| *a | Protrusion | *b | Cutout |
Align the cutout of the No. 3 cooler unit drain hose with the protrusion of the heater case and install the No. 3 cooler unit drain hose.
- NOTICE:
-
Check that any remaining No. 1 cooling unit packing has been completely removed from the heater case, No. 3 cooler unit drain hose.
88539
27.INSTALL NO. 1 COOLER UNIT DRAIN HOSE
|
|
|
88578C
28.INSTALL NO. 2 COOLING UNIT PACKING
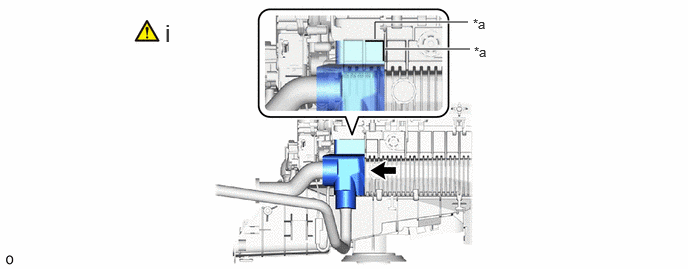
| *a | Specified Application Position for Packing | - | - |
Install a new No. 2 cooling unit packing in the position shown in the illustration.
- NOTICE:
-
Check that any remaining No. 2 cooling unit packing has been completely removed from the heater case, No. 1 cooler unit drain hose and No. 3 cooler unit drain hose.
88625Q
29.INSTALL COOLER THERMISTOR (ROOM TEMPERATURE SENSOR)
88897P
30.INSTALL ASPIRATOR
87130D
31.INSTALL BLOWER ASSEMBLY