EXTERIOR PANELS / TRIM REAR BUMPER REASSEMBLY
CAUTION / NOTICE / HINT
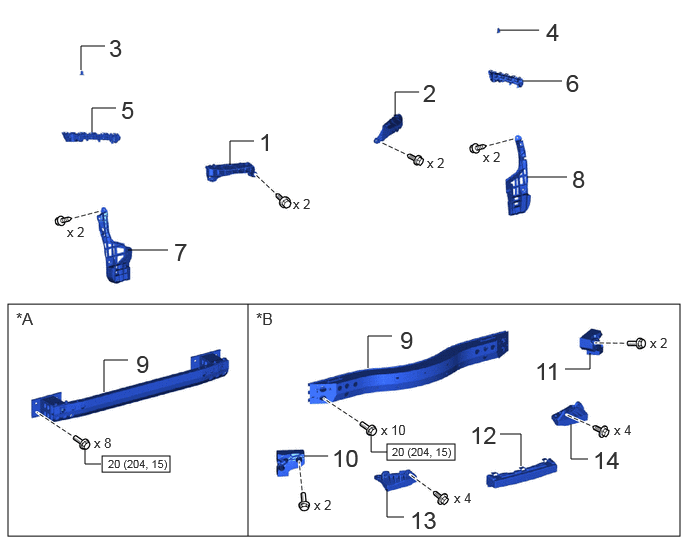
| Procedure | Part Name Code | 
|

|

|
|
|---|---|---|---|---|---|
| 1 | REAR BUMPER UPPER RETAINER LH | 52563A | - | - | - |
| 2 | REAR BUMPER UPPER RETAINER RH | 52562B | - | - | - |
| 3 | REAR BUMPER SEAL BRACKET LH | 52198A | - | - | - |
| 4 | REAR BUMPER SEAL BRACKET RH | 52197A | - | - | - |
| 5 | REAR BUMPER SIDE RETAINER LH | 52576 | - | - | - |
| 6 | REAR BUMPER SIDE RETAINER RH | 52575 | - | - | - |
| 7 | REAR BUMPER SIDE SEAL LH | 52592 | - | - | - |
| 8 | REAR BUMPER SIDE SEAL RH | 52591 | - | - | - |
| 9 | REAR BUMPER REINFORCEMENT SUB-ASSEMBLY | 52023 | - | - | - |
| 10 | REAR BUMPER ARM REINFORCEMENT LH | 52188A | - | - | - |
| 11 | REAR BUMPER ARM REINFORCEMENT RH | 52187A | - | - | - |
| 12 | REAR BUMPER ENERGY ABSORBER | 52615 | - | - | - |
| 13 | REAR BUMPER REINFORCEMENT BAR LH | - | - | - | - |
| 14 | REAR BUMPER REINFORCEMENT BAR RH | - | - | - | - |
| *A | for Type A | *B | for Type B |

|
N*m (kgf*cm, ft.*lbf): Specified torque | - | - |
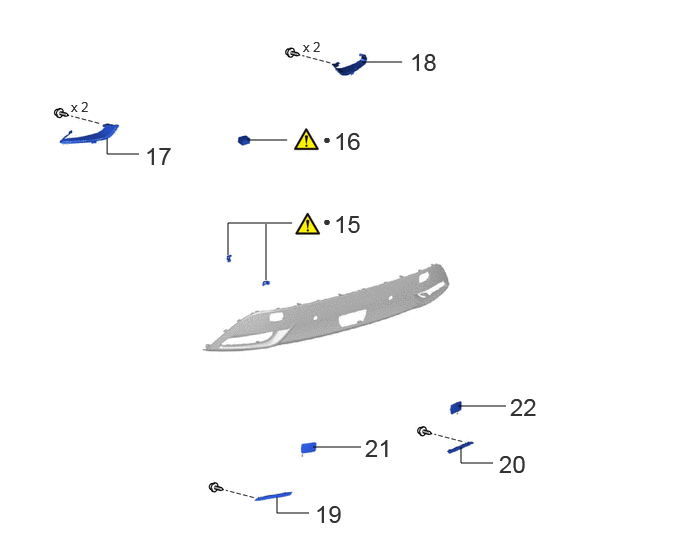
| Procedure | Part Name Code |
|
|
|
|
|---|---|---|---|---|---|
| 15 | REAR ULTRASONIC SENSOR CLIP | 89348Y | ( ) |
- | - |
| 16 | REAR BUMPER PAD | 52461F | ()
|
- | - |
| 17 | REAR BUMPER ARM EXTENSION LH | 52682A | - | - | - |
| 18 | REAR BUMPER ARM EXTENSION RH | 52681A | - | - | - |
| 19 | REFLEX REFLECTOR ASSEMBLY LH | 81920 | - | - | - |
| 20 | REFLEX REFLECTOR ASSEMBLY RH | 81910 | - | - | - |
| 21 | REAR BUMPER PLATE LH | 52164A | - | - | - |
| 22 | REAR BUMPER PLATE RH | 52163A | - | - | - |
| ● | Non-reusable part | - | - |
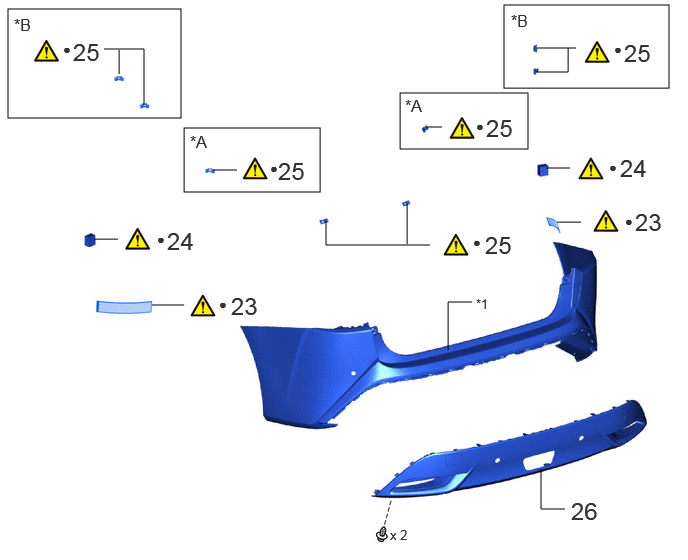
| Procedure | Part Name Code |
|
|
|
|
|---|---|---|---|---|---|
| 23 | NO. 1 MOULDING TAPE | 75895N | ()
|
- | - |
| 24 | REAR BUMPER PAD | 52461F | ()
|
- | - |
| 25 | REAR ULTRASONIC SENSOR CLIP | 89348Y | ()
|
- | - |
| 26 | REAR BUMPER CENTER EXTENSION SUB-ASSEMBLY | 52108C | - | - | - |
| *A | w/ TOYOTA Parking Assist-sensor System | *B | w/ Advanced Park |
| *1 | REAR BUMPER COVER | - | - |
| ● | Non-reusable part | - | - |
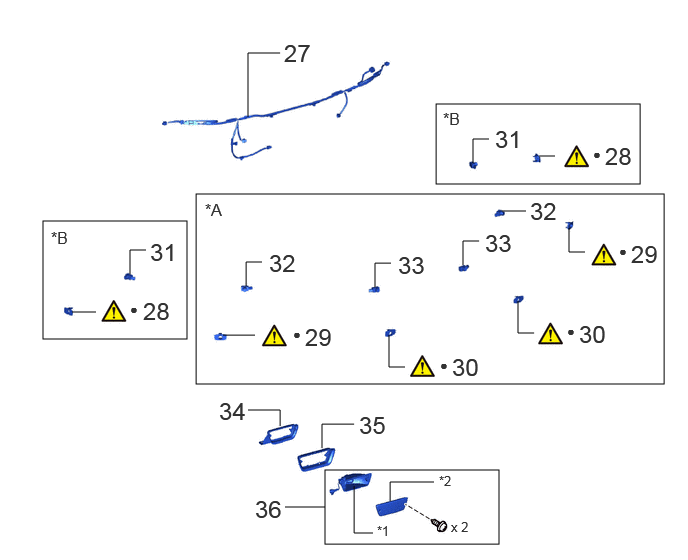
| Procedure | Part Name Code |
|
|
|
|
|---|---|---|---|---|---|
| 27 | NO. 3 LUGGAGE ROOM WIRE | 82183 | - | - | - |
| 28 | REAR SIDE ULTRASONIC SENSOR RETAINER | 89C48C | ()
|
- | - |
| 29 | REAR CORNER ULTRASONIC SENSOR RETAINER | 89C48A | ()
|
- | - |
| 30 | REAR CENTER ULTRASONIC SENSOR RETAINER | 89C48B | ()
|
- | - |
| 31 | REAR SIDE ULTRASONIC SENSOR | 89342B | - | - | - |
| 32 | REAR CORNER ULTRASONIC SENSOR | 89342 | - | - | - |
| 33 | REAR CENTER ULTRASONIC SENSOR | 89342A | - | - | - |
| 34 | REAR FOG LIGHT BRACKET | 81481K | - | - | - |
| 35 | FOG LIGHT PROTECTOR | 81483A | - | - | - |
| 36 | REAR FOG LIGHT LENS & BODY | 81457C | - | - | - |
| *A | w/ TOYOTA Parking Assist-sensor System | *B | w/ Advanced Park |
| *1 | BODY | *2 | LENS |
| ● | Non-reusable part | - | - |
PROCEDURE

 52563A
1.INSTALL REAR BUMPER UPPER RETAINER LH
52562B
2.INSTALL REAR BUMPER UPPER RETAINER RH
52198A
3.INSTALL REAR BUMPER SEAL BRACKET LH
52197A
4.INSTALL REAR BUMPER SEAL BRACKET RH
52576
5.INSTALL REAR BUMPER SIDE RETAINER LH
52575
6.INSTALL REAR BUMPER SIDE RETAINER RH
52592
7.INSTALL REAR BUMPER SIDE SEAL LH
52591
8.INSTALL REAR BUMPER SIDE SEAL RH
52023
9.INSTALL REAR BUMPER REINFORCEMENT SUB-ASSEMBLY
- Torque:
- 20 N*m (204 kgf*cm, 15 ft.*lbf)
52188A
10.INSTALL REAR BUMPER ARM REINFORCEMENT LH (for Type B)
52187A
11.INSTALL REAR BUMPER ARM REINFORCEMENT RH (for Type B)
52615
12.INSTALL REAR BUMPER ENERGY ABSORBER (for Type B)
13.INSTALL REAR BUMPER REINFORCEMENT BAR LH (for Type B)
14.INSTALL REAR BUMPER REINFORCEMENT BAR RH (for Type B)
89348Y
15.INSTALL REAR ULTRASONIC SENSOR CLIP
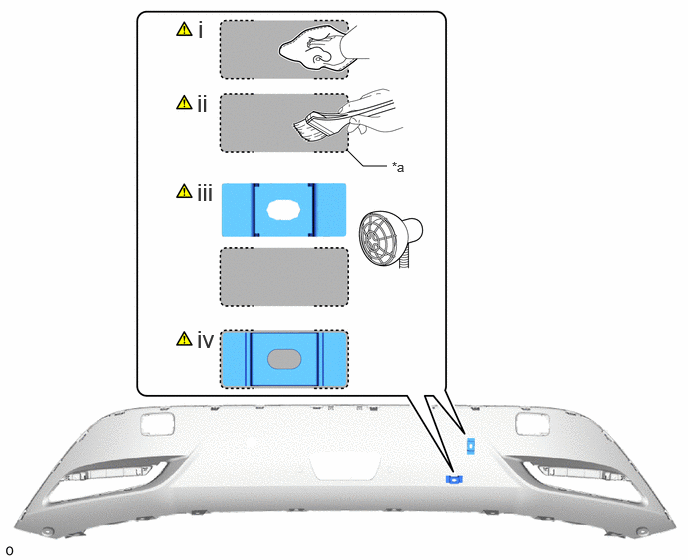
| *a | Mark-off Line | - | - |

|
Installation area | - | - |
Clean the rear bumper center extension sub-assembly surface:
1. When reusing the rear bumper center extension sub-assembly, remove remaining double-sided tape from the rear bumper center extension sub-assembly.
2. Using a heat light, heat the rear bumper center extension sub-assembly surface.
- Standard Value:
Part Temperature Rear Bumper Center Extension Sub-assembly 20 to 30°C (68 to 86°F) Rear Ultrasonic Sensor Clip 20 to 30°C (68 to 86°F)
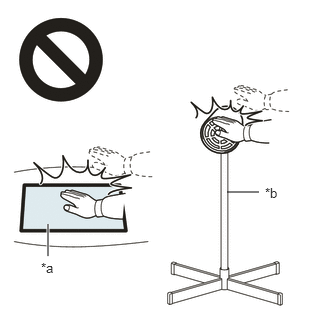
- CAUTION:
-
 2.365,2 2.698,2 false 0.5,2.333 0.5,2.667 true 0.427,2.708 0.74,2.865 0.313,0.156 10 false *a 2.76,1.927 3.073,2.083 0.313,0.156 10 false *b
*a Heated Part *b Heat Light
- ·
Do not touch the heat light and heated parts.
·Touching the heat light may result in burns.
·Touching heated parts for a long time may result in burns.
- NOTICE:
-
Do not heat the rear bumper center extension sub-assembly excessively.
3. Remove any remaining double-sided tape from the rear bumper center extension sub-assembly and wipe off any tape adhesive residue with cleaner.
4. Clean the installation area surface.
- NOTICE:
- ·
Installing the rear ultrasonic sensor clip with some double-sided tape remaining may cause poor adhesion. Perform this procedure until the tape is sufficiently removed.
·Make sure to use a cloth when removing. Using a screwdriver, etc., may cause damage and poor adhesion.
·Also, clean a new rear bumper center extension sub-assembly surface.
Primer application:
1. Apply primer to the rear bumper center extension sub-assembly on the installation area of the rear ultrasonic sensor clip using a brush or felt.
- NOTICE:
- ·
Replace the brush or felt if it is dirty or has become hardened.
·Keep any painted surface free from primer.
·If the primer contacts a painted surface, it may leave light primer marks. Therefore, use protective tape when using liquid primer.
·Do not touch surfaces to which primer has been applied until the rear ultrasonic sensor clip has been attached.
2. Let the primer dry sufficiently.
- NOTICE:
-
Do not touch applied surfaces until the primer is dry.
- Recommended drying time:
10 minutes or more (at 23°C (73°F))
Using a heat light, heat the rear bumper center extension sub-assembly and a new rear ultrasonic sensor clip.
- NOTICE:
-
Do not heat the rear ultrasonic sensor clip and rear bumper center extension sub-assembly excessively.
Install the 2 rear ultrasonic sensor clips in the position shown in the illustration.
- NOTICE:
-
The application strength of the rear ultrasonic sensor clip will weaken if reapplied. If reapplication is necessary, be sure to replace it with a new one.
- HINT:
-
Apply pressure so that it does not lift up from the rear bumper center extension sub-assembly.
52461F
16.INSTALL REAR BUMPER PAD
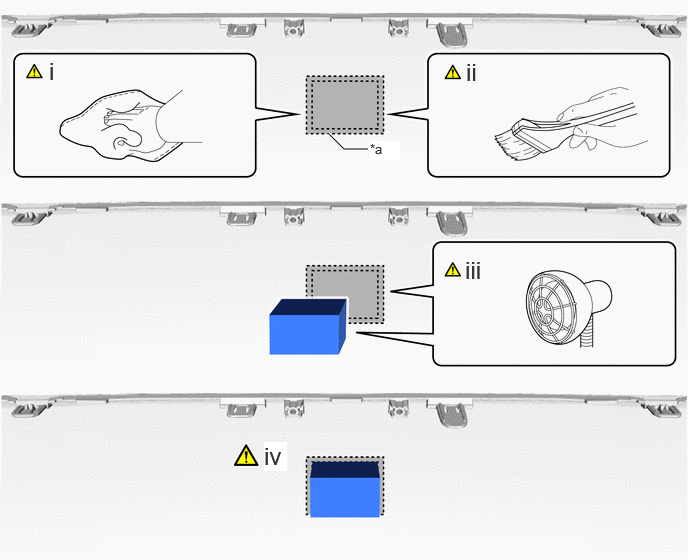
| *a | Mark-off Line | - | - |
|
|
Installation area | - | - |
Clean the rear bumper center extension sub-assembly surface:
1. When reusing the rear bumper center extension sub-assembly, remove remaining double-sided tape from the rear bumper center extension sub-assembly.
2. Using a heat light, heat the rear bumper center extension sub-assembly surface.
- Standard Value:
Part Temperature Rear Bumper Center Extension Sub-assembly 20 to 30°C (68 to 86°F) Rear Bumper pad 20 to 30°C (68 to 86°F)
- CAUTION:
-
2.365,2 2.698,2 false 0.5,2.333 0.5,2.667 true 0.427,2.708 0.74,2.865 0.313,0.156 10 false *a 2.76,1.927 3.073,2.083 0.313,0.156 10 false *b
*a Heated Part *b Heat Light
- ·
Do not touch the heat light and heated parts.
·Touching the heat light may result in burns.
·Touching heated parts for a long time may result in burns.
- NOTICE:
-
Do not heat the rear bumper center extension sub-assembly excessively.
3. Remove any remaining double-sided tape from the rear bumper center extension sub-assembly and wipe off any tape adhesive residue with cleaner.
4. Clean the installation area surface.
- NOTICE:
- ·
Installing the rear bumper pad with some double-sided tape remaining may cause poor adhesion. Perform this procedure until the tape is sufficiently removed.
·Make sure to use a cloth when removing. Using a screwdriver, etc., may cause damage and poor adhesion.
·Also, clean a new rear bumper center extension sub-assembly surface.
Primer application:
1. Apply primer to the rear bumper center extension sub-assembly on the installation area of the rear bumper pad using a brush or felt.
- NOTICE:
- ·
Replace the brush or felt if it is dirty or has become hardened.
·Keep any painted surface free from primer.
·If the primer contacts a painted surface, it may leave light primer marks. Therefore, use protective tape when using liquid primer.
·Do not touch surfaces to which primer has been applied until the rear bumper pad has been attached.
2. Let the primer dry sufficiently.
- NOTICE:
-
Do not touch applied surfaces until the primer is dry.
- Recommended drying time:
10 minutes or more (at 23°C (73°F))
Using a heat light, heat the rear bumper center extension sub-assembly and a new rear bumper pad.
- NOTICE:
-
Do not heat the rear bumper pad and rear bumper center extension sub-assembly excessively.
Install the rear bumper pad in the position shown in the illustration.
- NOTICE:
-
The application strength of the rear bumper pad will weaken if reapplied. If reapplication is necessary, be sure to replace it with a new one.
- HINT:
-
Apply pressure so that it does not lift up from the rear bumper center extension sub-assembly.
52682A
17.INSTALL REAR BUMPER ARM EXTENSION LH
52681A
18.INSTALL REAR BUMPER ARM EXTENSION RH
81920
19.INSTALL REFLEX REFLECTOR ASSEMBLY LH
81910
20.INSTALL REFLEX REFLECTOR ASSEMBLY RH
52164A
21.INSTALL REAR BUMPER PLATE LH
52163A
22.INSTALL REAR BUMPER PLATE RH
75895N
23.INSTALL NO. 1 MOULDING TAPE
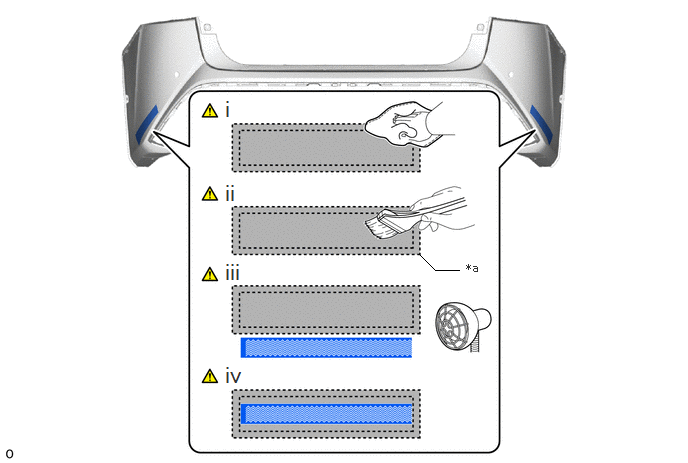
| *a | Mark-off Line | - | - |
|
|
Installation area | - | - |
Clean the rear bumper cover surface:
1. When reusing the rear bumper cover, remove remaining double-sided tape from the rear bumper cover.
2. Using a heat light, heat the rear bumper cover surface.
- Standard Value:
Part Temperature Rear Bumper Cover 20 to 30°C (68 to 86°F) No. 1 Moulding Tape 20 to 30°C (68 to 86°F)
- CAUTION:
-
2.365,2 2.698,2 false 0.5,2.333 0.5,2.667 true 0.427,2.708 0.74,2.865 0.313,0.156 10 false *a 2.76,1.927 3.073,2.083 0.313,0.156 10 false *b
*a Heated Part *b Heat Light
- ·
Do not touch the heat light and heated parts.
·Touching the heat light may result in burns.
·Touching heated parts for a long time may result in burns.
- NOTICE:
-
Do not heat the rear bumper cover excessively.
3. Remove any remaining double-sided tape from the rear bumper cover and wipe off any tape adhesive residue with cleaner.
4. Clean the installation area surface.
- NOTICE:
- ·
Installing the No. 1 moulding tape with some double-sided tape remaining may cause poor adhesion. Perform this procedure until the tape is sufficiently removed.
·Make sure to use a cloth when removing. Using a screwdriver, etc., may cause damage and poor adhesion.
·Also, clean a new rear bumper cover surface.
Primer application:
1. Apply primer to the rear bumper cover on the installation area of the No. 1 moulding tape using a brush or felt.
- NOTICE:
- ·
Replace the brush or felt if it is dirty or has become hardened.
·Keep any painted surface free from primer.
·If the primer contacts a painted surface, it may leave light primer marks. Therefore, use protective tape when using liquid primer.
·Do not touch surfaces to which primer has been applied until the No. 1 moulding tape has been attached.
2. Let the primer dry sufficiently.
- NOTICE:
-
Do not touch applied surfaces until the primer is dry.
- Recommended drying time:
10 minutes or more (at 23°C (73°F))
Using a heat light, heat the rear bumper cover and a new No. 1 moulding tape.
- NOTICE:
-
Do not heat the No. 1 moulding tape and rear bumper cover excessively.
Install the 2 No. 1 moulding tapes in the position shown in the illustration.
- NOTICE:
-
The application strength of the No. 1 moulding tape will weaken if reapplied. If reapplication is necessary, be sure to replace it with a new one.
- HINT:
-
Apply pressure so that it does not lift up from the rear bumper cover.
52461F
24.INSTALL REAR BUMPER PAD
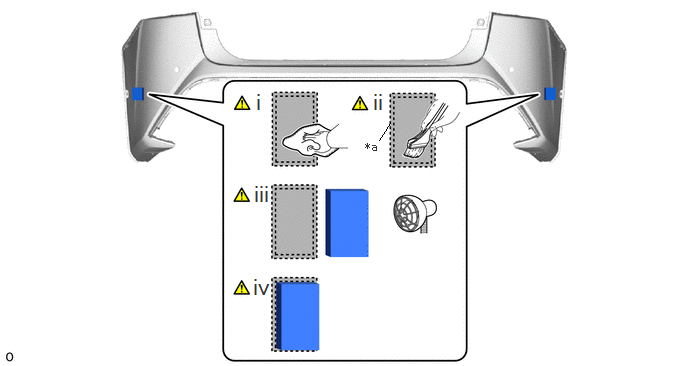
| *a | Mark-off Line | - | - |
|
|
Installation area | - | - |
Clean the rear bumper cover surface:
1. When reusing the rear bumper cover, remove remaining double-sided tape from the rear bumper cover.
2. Using a heat light, heat the rear bumper cover surface.
- Standard Value:
Part Temperature Rear Bumper Cover 20 to 30°C (68 to 86°F) Rear Bumper pad 20 to 30°C (68 to 86°F)
- CAUTION:
-
2.365,2 2.698,2 false 0.5,2.333 0.5,2.667 true 0.427,2.708 0.74,2.865 0.313,0.156 10 false *a 2.76,1.927 3.073,2.083 0.313,0.156 10 false *b
*a Heated Part *b Heat Light
- ·
Do not touch the heat light and heated parts.
·Touching the heat light may result in burns.
·Touching heated parts for a long time may result in burns.
- NOTICE:
-
Do not heat the rear bumper cover excessively.
3. Remove any remaining double-sided tape from the rear bumper cover and wipe off any tape adhesive residue with cleaner.
4. Clean the installation area surface.
- NOTICE:
- ·
Installing the rear bumper pad with some double-sided tape remaining may cause poor adhesion. Perform this procedure until the tape is sufficiently removed.
·Make sure to use a cloth when removing. Using a screwdriver, etc., may cause damage and poor adhesion.
·Also, clean a new rear bumper cover surface.
Primer application:
1. Apply primer to the rear bumper cover on the installation area of the rear bumper pad using a brush or felt.
- NOTICE:
- ·
Replace the brush or felt if it is dirty or has become hardened.
·Keep any painted surface free from primer.
·If the primer contacts a painted surface, it may leave light primer marks. Therefore, use protective tape when using liquid primer.
·Do not touch surfaces to which primer has been applied until the rear bumper pad has been attached.
2. Let the primer dry sufficiently.
- NOTICE:
-
Do not touch applied surfaces until the primer is dry.
- Recommended drying time:
10 minutes or more (at 23°C (73°F))
Using a heat light, heat the rear bumper cover and a new rear bumper pad.
- NOTICE:
-
Do not heat the rear bumper pad and rear bumper cover excessively.
Install the 2 rear bumper pads in the position shown in the illustration.
- NOTICE:
-
The application strength of the rear bumper pad will weaken if reapplied. If reapplication is necessary, be sure to replace it with a new one.
- HINT:
-
Apply pressure so that it does not lift up from the rear bumper cover.
89348Y
25.INSTALL REAR ULTRASONIC SENSOR CLIP
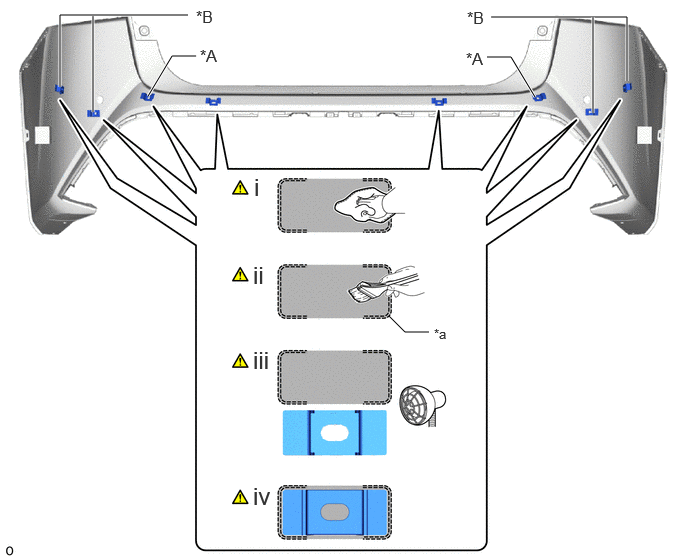
| *A | w/ TOYOTA Parking Assist-sensor System | *B | w/ Advanced Park |
| *a | Mark-off Line | - | - |
|
|
Installation area | - | - |
Clean the rear bumper cover surface:
1. When reusing the rear bumper cover, remove remaining double-sided tape from the rear bumper cover.
2. Using a heat light, heat the rear bumper cover surface.
- Standard Value:
Part Temperature Rear Bumper Cover 20 to 30°C (68 to 86°F) Rear Ultrasonic Sensor Clip 20 to 30°C (68 to 86°F)
- CAUTION:
-
2.365,2 2.698,2 false 0.5,2.333 0.5,2.667 true 0.427,2.708 0.74,2.865 0.313,0.156 10 false *a 2.76,1.927 3.073,2.083 0.313,0.156 10 false *b
*a Heated Part *b Heat Light
- ·
Do not touch the heat light and heated parts.
·Touching the heat light may result in burns.
·Touching heated parts for a long time may result in burns.
- NOTICE:
-
Do not heat the rear bumper cover excessively.
3. Remove any remaining double-sided tape from the rear bumper cover and wipe off any tape adhesive residue with cleaner.
4. Clean the installation area surface.
- NOTICE:
- ·
Installing the rear ultrasonic sensor clip with some double-sided tape remaining may cause poor adhesion. Perform this procedure until the tape is sufficiently removed.
·Make sure to use a cloth when removing. Using a screwdriver, etc., may cause damage and poor adhesion.
·Also, clean a new rear bumper cover surface.
Primer application:
1. Apply primer to the rear bumper cover on the installation area of the rear ultrasonic sensor clip using a brush or felt.
- NOTICE:
- ·
Replace the brush or felt if it is dirty or has become hardened.
·Keep any painted surface free from primer.
·If the primer contacts a painted surface, it may leave light primer marks. Therefore, use protective tape when using liquid primer.
·Do not touch surfaces to which primer has been applied until the rear ultrasonic sensor clip has been attached.
2. Let the primer dry sufficiently.
- NOTICE:
-
Do not touch applied surfaces until the primer is dry.
- Recommended drying time:
10 minutes or more (at 23°C (73°F))
Using a heat light, heat the rear bumper cover and a new rear ultrasonic sensor clip.
- NOTICE:
-
Do not heat the rear ultrasonic sensor clip and rear bumper cover excessively.
Install each rear ultrasonic sensor clip in the position shown in the illustration.
- NOTICE:
-
The application strength of the rear ultrasonic sensor clip will weaken if reapplied. If reapplication is necessary, be sure to replace it with a new one.
- HINT:
-
Apply pressure so that it does not lift up from the rear bumper cover.
52108C
26.INSTALL REAR BUMPER CENTER EXTENSION SUB-ASSEMBLY
82183
27.INSTALL NO. 3 LUGGAGE ROOM WIRE
89C48C
28.INSTALL REAR SIDE ULTRASONIC SENSOR RETAINER (w/ Advanced Park)
|
|
Click here()
|
89C48A
29.INSTALL REAR CORNER ULTRASONIC SENSOR RETAINER (w/ TOYOTA Parking Assist-sensor System)
|
|
Click here()
|
89C48B
30.INSTALL REAR CENTER ULTRASONIC SENSOR RETAINER (w/ TOYOTA Parking Assist-sensor System)
|
|
Click here()
|
89342B
31.INSTALL REAR SIDE ULTRASONIC SENSOR (w/ Advanced Park)
89342
32.INSTALL REAR CORNER ULTRASONIC SENSOR (w/ TOYOTA Parking Assist-sensor System)
89342A
33.INSTALL REAR CENTER ULTRASONIC SENSOR (w/ TOYOTA Parking Assist-sensor System)
81481K
34.INSTALL REAR FOG LIGHT BRACKET
81483A
35.INSTALL FOG LIGHT PROTECTOR
81457C
36.INSTALL REAR FOG LIGHT LENS & BODY