HEATING / AIR CONDITIONING AIR CONDITIONING SYSTEM B1498 Communication Malfunction (A/C Inverter Local)
DESCRIPTION
The EV control ECU and compressor with motor assembly communicate via a direct line. Compressor control is stopped and this DTC is stored if communication information is cut off or abnormal information occurs.
This DTC is also detected if high-voltage power supplied from the inverter with converter assembly to the compressor control circuit is shut off.
This DTC will be stored as a history DTC.
| DTC No. | Detection Item | DTC Detection Condition | Trouble Area | Memory | DTC Output from | Priority |
|---|---|---|---|---|---|---|
| B1498 | Communication Malfunction (A/C Inverter Local) | Diagnosis condition:
Ignition switch ON (READY) Malfunction status:
Error or open in communication line between the EV control ECU and compressor with motor assembly or high-voltage power source shut off Detection time:
None |
·
Harness or connector ·
EV control ECU ·
Compressor with motor assembly ·
No. 1 EV battery pack wire |
Memorized | Air Conditioner | B |
WIRING DIAGRAM
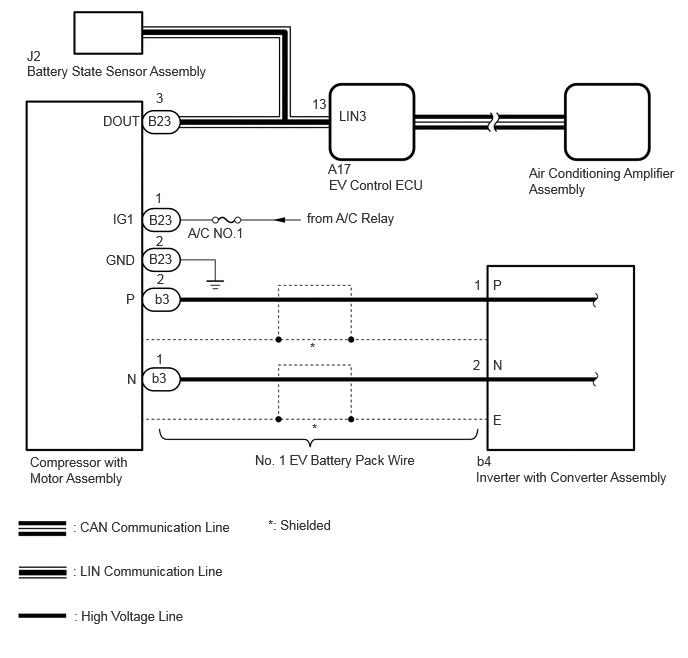
CAUTION / NOTICE / HINT
- CAUTION:
- ·
After removing the EV battery service plug grip and FC converter power outlet cable (inverter with converter assembly) on FC converter side, store them according to the following guidelines to prevent other technicians from accidentally reconnecting them while work is being performed on the high voltage systems.
·After removing the EV battery service plug grip and FC converter power outlet cable (inverter with converter assembly) on FC converter side, wait for at least 10 minutes before touching any of the high-voltage connectors or terminals. After waiting for 10 minutes, check the voltage at the terminals in the inspection point in the inverter with converter assembly. The voltage should be 0 V before beginning work.
- NOTICE:
- ·
Inspect the fuses for circuits related to this system before performing the following procedure.
·After the ignition switch is turned off, there may be a waiting time before disconnecting the negative (-) auxiliary battery terminal.
Click hereGeneral>SETUP>WHEN DISCONNECTING OR RECONNECTING BATTERY TERMINAL>BEFORE DISCONNECTING BATTERY
·When disconnecting and reconnecting the auxiliary battery
Click hereGeneral>SETUP>WHEN DISCONNECTING OR RECONNECTING BATTERY TERMINAL>WORK PROCEDURE
- HINT:
-
When disconnecting and reconnecting the auxiliary battery, there is an automatic learning function that completes learning when the respective system is used.
-
Click hereGeneral>SETUP>WHEN DISCONNECTING OR RECONNECTING BATTERY TERMINAL>AUTOMATIC LEARNING CHART
·The hybrid control system and air conditioning system output DTCs separately. Perform troubleshooting for the hybrid control system first if DTCs from these systems are output simultaneously.
PROCEDURE
Using the GTS, check if the CAN communication system is functioning normally.
- HINT:
-
Click herePower Source / Network>NETWORKING>CAN COMMUNICATION SYSTEM>HOW TO PROCEED WITH TROUBLESHOOTING
- Result:
Result Proceed to CAN communication system DTCs are not output A CAN communication system DTCs are output B
A
B
Click herePower Source / Network>NETWORKING>CAN COMMUNICATION SYSTEM>HOW TO PROCEED WITH TROUBLESHOOTING
Check if hybrid control system DTCs are output.
- Powertrain > EV > Trouble Codes
- 50001 397
- Result:
Result Proceed to DTCs are not output A DTCs are output B
A
B
Pre-procedure1
Disconnect the B23 compressor with motor assembly connector.
Disconnect the A17 EV control ECU connector.
Disconnect the J2 battery state sensor assembly connector.
Procedure1
Measure the resistance according to the value(s) in the table below.
- Standard Resistance:
Tester Connection Condition Specified Condition Click Location & Routing(B23,A17)Location & Routingewd_type=routing;type=c,c;code=B23,A17
Click Connector(B23)Engine Compartment>No. 2 Stack Wire>Compressor with Motor Assemblyewd_type=component;type=c;code=B23;pinno=3
Click Connector(A17)Instrument Panel>Front Compartment Main Wire>EV Control ECUewd_type=component;type=c;code=A17;pinno=13
B23-3 (DOUT) - A17-13 (LIN3) Always Below 1 Ω B23-3 (DOUT) - A17-13 (LIN3) - Other terminals and body ground Always 10 kΩ or higher
- Result:
Proceed to OK NG
Post-procedure1
None
OK
NG
- CAUTION:
-
Do not disconnect the connector on the high-voltage side.
Pre-procedure1
Disconnect the B23 compressor with motor assembly connector.
Procedure1
Measure the resistance according to the value(s) in the table below.
- Standard Resistance:
Tester Connection Condition Specified Condition Click Location & Routing(B23)Location & Routingewd_type=routing;type=c;code=B23
Click Connector(B23)Engine Compartment>No. 2 Stack Wire>Compressor with Motor Assemblyewd_type=component;type=c;code=B23;pinno=2
B23-2 (GND) - Body ground Always Below 1 Ω
- Result:
Proceed to OK NG
Post-procedure1
None
OK
NG
- CAUTION:
-
Do not disconnect the connector on the high-voltage side.
Pre-procedure1
Disconnect the B23 compressor with motor assembly connector.
Procedure1
Measure the voltage according to the value(s) in the table below.
- Standard Voltage:
Tester Connection Switch Condition Specified Condition Click Location & Routing(B23)Location & Routingewd_type=routing;type=c;code=B23
Click Connector(B23)Engine Compartment>No. 2 Stack Wire>Compressor with Motor Assemblyewd_type=component;type=c;code=B23;pinno=1
B23-1 (IG1) - Body ground Ignition switch ON 11 to 14 V B23-1 (IG1) - Body ground Ignition switch off Below 1 V
- Result:
Proceed to OK NG
Post-procedure1
None
OK
NG
- CAUTION:
-
Be sure to wear insulated gloves.
Remove the No. 1 EV battery pack wire.
Measure the resistance according to the value(s) in the table below.
- Standard Resistance:
Tester Item
(Tester Connection)Condition Specified Condition b3-2 (P) - b4-2 (P) Always Below 1 Ω b3-1 (N) - b4-1 (N) Always Below 1 Ω b3-2 (P) - Other terminals and body ground Always Below 1 Ω
- Result:
Proceed to OK NG
OK
NG