METER / GAUGE / DISPLAY METER / GAUGE SYSTEM Operating Light Control Rheostat does not Change Light Brightness
DESCRIPTION
The combination meter assembly receives signals from this circuit to adjust the illumination of the combination meter assembly. The combination meter assembly sets the illumination level based on the user operation of the light control rheostat switch in the trip switch.
WIRING DIAGRAM
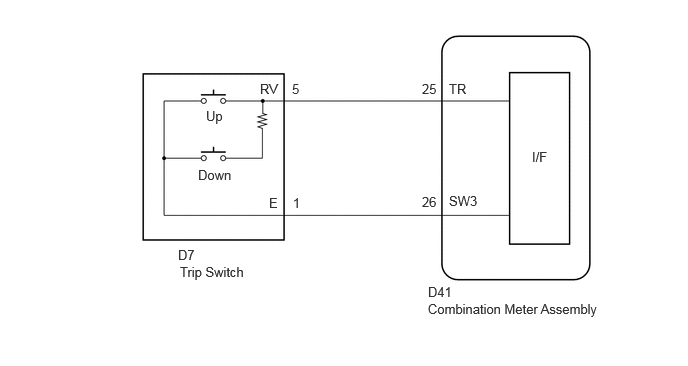
CAUTION / NOTICE / HINT
- NOTICE:
-
When replacing the combination meter assembly, always replace it with a new one. If a combination meter assembly which was installed to another vehicle is used, the information stored in it will not match the information from the vehicle and a DTC may be stored.
- HINT:
- ·
The meter illumination level can be adjusted by pressing the light control rheostat switch.
- ·
The meter illumination dims when the taillights are turned on.
- ·
Setting the meter illumination level to maximum brightness cancels the above dimming of the meter illumination.
PROCEDURE
Using the GTS, read the Data List.
Click hereVehicle Interior>METER / GAUGE / DISPLAY>METER / GAUGE SYSTEM>DATA LIST / ACTIVE TEST
- Body Electrical > Combination Meter > Data List
-
Tester Display Measurement Item Range Normal Condition Diagnostic Note Light Control Switch (UP) Light control rheostat up switch (Trip switch) OFF/ON OFF: Switch released
ON: Switch pushed- Light Control Switch (DOWN) Light control rheostat down switch (Trip switch) OFF/ON OFF: Switch released
ON: Switch pushed-
- Body Electrical > Combination Meter > Data List
-
Tester Display Light Control Switch (UP) Light Control Switch (DOWN) - 50003 409 398,399
- OK:
Light control rheostat up or down switch condition displayed on the GTS changes with the actual switch operation.
- Result:
Proceed to OK NG
OK
NG
Click hereVehicle Interior>METER / GAUGE / DISPLAY>LIGHT CONTROL RHEOSTAT>INSPECTION
- Result:
Proceed to OK NG
OK
NG
Disconnect the D41 combination meter assembly connector.
Disconnect the D7 trip switch connector.
Measure the resistance according to the value(s) in the table below.
- Standard Resistance:
Tester Connection Condition Specified Condition Click Location & Routing(D41,D7)Location & Routingewd_type=routing;type=c,c;code=D41,D7
Click Connector(D41)Instrument Panel>Instrument Panel Wire>Combination Meter Assemblyewd_type=component;type=c;code=D41;pinno=25,26
Click Connector(D7)Instrument Panel>Instrument Panel Wire>Trip Switchewd_type=component;type=c;code=D7;pinno=5,1
D41-25 (TR) - D7-5 (RV) Always Below 1 Ω D41-26 (SW3) - D7-1 (E) Always Below 1 Ω D41-25 (TR) or D7-5 (RV) - Other terminals and body ground Always 10 kΩ or higher D41-26 (SW3) or D7-1 (E) - Other terminals and body ground Always 10 kΩ or higher
- Result:
Proceed to OK NG
OK
NG