NETWORKING CAN COMMUNICATION SYSTEM Check CAN Communication Connection
DESCRIPTION
| Symptom | Trouble Area |
|---|---|
| Check CAN Communication Connection | ·
CAN branch line or connector ·
Power source circuit of central gateway ECU (network gateway ECU) ·
Central gateway ECU (network gateway ECU) ground circuit ·
Central gateway ECU (network gateway ECU) ·
DLC3 ground circuit |
WIRING DIAGRAM
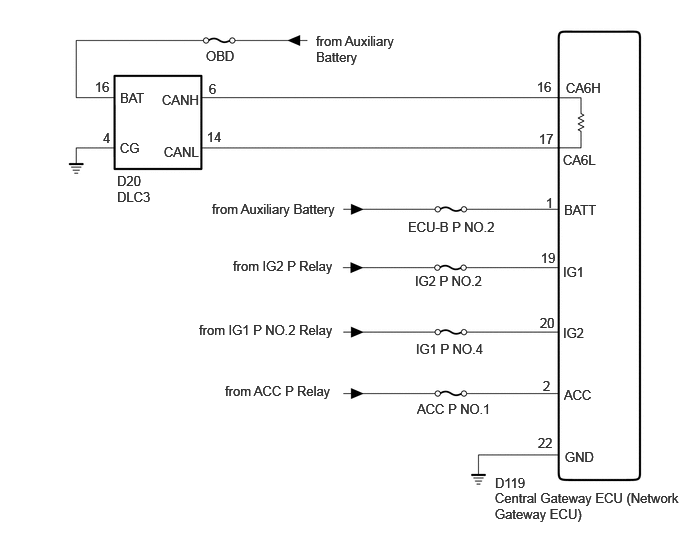
CAUTION / NOTICE / HINT
- CAUTION:
-
When performing the confirmation driving pattern, obey all speed limits and traffic laws.
- NOTICE:
- ·
Because the order of diagnosis is important to allow correct diagnosis, make sure to begin troubleshooting using How to Proceed with Troubleshooting when CAN communication system related DTCs are output.
Click herePower Source / Network>NETWORKING>CAN COMMUNICATION SYSTEM>HOW TO PROCEED WITH TROUBLESHOOTING
·Inspect the fuses for circuits related to this system before performing the following procedure.
·Before measuring the resistance of the CAN bus, turn the ignition switch off and leave the vehicle for 1 minute or more without operating the key or any switches, or opening or closing the doors. After that, disconnect the cable from the negative (-) auxiliary battery terminal and leave the vehicle for 1 minute or more before measuring the resistance.
·After the ignition switch is turned off, there may be a waiting time before disconnecting the negative (-) auxiliary battery terminal.
Click hereGeneral>SETUP>WHEN DISCONNECTING OR RECONNECTING BATTERY TERMINAL>BEFORE DISCONNECTING BATTERY
·When disconnecting and reconnecting the auxiliary battery.
Click hereGeneral>SETUP>WHEN DISCONNECTING OR RECONNECTING BATTERY TERMINAL>WORK PROCEDURE
- HINT:
-
When disconnecting and reconnecting the auxiliary battery, there is an automatic learning function that completes learning when the respective system is used.
-
Click hereGeneral>SETUP>WHEN DISCONNECTING OR RECONNECTING BATTERY TERMINAL>AUTOMATIC LEARNING CHART
·Some parts must be initialized and set when replacing or removing and installing parts.
Click hereGeneral>SETUP>WHEN REPLACING OR REMOVING/INSTALLING PARTS>WORK PROCEDURE
·After performing repairs, perform the DTC check procedure and confirm that the DTCs are not output again.
DTC check procedure: Turn the ignition switch to ON and wait for 1 minute or more. Then operate the suspected malfunctioning system and drive the vehicle at 60 km/h (37 mph) or more for 5 minutes or more.
·After the repair, perform the CAN bus check and check that all the ECUs and sensors connected to the CAN communication system are displayed as normal.
Click herePower Source / Network>NETWORKING>CAN COMMUNICATION SYSTEM>DIAGNOSIS SYSTEM
- HINT:
- ·
Before disconnecting related connectors for inspection, push in on each connector body to check that the connector is not loose or disconnected.
·When a connector is disconnected, check that the terminals and connector body are not cracked, deformed or corroded.
PROCEDURE
- HINT:
-
Read the GTS operator's manual before use.
-
Click hereGeneral>INTRODUCTION>HOW TO TROUBLESHOOT ECU CONTROLLED SYSTEMS>GENERAL INFORMATION
Connect the GTS to the DLC3 of another vehicle.
Turn the ignition switch to ON.
Turn the GTS on.
Check that the GTS and ECUs can communicate with the ignition switch ON.
- HINT:
- ·
ECUs and sensors are not displayed on the "Communication Bus Check" screen when the GTS cannot communicate with the vehicle.
·If communication between the GTS and ECUs is not possible, either the GTS or vehicle has a malfunction.
·If communication between the GTS and ECUs is still not possible even when the GTS is connected to another vehicle, the GTS has a malfunction. Perform the self tests described in the GTS operator's manual. (The GTS may be malfunctioning or its battery may be discharged.)
- Result:
Result Proceed to OK (Communication between the GTS and the vehicle is not possible but communication is possible when connected to another vehicle.) A NG (Communication is not possible between the GTS and the vehicle, nor between the GTS and another vehicle.) B
A
B
Confirm error on the GTS screen.
- Result:
Result Proceed to "A communication error with FC control ECU occurred. Please confirm that FC control ECU is properly installed." is displayed. A Cannot proceed to vehicle selection screen. B
A
B
- NOTICE:
-
Before measuring the resistance of the CAN bus, turn the ignition switch off and leave the vehicle for 1 minute or more without operating the key or any switches, or opening or closing the doors. After that, disconnect the cable from the negative (-) auxiliary battery terminal and leave the vehicle for 1 minute or more before measuring the resistance.
- HINT:
-
Operating the ignition switch, any other switches or a door triggers related ECU and sensor communication on the CAN. This communication will cause the resistance value to change.
Disconnect the cable from the negative (-) auxiliary battery terminal.
Measure the resistance according to the value(s) in the table below.
- Standard Resistance:
Tester Connection Condition Specified Condition Result Click Location & Routing(D119,D20)Location & Routingewd_type=routing;type=c,c;code=D119,D20
Click Connector(D119)Instrument Panel>Instrument Panel Wire>Network Gateway ECUewd_type=component;type=c;code=D119;pinno=26,25
Click Connector(D20)Instrument Panel>Instrument Panel Wire>DLC3ewd_type=component;type=c;code=D20;pinno=4,16
D119-26 (CA4H) - D119-25 (CA4L) Cable disconnected from negative (-) auxiliary battery terminal 54 to 69 Ω Below 54 Ω: Short circuit between bus lines 70 Ω or higher: Open circuit in main bus lines D119-26 (CA4H) - D20-4 (CG) Cable disconnected from negative (-) auxiliary battery terminal 200 Ω or higher Below 200 Ω: CANH short to ground D119-25 (CA4L) - D20-4 (CG) Cable disconnected from negative (-) auxiliary battery terminal 200 Ω or higher Below 200 Ω: CANL short to ground D119-26 (CA4H) - D20-16 (BAT) Cable disconnected from negative (-) auxiliary battery terminal 6 kΩ or higher Below 6 kΩ: CANH +B short D119-25 (CA4L) - D20-16 (BAT) Cable disconnected from negative (-) auxiliary battery terminal 6 kΩ or higher Below 6 kΩ: CANL +B short
- Result:
Result Proceed to OK (CAN bus main lines are normal) A NG (There is an open or short in a CAN bus main line of a suspected bus) B
A
- HINT:
-
Inspect the EV control ECU supply power or VC voltage.
B
- NOTICE:
-
Before measuring the resistance of the CAN bus, turn the ignition switch off and leave the vehicle for 1 minute or more without operating the key or any switches, or opening or closing the doors. After that, disconnect the cable from the negative (-) auxiliary battery terminal and leave the vehicle for 1 minute or more before measuring the resistance.
- HINT:
-
Operating the ignition switch, any other switches or a door triggers related ECU and sensor communication on the CAN. This communication will cause the resistance value to change.
Measure the voltage according to the value(s) in the table below.
- Standard Voltage:
Tester Connection Switch Condition Specified Condition Click Location & Routing(D20)Location & Routingewd_type=routing;type=c;code=D20
Click Connector(D20)Instrument Panel>Instrument Panel Wire>DLC3ewd_type=component;type=c;code=D20;pinno=16
D20-16 (BAT) - Body ground Ignition switch off 11 to 14 V
- HINT:
-
If the resistance between CANH and CANL is not as specified, a connector may have been loose or disconnected during inspection. If a connector is loose or disconnected, connect it and perform the inspection again.
Disconnect the cable from the negative (-) auxiliary battery terminal.
Measure the resistance according to the value(s) in the table below.
- Standard Resistance:
Tester Connection Condition Specified Condition Click Location & Routing(D20)Location & Routingewd_type=routing;type=c;code=D20
Click Connector(D20)Instrument Panel>Instrument Panel Wire>DLC3ewd_type=component;type=c;code=D20;pinno=4
D20-4 (CG) - Body ground Cable disconnected from negative (-) auxiliary battery terminal Below 1 Ω
- HINT:
-
If the resistance between CANH and CANL is not as specified, a connector may have been loose or disconnected during inspection. If a connector is loose or disconnected, connect it and perform the inspection again.
- Result:
Proceed to OK NG
OK
NG
Measure the resistance according to the value(s) in the table below.
- Standard Resistance:
Tester Connection Condition Specified Condition Click Location & Routing(D20)Location & Routingewd_type=routing;type=c;code=D20
Click Connector(D20)Instrument Panel>Instrument Panel Wire>DLC3ewd_type=component;type=c;code=D20;pinno=6,14
D20-6 (CANH) - D20-14 (CANL) Cable disconnected from negative (-) auxiliary battery terminal Below 70 Ω
- HINT:
-
If the resistance between CANH and CANL is not as specified, a connector may have been loose or disconnected during inspection. If a connector is loose or disconnected, connect it and perform the inspection again.
- Result:
Proceed to OK NG
OK
NG
Measure the resistance according to the value(s) in the table below.
- Standard Resistance:
Tester Connection Condition Specified Condition Click Location & Routing(D20)Location & Routingewd_type=routing;type=c;code=D20
Click Connector(D20)Instrument Panel>Instrument Panel Wire>DLC3ewd_type=component;type=c;code=D20;pinno=6,14,4,16
D20-6 (CANH) - D20-14 (CANL) Cable disconnected from negative (-) auxiliary battery terminal 54 Ω or higher D20-6 (CANH) - D20-4 (CG) Cable disconnected from negative (-) auxiliary battery terminal 200 Ω or higher D20-14 (CANL) - D20-4 (CG) D20-6 (CANH) - D20-16 (BAT) Cable disconnected from negative (-) auxiliary battery terminal 6 kΩ or higher D20-14 (CANL) - D20-16 (BAT)
- HINT:
-
If the resistance between CANH and CANL is not as specified, a connector may have been loose or disconnected during inspection. If a connector is loose or disconnected, connect it and perform the inspection again.
- Result:
Proceed to OK NG
OK
NG
Reconnect the cable to the negative (-) auxiliary battery terminal.
Disconnect the central gateway ECU (network gateway ECU) connector.
Measure the resistance according to the value(s) in the table below.
- Standard Resistance:
Tester Connection Condition Specified Condition Click Location & Routing(D119)Location & Routingewd_type=routing;type=c;code=D119
Click Connector(D119)Instrument Panel>Instrument Panel Wire>Network Gateway ECUewd_type=component;type=c;code=D119;pinno=22
D119-22 (GND) - Body ground Cable disconnected from negative (-) auxiliary battery terminal Below 1 Ω
Measure the voltage according to the value(s) in the table below.
- Standard Voltage:
Tester Connection Switch Condition Specified Condition Click Location & Routing(D119)Location & Routingewd_type=routing;type=c;code=D119
Click Connector(D119)Instrument Panel>Instrument Panel Wire>Network Gateway ECUewd_type=component;type=c;code=D119;pinno=1,2,19,20
D119-1 (BATT) - Body ground Ignition switch off 11 to 14 V D119-2 (ACC) - Body ground Ignition switch ACC 11 to 14 V Ignition switch off Below 1 V D119-19 (IGP) - Body ground Ignition switch ON 11 to 14 V Ignition switch off Below 1 V D119-20 (IGR) - Body ground Ignition switch ON 11 to 14 V Ignition switch off Below 1 V
- Result:
Proceed to OK NG
OK
NG
Disconnect the D119 central gateway ECU (network gateway ECU) connector.
Measure the resistance according to the value(s) in the table below.
- Standard Resistance:
Tester Connection Condition Specified Condition Click Location & Routing(D119,D20)Location & Routingewd_type=routing;type=c,c;code=D119,D20
Click Connector(D119)Instrument Panel>Instrument Panel Wire>Network Gateway ECUewd_type=component;type=c;code=D119;pinno=16,17
Click Connector(D20)Instrument Panel>Instrument Panel Wire>DLC3ewd_type=component;type=c;code=D20;pinno=6,14
D119-16 (CA6H) - D20-6 (CANH) Cable disconnected from negative (-) auxiliary battery terminal Below 1 Ω D119-17 (CA6L) - D20-14 (CANL)
- Result:
Proceed to OK NG
OK
NG
Disconnect the central gateway ECU (network gateway ECU) connector.
Measure the resistance according to the value(s) in the table below.
- Standard Resistance:
Tester Connection Condition Specified Condition Click Location & Routing(D119,D20)Location & Routingewd_type=routing;type=c,c;code=D119,D20
Click Connector(D119)Instrument Panel>Instrument Panel Wire>Network Gateway ECUewd_type=component;type=c;code=D119;pinno=16,17
Click Connector(D20)Instrument Panel>Instrument Panel Wire>DLC3ewd_type=component;type=c;code=D20;pinno=4,16
D119-16 (CA6H) - D119-17 (CA6L) Cable disconnected from negative (-) auxiliary battery terminal 54 to 69 Ω D119-16 (CA6H) - D20-4 (CG) Cable disconnected from negative (-) auxiliary battery terminal 200 Ω or higher D119-17 (CA6L) - D20-4 (CG) D119-16 (CA6H) - D20-16 (BAT) Cable disconnected from negative (-) auxiliary battery terminal 6 kΩ or higher D119-17 (CA6L) - D20-16 (BAT)
- Result:
Proceed to OK NG
OK
NG