MAINTENANCE FRONT DISC BRAKE PAD REMOVAL
CAUTION / NOTICE / HINT
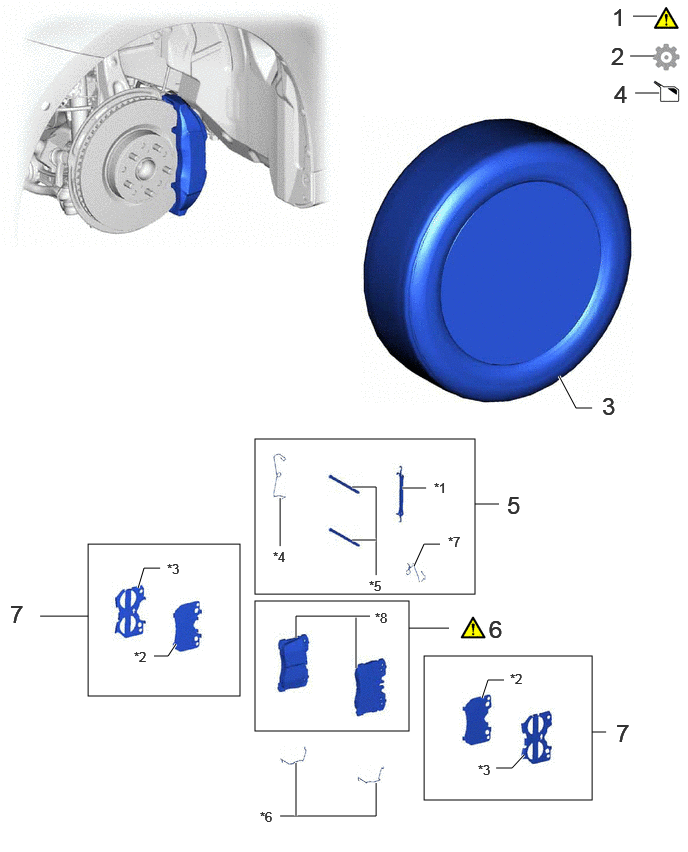
| Procedure | Part Name Code | 
|

|

|
|
|---|---|---|---|---|---|
| 1 | PRECAUTION | - | ( ) |
- | - |
| 2 | DISABLE BRAKE CONTROL | - | - | - | ()
|
| 3 | FRONT WHEEL | - | - | - | - |
| 4 | DRAIN BRAKE FLUID | - | - | ()
|
- |
| 5 | FRONT DISC BRAKE FITTING KIT | 04947 | - | - | - |
| 6 | FRONT DISC BRAKE PAD KIT | 04465 | ()
|
- | - |
| 7 | FRONT ANTI SQUEAL SHIM KIT | 04945 | - | - | - |
| *1 | NO. 1 ANTI-RATTLE SPRING | *2 | NO. 1 ANTI-SQUEAL SHIM |
| *3 | NO. 2 ANTI-SQUEAL SHIM | *4 | PIN HOLD CLIP |
| *5 | HOLE PIN | *6 | INNER ANTI-RATTLE SPRING |
| *7 | ANTI-SQUEAL SPRING | *8 | FRONT DISC BRAKE PAD |
CAUTION / NOTICE / HINT
The necessary procedures (adjustment, calibration, initialization, or registration) that must be performed after parts are removed, installed, or replaced during the front disc brake pad removal/installation are shown below.
| Replaced Part or Performed Procedure | Necessary procedures | Effect/Inoperative Function when Necessary Procedure not Performed | Link |
|---|---|---|---|
| Disconnect cable from negative (-) auxiliary battery terminal | Memorize steering angle neutral point | Parking assist monitor system | ()
|
| Panoramic view monitor system | ()
|
- NOTICE:
- ·
Immediately after installing the brake pads, the braking performance may be reduced. Always perform a road test in a safe place while paying attention to the surroundings.
·After replacing the front disc brake pads, the brake pedal may feel soft due to clearance between the front disc brake pads and front disc. Depress the brake pedal several times until the brake pedal feels firm.
·After replacing the front disc brake pads, always perform a road test to check the braking performance and check for vibrations.
·When removing or installing the front disc brake cylinder assembly, pushing back the disc brake piston may cause a large clearance between the brake pads and brake disc. When the brake pedal is depressed with a large clearance between the brake pads and the brake disc, DTC C13DB00, C13DC00, C13DD00, C13DE00, C140000 and/or C140A00 related to abnormal brake fluid pressure may be stored. Make sure to clear any DTCs after performing this procedure.
·While the auxiliary battery is connected, even if the ignition switch is off, the brake control system activates when the brake pedal is depressed or the door courtesy switch is turned on. Therefore, even if only brake pads are to be removed and installed, be sure to remove the brake booster pump connectors before beginning work.
- HINT:
- ·
When the cable is disconnected/reconnected to the auxiliary battery terminal, systems temporarily stop operating. However, each system has a function that completes learning the first time the system is used.
-Learning completes when vehicle is driven
Effect/Inoperative Function When Necessary Procedures are not Performed Necessary Procedures Link Lane tracing assist system Drive the vehicle straight ahead at 35 km/h (22 mph) or more for 5 seconds or more. ( )
Pre-collision system Adaptive high beam system
-Learning completes when vehicle is operated normally
Effect/Inoperative Function When Necessary Procedures are not Performed Necessary Procedures Link Air conditioning system After the ignition switch is turned to ON, the servo motor and expansion valve standard position is recognized. -
·Use the same procedure for the RH and LH sides, except where indicated.
·The following procedure is for the LH side.
PROCEDURE

 1. PRECAUTION
|
|
|
2.DISABLE BRAKE CONTROL
|
|
Click here()
|
3.REMOVE FRONT WHEEL
4.DRAIN BRAKE FLUID
|
|
|
04947
5.REMOVE FRONT DISC BRAKE FITTING KIT
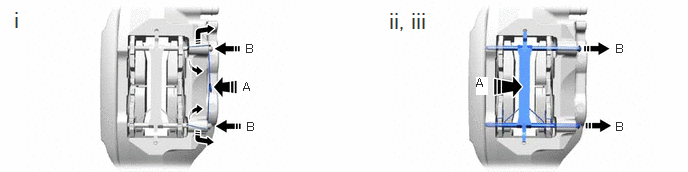
While pressing the area (A), push the hole pin (B) toward the disk brake cylinder assembly LH, and remove the pin hold clip.
While pressing the area (A), remove the 2 hole pins (B) and No. 1 anti-rattle spring.
Remove the anti-squeal spring.
04465
6.REMOVE FRONT DISC BRAKE PAD KIT
|
|
|

04945
7.REMOVE FRONT ANTI SQUEAL SHIM KIT
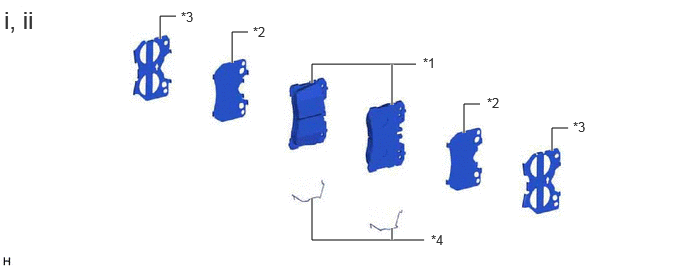
| *1 | Front Disc Brake Pad | *2 | No. 1 Anti-Squeal Shim |
| *3 | No. 2 Anti-Squeal Shim | *4 | Inner Anti-Rattle Spring |
Remove the No. 1 and No. 2 anti-squeal shims from each of the front disc brake pads.
Remove the inner anti-rattle springs from each of the front disc brake pads.