MAINTENANCE COOLANT(for Inverter Coolant) REPLACEMENT
CAUTION / NOTICE / HINT
- CAUTION:
- ·
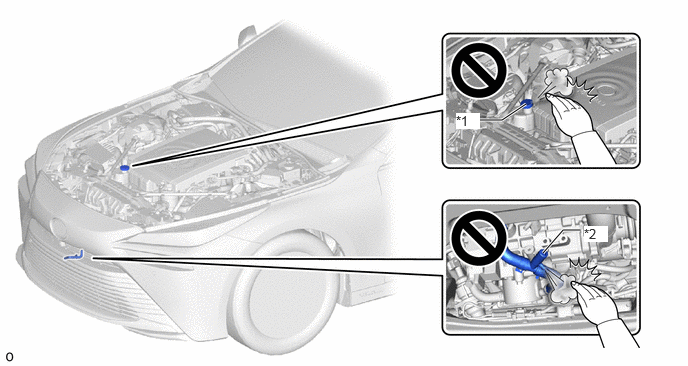
To avoid the danger of being burned, do not remove the inverter reserve tank cap or drain cock plug while the coolant (for inverter) is still hot.
·Pressurized, hot coolant (for inverter) and steam may be released and cause serious burns.
 4.979,1.25 5.229,1.25 5.229,1.25 5.479,1.083 true 5.656,2.635 5.865,2.396 5.865,2.396 6.042,2.396 true 4.75,1.177 5,1.344 0.25,0.167 10 true *1 6.083,2.354 6.333,2.521 0.25,0.167 10 true *2
*1 Inverter Reserve Tank Cap *2 Drain Cock Plug
PROCEDURE

 53292A
1.REMOVE UPPER RADIATOR SUPPORT SEAL
53291B
2.REMOVE RADIATOR COVER PLATE
53295
3.REMOVE LOWER RADIATOR AIR DEFLECTOR
51420A
4.REMOVE FRONT COMPARTMEMT UNDER COVER ASSEMBLY
5.DRAIN COOLANT (for Inverter)
- CAUTION:
- ·
To avoid the danger of being burned, do not remove the reserve tank cap or drain cock plug while the coolant (for inverter) is still hot.
·Pressurized, hot coolant (for inverter) and steam may be released and cause serious burns.
- NOTICE:
- ·
Do not reuse the drained coolant because it may contain foreign objects.
·Collect the drained coolant and measure its volume to establish a benchmark. When adding coolant, make sure to add more coolant than the measured amount.
Remove the inverter reserve tank cap from the inverter reserve tank assembly.
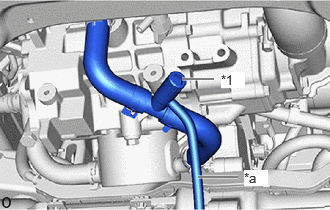
| *1 | Drain Cock Plug |
| *a | Hose |
Connect a hose to the drain cock as shown in the illustration.
Loosen the drain cock plug and drain the coolant.
Tighten the drain cock plug.
Disconnect the hose from the radiator drain cock.
6.ADD COOLANT (for Inverter)
- NOTICE:
- ·
Do not reuse the drained coolant because it may contain foreign objects.
·If the vehicle is driven with air in the inverter cooling system, damage may occur and the following DTCs may be set.
DTC Code Detection Item P0A9300 Inverter "A" Cooling System Performance P0C7396 Motor Electronics Coolant Pump "A" Component Internal Failure P0A001C Motor Electronics Coolant Temperature Sensor "A" Circuit Voltage Out of Range P0A0011 Motor Electronics Coolant Temperature Sensor Circuit Short to Ground P0A0015 Motor Electronics Coolant Temperature Sensor "A" Circuit Short to Battery or Open P0A789E Drive Motor "A" Inverter Fail Signal Stuck On P0A949E DC/DC Converter "A" Fail Signal Stuck On P0AED1C Drive Motor InverterTemperature Sensor "A" Circuit Voltage Out of Range P0AED11 Drive Motor Inverter Temperature Sensor "A" Circuit Short toGround P0AED15 Drive Motor InverterTemperature Sensor "A" Circuit Short to Battery or Open P0C381C DC/DC Converter Temperature Sensor "A" Circuit Voltage Out of Range P0C381F DC/DC Converter Temperature Sensor "A" Circuit Intermittent P0C3D1C DC/DC ConverterTemperature Sensor "B" Circuit Voltage Out of Range P0C3D1F DC/DC ConverterTemperature Sensor "B" Circuit Intermittent P1CCC96 DC/DC Converter Enable Component Internal Failure
Slowly pour coolant into the inverter reserve tank assembly until it reaches the MAX line.
- Standard Capacity:
- for LHD:
4.0 liters (4.2 US qts, 3.5 Imp. qts)
- for RHD:
3.9 liters (4.1 US qts, 3.4 Imp. qts)
- NOTICE:
-
To prevent foreign matter such as dust or dirt from entering the cooling system, make sure to confirm that the container used to add coolant is clean and free of foreign matter.
When using the GTS:
Activate the Inverter Water Pump
- Powertrain > EV > Active Test
-
Tester Display Activate the Inverter Water Pump - 50004 397 1
While adding coolant to the inverter reserve tank assembly to keep the coolant at the MAX line and compensate for the drop in the coolant level as the air bleeds, operate and stop the inverter water pump assembly at 1 minute intervals.
- Standard:
Air bleeding from the inverter cooling system is completed when the noise made by the inverter water pump assembly becomes smaller and the circulation of coolant in the inverter reserve tank assembly improves.
- HINT:
-
Loud noises made by the inverter water pump assembly and poor circulation of coolant in the inverter reserve tank assembly indicate that there is air in the cooling system.
When not using the GTS:
Turn the ignition switch on (READY). [*1]
Turn the ignition switch off and add coolant to the MAX line as the coolant level will drop as the air bleeds. [*2]
- NOTICE:
- ·
Be sure to turn the ignition switch off before adding SLLC.
·Do not work on the components in the engine compartment while the ignition switch is on (READY) as the engine will operate intermittently.
Repeat steps [*1] and [*2] until air bleeding from the cooling system is completed.
- Standard:
Air bleeding from the inverter cooling system is completed when the noise made by the inverter water pump assembly becomes smaller and the circulation of coolant in the inverter reserve tank assembly improves.
- HINT:
-
Loud noises made by the inverter water pump assembly and poor circulation of coolant in the inverter reserve tank assembly indicate that there is air in the cooling system.
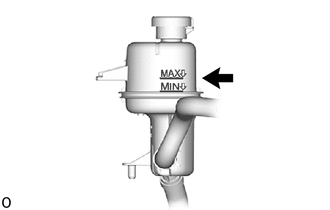
After the air is completely bled from the cooling system, add coolant to the MAX line of inverter reserve tank assembly and install the reserve tank cap.
7.INSPECT FOR COOLANT LEAK (for Inverter)
51420A
8.INSTALL FRONT COMPARTMEMT UNDER COVER ASSEMBLY
53295
9.INSTALL LOWER RADIATOR AIR DEFLECTOR
53291B
10.INSTALL RADIATOR COVER PLATE
53292A
11.INSTALL UPPER RADIATOR SUPPORT SEAL