BRAKE CONTROL / DYNAMIC CONTROL SYSTEMS ELECTRONICALLY CONTROLLED BRAKE SYSTEM C05262A Steering Angle Sensor Module Signal Stuck In Range
DESCRIPTION
The No. 2 skid control ECU (brake actuator assembly) receives signals from the steering sensor via CAN communication.
- HINT:
-
When a malfunction occurs in the communication line to the steering sensor, U012687 is output.
-
If a DTC related to the CAN communication line is output, first troubleshoot the CAN communication line.
| DTC No. | Detection Item | DTC Detection Condition | Trouble Area | DTC Output from | Priority | Note |
|---|---|---|---|---|---|---|
| C05262A | Steering Angle Sensor Module Signal Stuck In Range | Normal communication between the No. 2 skid control ECU (brake actuator assembly) and the steering sensor and abnormal steering sensor zero point. | ·
Steering sensor ·
Wire harness and connector |
Brake/EPB | B | Output ECU: No. 2 skid control ECU (brake actuator assembly) |
WIRING DIAGRAM
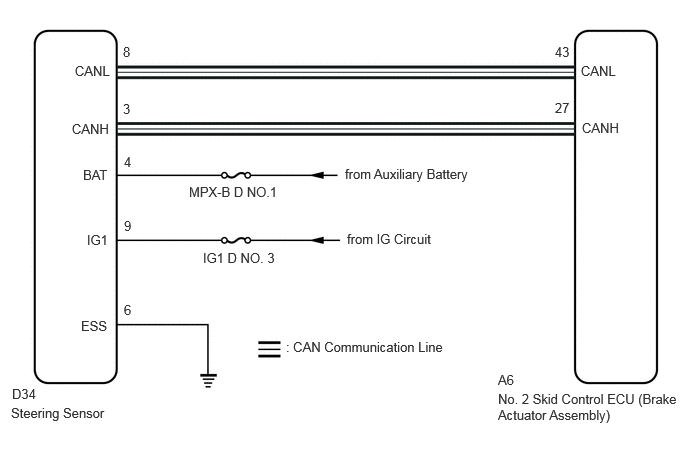
CAUTION / NOTICE / HINT
- NOTICE:
-
Inspect the fuses for circuits related to this system before performing the following procedure.
PROCEDURE
Pre-procedure1
None
Procedure1
Clear the DTCs.
- Chassis > Brake Booster > Clear DTCs
- 50002 466
- Chassis > Brake/EPB > Clear DTCs
- 50002 435
- Result:
Proceed to NEXT
Post-procedure1
Turn the ignition switch off.
NEXT
Pre-procedure1
Turn the ignition switch to ON and check that no CAN communication system DTCs are output.
Turn the ignition switch to ON (READY).
Drive the vehicle at a speed of 35 km/h (22 mph) and turn the steering wheel to the right and left.
Procedure1
Check that no speed sensor and/or yaw rate sensor DTCs are output.
- Chassis > Brake Booster > Trouble Codes
- 50001 466
- Chassis > Brake/EPB > Trouble Codes
- 50001 435
- HINT:
- ·
If a speed sensor, or the yaw rate sensor is malfunctioning, DTCs for the steering sensor may be stored even though the steering sensor is normal.
·If speed sensor and yaw rate sensor DTCs are output simultaneously, repair these malfunctions and then inspect the steering sensor.
- Result:
Result Proceed to DTC C05262A is output. A CAN communication system DTCs are output. B Speed sensor and/or yaw rate sensor DTCs are output. C
Post-procedure1
Turn the ignition switch off.
A
B
Click herePower Source / Network>NETWORKING>CXPI COMMUNICATION SYSTEM>HOW TO PROCEED WITH TROUBLESHOOTING
C
Pre-procedure1
Turn the ignition switch off.
Procedure1
Make sure that there is no looseness at the locking part and the connecting part of the connectors.
- OK:
The connector is securely connected.
Pre-procedure2
Disconnect the D34 steering sensor connector.
Procedure2
Check both the connector case and the terminals for deformation and corrosion.
- OK:
No deformation or corrosion.
Pre-procedure3
Turn the ignition switch to ON.
Procedure3
Measure the voltage according to the value(s) in the table below.
- Standard Voltage:
Tester Connection Condition Specified Condition Click Location & Routing(D34)Location & Routingewd_type=routing;type=c;code=D34
Click Connector(D34)Instrument Panel>Instrument Panel Wire>Steering Sensorewd_type=component;type=c;code=D34;pinno=9
D34-9 (IG1) - Body ground Ignition switch ON 11 to 14 V
- Result:
Proceed to OK NG
Post-procedure1
None
OK
NG
Pre-procedure1
Turn the ignition switch off.
Procedure1
Measure the voltage according to the value(s) in the table below.
- Standard Voltage:
Tester Connection Condition Specified Condition Click Location & Routing(D34)Location & Routingewd_type=routing;type=c;code=D34
Click Connector(D34)Instrument Panel>Instrument Panel Wire>Steering Sensorewd_type=component;type=c;code=D34;pinno=4
D34-4 (BAT) - Body ground Always 11 to 14 V
- Result:
Proceed to OK NG
Post-procedure1
None
OK
NG
Measure the resistance according to the value(s) in the table below.
- Standard Resistance:
Tester Connection Condition Specified Condition Click Location & Routing(D34)Location & Routingewd_type=routing;type=c;code=D34
Click Connector(D34)Instrument Panel>Instrument Panel Wire>Steering Sensorewd_type=component;type=c;code=D34;pinno=6
D34-6 (ESS) - Body ground 1 minute or more after disconnecting the cable from the negative (-) auxiliary battery terminal Below 1 Ω
- Result:
Proceed to OK NG
OK
NG