ADVANCED PARK ADVANCED PARK Vehicle does not Move to Set Parking Position
CAUTION / NOTICE / HINT
- NOTICE:
- ·
Depending on the parts that are replaced or operations that are performed during vehicle inspection or maintenance, calibration of other systems as well as the simple advanced parking guidance system may be needed.
·If initialization is necessary while performing an inspection, perform initialization first and then proceed to the next step.
PROCEDURE
Check that the tire pressure and tire size are as specified.
Check that there is no excessive wear on the tires.
- Result:
Result Proceed to Tire size is as specified and there is no excessive wear A Tire size is not as specified but there is no excessive wear Tire size is as specified but there is excessive wear B Tire size is not as specified and there is excessive wear Tire size is totally different from specified size
A
B
Check advanced park.
Move the vehicle to a flat area with parking lines.
- NOTICE:
-
This check involves moving the vehicle. Use a large area where safety can be assured.
Activate the advanced park and park the vehicle. Check the displacement of the vehicle from the target parking position.
- HINT:
-
Begin the check with the vehicle at a 45° angle to the parking space. Park the vehicle from the right and left side of the parking space.
Check problem symptom
Case 1
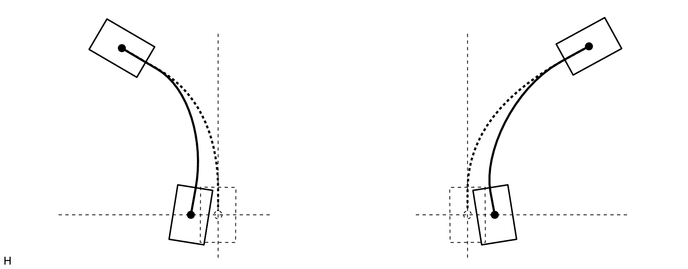
| Problem | Cause | Proceed to |
|---|---|---|
| Vehicle stops as shown in the illustration | ·
Actual turning radius is small ·
Screen out of adjustment |
A |
Case 2
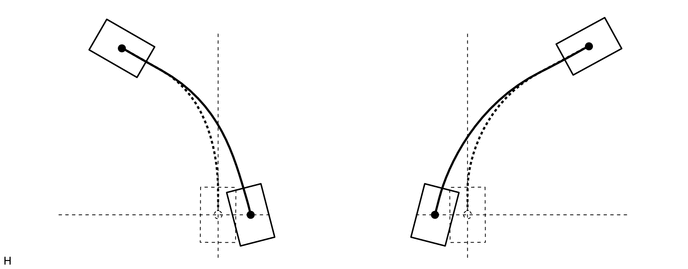
| Problem | Cause | Proceed to |
|---|---|---|
| Vehicle stops as shown in the illustration | ·
Actual turning radius is large ·
Screen out of adjustment |
B |
Case 3
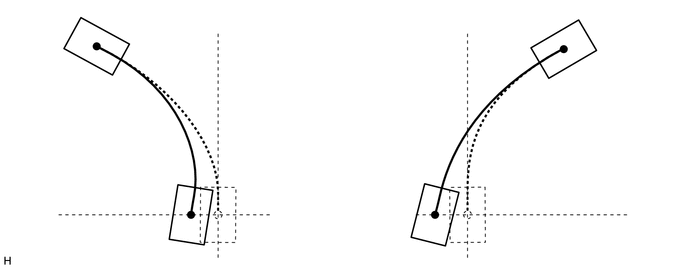
| Problem | Cause | Proceed to |
|---|---|---|
| Vehicle stops as shown in the illustration | ·
Incorrect steering angle adjustment value stored ·
Screen out of adjustment |
C |
Case 4
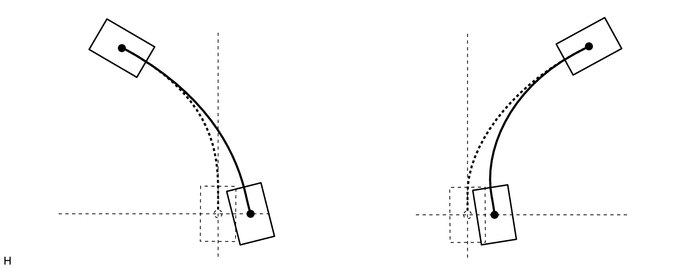
| Problem | Cause | Proceed to |
|---|---|---|
| Vehicle stops as shown in the illustration | ·
Incorrect steering angle adjustment value stored ·
Screen out of adjustment |
C |
Case 5
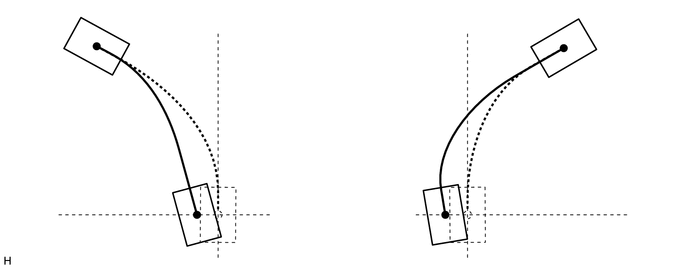
| Problem | Cause | Proceed to |
|---|---|---|
| Vehicle stops as shown in the illustration | ·
Incorrect steering angle adjustment value stored ·
Screen out of adjustment |
C |
Case 6
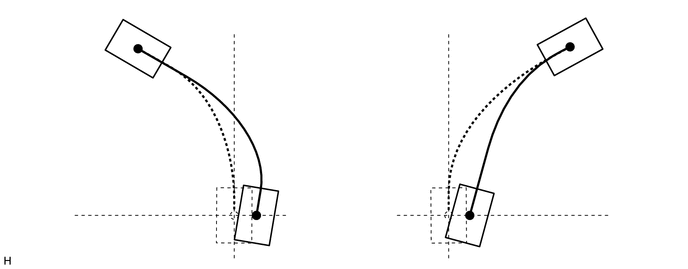
| Problem | Cause | Proceed to |
|---|---|---|
| Vehicle stops as shown in the illustration | ·
Incorrect steering angle adjustment value stored ·
Screen out of adjustment |
C |
- Result:
Result Proceed to Case 1 A Case 2 B Case 3 C Case 4 Case 5 Case 6
A
B
C
Perform the following settings.
Refer to steering angle setting.
Operate the advanced park and check if the malfunction recurs.
- OK:
Returned to normal.
- Result:
Proceed to OK NG
OK
NG
Perform the front wheel alignment inspection.
- HINT:
-
For alignment inspection, follow the toe-in and camber specifications.
-
Click hereSuspension>ALIGNMENT / HANDLING DIAGNOSIS>FRONT WHEEL ALIGNMENT>ADJUSTMENT
- OK:
Alignment is within specifications.
Perform the rear wheel alignment inspection.
- HINT:
-
For alignment inspection, follow the toe-in and camber specifications.
-
Click hereSuspension>ALIGNMENT / HANDLING DIAGNOSIS>REAR WHEEL ALIGNMENT>ADJUSTMENT
- OK:
Alignment is within specifications.
- Result:
Proceed to OK NG
OK
NG
for Front Wheel: Click hereSuspension>ALIGNMENT / HANDLING DIAGNOSIS>FRONT WHEEL ALIGNMENT>ADJUSTMENT
for Rear Wheel: Click hereSuspension>ALIGNMENT / HANDLING DIAGNOSIS>REAR WHEEL ALIGNMENT>ADJUSTMENT
Perform the front wheel alignment inspection.
- HINT:
-
For alignment inspection, follow the toe-in and camber specifications.
-
Click hereSuspension>ALIGNMENT / HANDLING DIAGNOSIS>FRONT WHEEL ALIGNMENT>ADJUSTMENT
- OK:
Alignment is within specifications.
Perform the rear wheel alignment inspection.
- HINT:
-
For alignment inspection, follow the toe-in and camber specifications.
-
Click hereSuspension>ALIGNMENT / HANDLING DIAGNOSIS>REAR WHEEL ALIGNMENT>ADJUSTMENT
- OK:
Alignment is within specifications.
- Result:
Proceed to OK NG
OK
NG
for Front Wheel: Click hereSuspension>ALIGNMENT / HANDLING DIAGNOSIS>FRONT WHEEL ALIGNMENT>ADJUSTMENT
for Rear Wheel: Click hereSuspension>ALIGNMENT / HANDLING DIAGNOSIS>REAR WHEEL ALIGNMENT>ADJUSTMENT
Perform the following settings.
Refer to camera view adjustment.
Operate the advanced park and check if the malfunction recurs.
- OK:
Returned to normal.
- Result:
Proceed to OK NG
OK
NG
Perform the following settings.
Refer to camera view adjustment.
Refer to steering angle setting.
Operate the advanced park and check if the malfunction recurs.
- OK:
Returned to normal.
- Result:
Proceed to OK NG
OK
NG
Perform the front wheel alignment inspection.
- HINT:
-
For alignment inspection, follow the toe-in and camber specifications.
-
Click hereSuspension>ALIGNMENT / HANDLING DIAGNOSIS>FRONT WHEEL ALIGNMENT>ADJUSTMENT
- OK:
Alignment is within specifications.
Perform the rear wheel alignment inspection.
- HINT:
-
For alignment inspection, follow the toe-in and camber specifications.
-
Click hereSuspension>ALIGNMENT / HANDLING DIAGNOSIS>REAR WHEEL ALIGNMENT>ADJUSTMENT
- OK:
Alignment is within specifications.
- Result:
Proceed to OK NG
OK
NG
for Front Wheel: Click hereSuspension>ALIGNMENT / HANDLING DIAGNOSIS>FRONT WHEEL ALIGNMENT>ADJUSTMENT
for Rear Wheel: Click hereSuspension>ALIGNMENT / HANDLING DIAGNOSIS>REAR WHEEL ALIGNMENT>ADJUSTMENT