INTERIOR PANELS / TRIM ROOF HEADLINING INSTALLATION
CAUTION / NOTICE / HINT
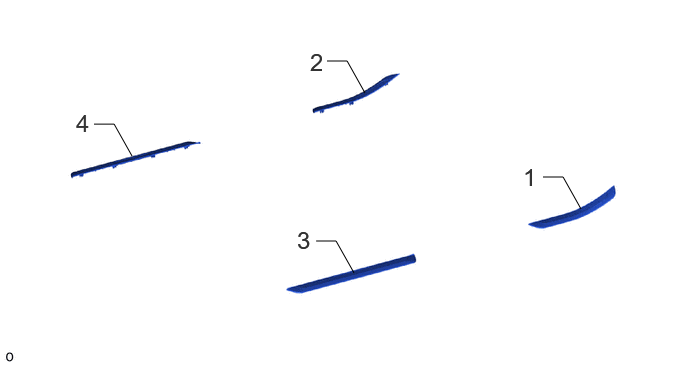
| Procedure | Part Name Code | 
|

|

|
|
|---|---|---|---|---|---|
| 1 | REAR DOOR SCUFF PLATE OUTSIDE LH | 67916 | - | - | - |
| 2 | REAR DOOR SCUFF PLATE OUTSIDE RH | 67915 | - | - | - |
| 3 | FRONT DOOR SCUFF PLATE OUTSIDE LH | 67912A | - | - | - |
| 4 | FRONT DOOR SCUFF PLATE RH | 67911B | - | - | - |
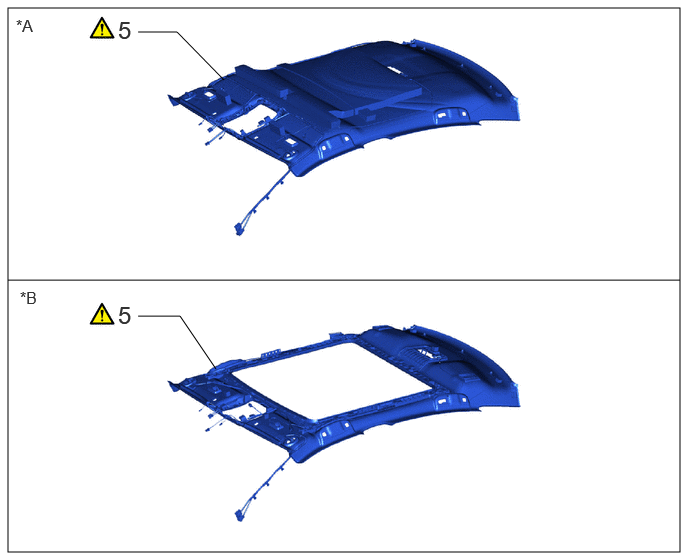
| Procedure | Part Name Code |
|
|
|
|
|---|---|---|---|---|---|
| 5 | ROOF HEADLINING ASSEMBLY | - | ( ) |
- | - |
| *A | for Normal Roof | *B | for Panoramic Moon Roof |
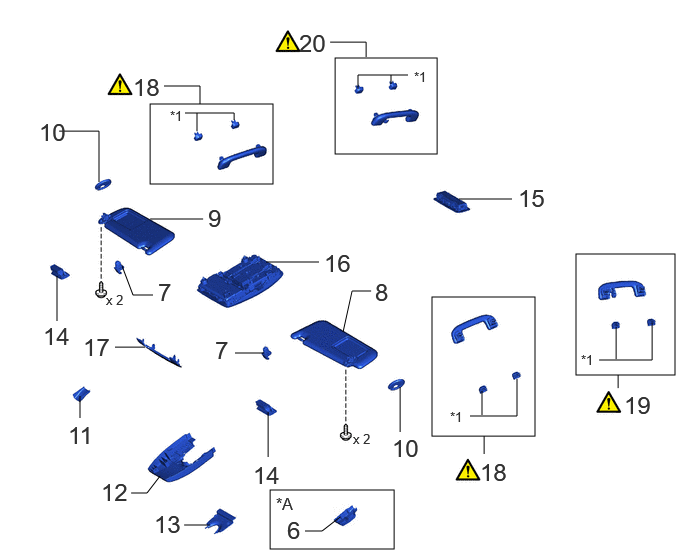
| Procedure | Part Name Code |
|
|
|
|
|---|---|---|---|---|---|
| 6 | TOLL COLLECTION COVER | - | - | - | - |
| 7 | VISOR HOLDER | 74348 | - | - | - |
| 8 | VISOR ASSEMBLY LH | 74320 | - | - | - |
| 9 | VISOR ASSEMBLY RH | 74310 | - | - | - |
| 10 | VISOR BRACKET COVER | 74325 | - | - | - |
| 11 | RAIN SENSOR COVER | 89943 | - | - | - |
| 12 | NO. 1 FORWARD RECOGNITION COVER | 86466D | - | - | - |
| 13 | NO. 2 FORWARD RECOGNITION COVER | 86466E | - | - | - |
| 14 | VANITY LIGHT ASSEMBLY | 81340 | - | - | - |
| 15 | SPOT LIGHT ASSEMBLY | 81360T | - | - | - |
| 16 | MAP LIGHT ASSEMBLY | 81260A | - | - | - |
| 17 | FRONT ROOF TOP GARNISH | 75631L | - | - | - |
| 18 | ASSIST GRIP SUB-ASSEMBLY | 74610A | ()
|
- | - |
| 19 | REAR ASSIST GRIP ASSEMBLY LH | 74630E | ()
|
- | - |
| 20 | REAR ASSIST GRIP ASSEMBLY RH | 74620C | ()
|
- | - |
| *A | w/ ETC System | - | - |
| *1 | ASSIST GRIP COVER | - | - |
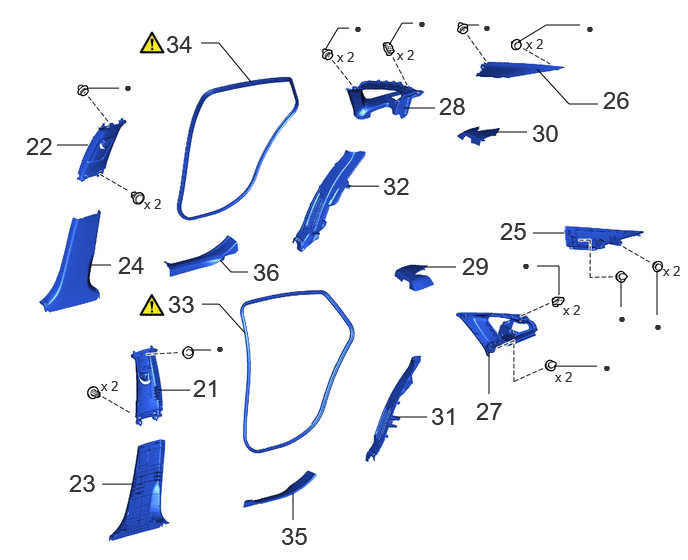
| Procedure | Part Name Code |
|
|
|
|
|---|---|---|---|---|---|
| 21 | CENTER PILLAR GARNISH ASSEMBLY LH | 62420A | - | - | - |
| 22 | CENTER PILLAR GARNISH ASSEMBLY RH | 62410A | - | - | - |
| 23 | LOWER CENTER PILLAR GARNISH LH | 62414A | - | - | - |
| 24 | LOWER CENTER PILLAR GARNISH RH | 62413A | - | - | - |
| 25 | ROOF SIDE RAIL GARNISH ASSEMBLY LH | 62440 | - | - | - |
| 26 | ROOF SIDE RAIL GARNISH ASSEMBLY RH | 62430 | - | - | - |
| 27 | INNER ROOF SIDE GARNISH ASSEMBLY LH | 62480A | - | - | - |
| 28 | INNER ROOF SIDE GARNISH ASSEMBLY RH | 62470A | - | - | - |
| 29 | INNER ROOF SIDE GARNISH COVER LH | 62488A | - | - | - |
| 30 | INNER ROOF SIDE GARNISH COVER RH | 62487A | - | - | - |
| 31 | REAR SEAT SIDE GARNISH LH | 62552F | - | - | - |
| 32 | REAR SEAT SIDE GARNISH RH | 62551F | - | - | - |
| 33 | REAR DOOR OPENING TRIM WEATHERSTRIP LH | 62332A | ()
|
- | - |
| 34 | REAR DOOR OPENING TRIM WEATHERSTRIP RH | 62331A | ()
|
- | - |
| 35 | REAR DOOR SCUFF PLATE INSIDE LH | 67918F | - | - | - |
| 36 | REAR DOOR SCUFF PLATE INSIDE RH | 67917F | - | - | - |
| ● | Non-reusable part | - | - |
| Procedure | Part Name Code |
|
|
|
|
|---|---|---|---|---|---|
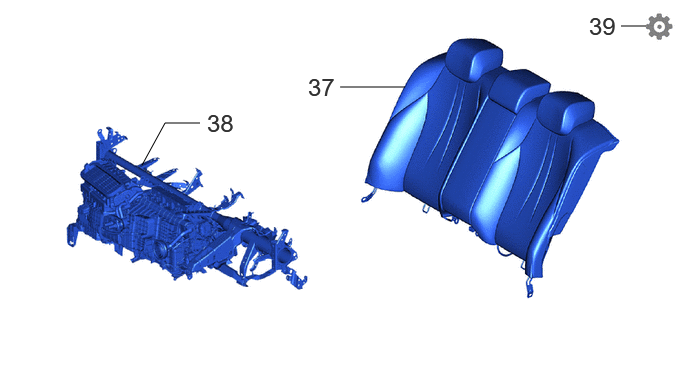
| 37 | BENCH TYPE REAR SEATBACK ASSEMBLY | - | - | - | - |
| 38 | INSTRUMENT PANEL REINFORCEMENT ASSEMBLY WITH AIR CONDITIONING UNIT ASSEMBLY | - | - | - | - |
| 39 | INITIALIZATION AFTER RECONNECTING AUXILIARY BATTERY TERMINAL | - | - | - | ()
|
- HINT:
- ·
Use the same procedure for RHD and LHD vehicles.
·The procedure listed below is for LHD vehicles.
PROCEDURE

 67916
1.INSTALL REAR DOOR SCUFF PLATE OUTSIDE LH
67915
2.INSTALL REAR DOOR SCUFF PLATE OUTSIDE RH
67912A
3.INSTALL FRONT DOOR SCUFF PLATE OUTSIDE LH
67911B
4.INSTALL FRONT DOOR SCUFF PLATE RH
5.INSTALL ROOF HEADLINING ASSEMBLY
for Normal Roof:
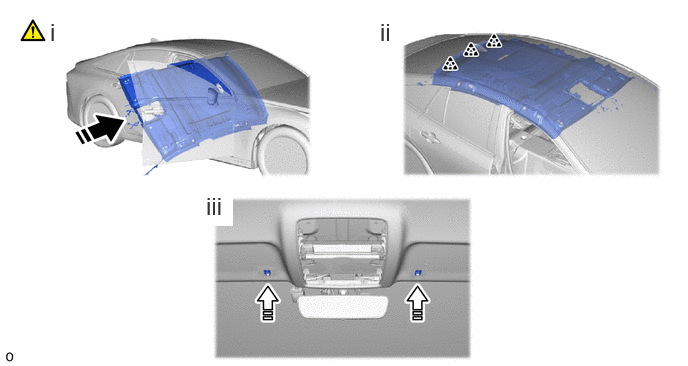

|
Install in this Direction (1) | 
|
Install in this Direction (2) |
Put the roof headlining assembly into the vehicle through the front door RH as shown in the illustration.
- NOTICE:
- ·
Installation of the roof headlining assembly must be performed by multiple people to prevent deformation of the roof headlining assembly.
·Check that the corners of the roof headlining are not folded, twisted or otherwise deformed and that none of the mounted parts have fallen off.
·Make sure that the roof headlining does not get caught on anything as it may become bent or damaged.
·Do not damage the roof headlining or vehicle interior.
Attach the clip to install the roof headlining assembly.
Install the visor holder base as shown in the illustration.
for Panoramic Moon Roof:
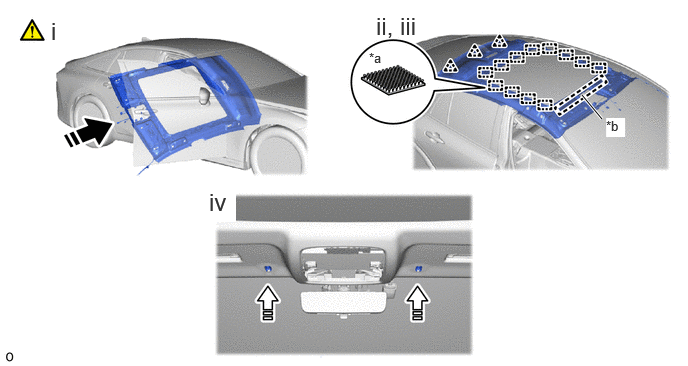
| *a | Fastener | *b | Guide |
|
|
Install in this Direction (1) |
|
Install in this Direction (2) |
Put the roof headlining assembly into the vehicle through the front door RH as shown in the illustration.
- NOTICE:
- ·
Installation of the roof headlining assembly must be performed by multiple people to prevent deformation of the roof headlining assembly.
·Check that the corners of the roof headlining are not folded, twisted or otherwise deformed and that none of the mounted parts have fallen off.
·Make sure that the roof headlining does not get caught on anything as it may become bent or damaged.
·Do not damage the roof headlining or vehicle interior.
Attach the guide to set the roof headlining assembly.
Attach the fastener and clip to install the roof headlining assembly.
Install the visor holder base as shown in the illustration.
w/ ETC System:

Connect the connector.
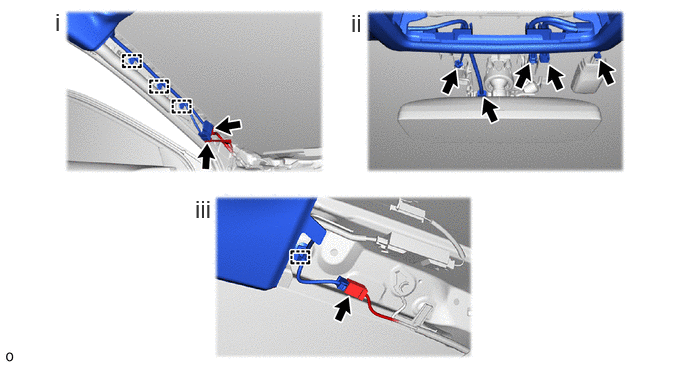
for Front Pillar LH Side:
1. Remove the protective cover installed to the front pillar LH.
2. Attach the clamp.
3. Connect the 2 connectors.
4. Install the protective cover to the front pillar LH.
for Windshield Glass Side:
1. Connect each connector.
for Rear Pillar RH Side:
1. Attach the clamp.
2. Connect the connector.
6.INSTALL TOLL COLLECTION COVER (w/ ETC System)
74348
7.INSTALL VISOR HOLDER
74320
8.INSTALL VISOR ASSEMBLY LH
74310
9.INSTALL VISOR ASSEMBLY RH
74325
10.INSTALL VISOR BRACKET COVER
89943
11.INSTALL RAIN SENSOR COVER
86466D
12.INSTALL NO. 1 FORWARD RECOGNITION COVER
86466E
13.INSTALL NO. 2 FORWARD RECOGNITION COVER
81340
14.INSTALL VANITY LIGHT ASSEMBLY
81360T
15.INSTALL SPOT LIGHT ASSEMBLY
81260A
16.INSTALL MAP LIGHT ASSEMBLY
75631L
17.INSTALL FRONT ROOF TOP GARNISH
74610A
18.INSTALL ASSIST GRIP SUB-ASSEMBLY
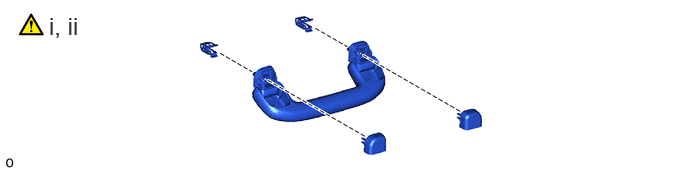
Install the 2 clips to the assist grip sub-assembly.
Temporarily install the 2 assist grip covers to the assist grip sub-assembly as shown in the illustration.
- HINT:
-
Use the same procedure described for the opposite side.
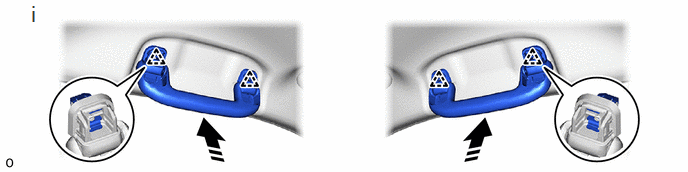
|
|
Install in this Direction | - | - |
Attach the clip to install the assist grip sub-assembly as shown in the illustration.
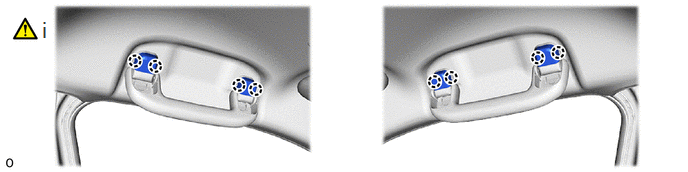
Attach the clip to install the 4 assist grip covers.
- NOTICE:
-
Check that the 4 clips are securely attached.
74630E
19.INSTALL REAR ASSIST GRIP ASSEMBLY LH
Use the same procedure described for the assist grip sub-assembly.
74620C
20.INSTALL REAR ASSIST GRIP ASSEMBLY RH
Use the same procedure described for the assist grip sub-assembly.
62420A
21.INSTALL CENTER PILLAR GARNISH ASSEMBLY LH
62410A
22.INSTALL CENTER PILLAR GARNISH ASSEMBLY RH
62414A
23.INSTALL LOWER CENTER PILLAR GARNISH LH
62413A
24.INSTALL LOWER CENTER PILLAR GARNISH RH
62440
25.INSTALL ROOF SIDE RAIL GARNISH ASSEMBLY LH
62430
26.INSTALL ROOF SIDE RAIL GARNISH ASSEMBLY RH
62480A
27.INSTALL INNER ROOF SIDE GARNISH ASSEMBLY LH
62470A
28.INSTALL INNER ROOF SIDE GARNISH ASSEMBLY RH
62488A
29.INSTALL INNER ROOF SIDE GARNISH COVER LH
62487A
30.INSTALL INNER ROOF SIDE GARNISH COVER RH
62552F
31.INSTALL REAR SEAT SIDE GARNISH LH
62551F
32.INSTALL REAR SEAT SIDE GARNISH RH
62332A
33.INSTALL REAR DOOR OPENING TRIM WEATHERSTRIP LH
|
|
Click here()
|
62331A
34.INSTALL REAR DOOR OPENING TRIM WEATHERSTRIP RH
Use the same procedure described for the LH side.
67918F
35.INSTALL REAR DOOR SCUFF PLATE INSIDE LH
67917F
36.INSTALL REAR DOOR SCUFF PLATE INSIDE RH
37.INSTALL BENCH TYPE REAR SEATBACK ASSEMBLY
38.INSTALL INSTRUMENT PANEL REINFORCEMENT ASSEMBLY WITH AIR CONDITIONING UNIT ASSEMBLY
39. INITIALIZATION AFTER RECONNECTING AUXILIARY BATTERY TERMINAL
Click hereGeneral>SETUP>WHEN DISCONNECTING OR RECONNECTING BATTERY TERMINAL>WORK PROCEDURE
- HINT:
-
When disconnecting and reconnecting the auxiliary battery, there is an automatic learning function that completes learning when the respective system is used.
-
Click hereGeneral>SETUP>WHEN DISCONNECTING OR RECONNECTING BATTERY TERMINAL>AUTOMATIC LEARNING CHART