DOOR / HATCH LUGGAGE CLOSER ECU REMOVAL
CAUTION / NOTICE / HINT
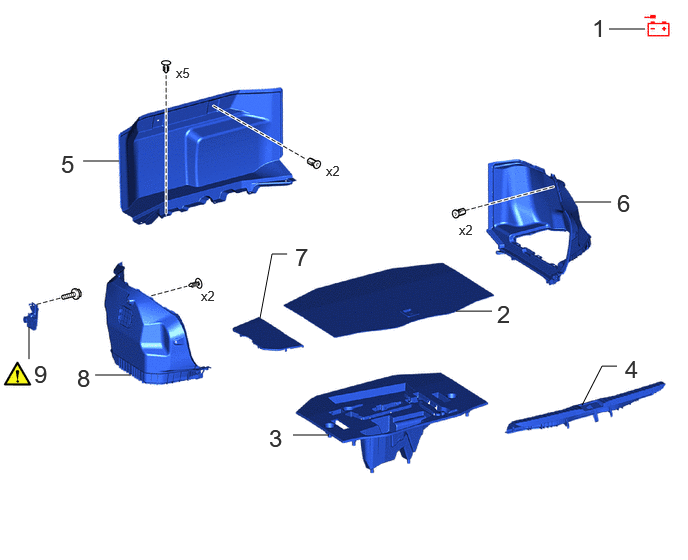
| Procedure | Part Name Code | 
|

|

|
|
|---|---|---|---|---|---|
| 1 | DISCONNECT CABLE FROM NEGATIVE AUXILIARY BATTERY TERMINAL | - | - | - | - |
| 2 | LUGGAGE COMPARTMENT MAT SUB-ASSEMBLY | 64701 | - | - | - |
| 3 | TOOL BOX | 75201A | - | - | - |
| 4 | REAR FLOOR FINISH PLATE | 58387 | - | - | - |
| 5 | FRONT LUGGAGE COMPARTMENT TRIM COVER | 64075B | - | - | - |
| 6 | LUGGAGE COMPARTMENT TRIM COVER INNER RH | 64721 | - | - | - |
| 7 | LUGGAGE COMPARTMENT TRIM COVER LH | 64715D | - | - | - |
| 8 | LUGGAGE COMPARTMENT TRIM COVER INNER LH | 64722 | - | - | - |
| 9 | MULTIPLEX NETWORK DOOR ECU | 89222A | ( ) |
- | - |
CAUTION / NOTICE / HINT
The necessary procedures (adjustment, initialization or registration) that must be performed after parts are removed, installed or replaced during the front door disassembly are shown below.
| Replacement Part | Necessary Procedure | Effect/Inoperative Function When Necessary Procedures are not Performed | Link |
|---|---|---|---|
| Disconnect cable from negative (-) auxiliary battery terminal | Memorize steering angle neutral point | Parking assist monitor system | ()
|
| Panoramic view monitor system | ()
|
- HINT:
-
When the cable is disconnected/reconnected to the auxiliary battery terminal, systems temporarily stop operating. However, each system has a function that completes learning the first time the system is used.
- ·
Learning completes when vehicle is driven
Effect/Inoperative Function When Necessary Procedures are not Performed Necessary Procedures Link *: This can be completed by doing this for 30 seconds continuously or for a total of 30 seconds intermittently.
Lane tracing assist system (for Mono camera type) Drive the vehicle straight ahead at 35 km/h (22 mph) or more for 5 seconds or more. for Stereo Camera Type:
-
for Mono Camera Type:
()
Lane tracing assist system (for Stereo camera type) Pre-collision system (for Mono camera type) Pre-collision system (for Stereo camera type) Lighting system (EXT) Advanced drive system Drive the vehicle straight ahead at a vehicle speed of 35 km/h or higher for 30 seconds* or more. -
- ·
Learning completes when vehicle is operated normally
Effect/Inoperative Function When Necessary Procedures are not Performed Necessary Procedures Link Air conditioning system After the ignition switch is turned to ON, the servo motor and expansion valve standard position is recognized. -
·Use the same procedure for the RH and LH sides.
·The procedure listed below is for the LH side.
·When removing the front door glass sub-assembly LH, move the front door glass sub-assembly LH to the lowest position before disconnecting the auxiliary battery negative (-) terminal.
PROCEDURE

 1.DISCONNECT CABLE FROM NEGATIVE AUXILIARY BATTERY TERMINAL
|
|
|
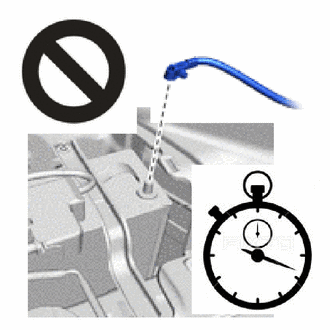
64701
2.REMOVE LUGGAGE COMPARTMENT MAT SUB-ASSEMBLY

75201A
3.REMOVE TOOL BOX

58387
4.REMOVE REAR FLOOR FINISH PLATE
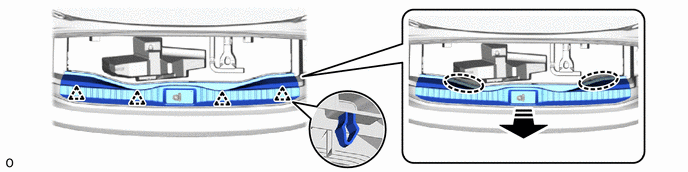
64075B
5.REMOVE FRONT LUGGAGE COMPARTMENT TRIM COVER

64721
6.REMOVE LUGGAGE COMPARTMENT TRIM COVER INNER RH

64715D
7.REMOVE LUGGAGE COMPARTMENT TRIM COVER LH

64722
8.REMOVE LUGGAGE COMPARTMENT TRIM COVER INNER LH

89222A
9.REMOVE MULTIPLEX NETWORK DOOR ECU
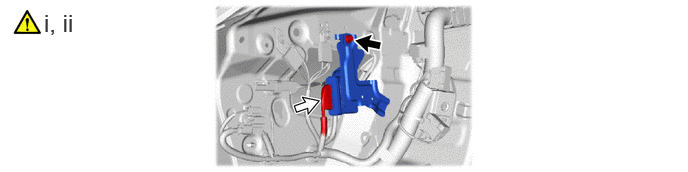

|
Bolt | 
|
Connector |
Remove the bolt.
Disconnect the connector and remove the multiplex network door ECU.
- NOTICE:
-
Do not has been struck or dropped.