Home › ENGINE › 1NZ-FXE ENGINE CONTROL SYSTEM › SFI SYSTEM

DTC    P0420    Catalyst System Efficiency Below Threshold (Bank 1)

for Preparation Click here


MONITOR DESCRIPTION

The ECM uses 2 sensors mounted before and after the three-way catalytic converter (TWC) to monitor its efficiency. The air-fuel ratio (A/F) sensor (sensor 1) sends pre-catalyst information to the ECM. The heated oxygen (O2) sensor (sensor 2) sends post-catalyst information to the ECM.
In order to detect deterioration in the catalyst, the ECM calculates Oxygen Storage Capacity (OSC) in the catalyst based on voltage output of sensor 2 while performing "active air-fuel ratio control" instead of the conventional detecting method which uses the locus ratio.
The OSC is an indication value of the catalyst oxygen storage capacity and is used for representing how much the catalyst can store oxygen. When the vehicle is being driven with a warm engine, the active air-fuel ratio control is performed for approximately 15 to 20 seconds. When it is performed, the air-fuel ratio is forcibly regulated to be LEAN or RICH by the ECM, and if a RICH and LEAN cycle of sensor 2 is long, the OSC will become greater. The greater OSC and capability of the catalyst are mutually related. The ECM judges if the catalyst has deteriorated based on the calculated OSC value. The ECM will illuminate the MIL and a DTC will be set.

DTC No.
DTC Detection Condition
Trouble Area
P0420
OSC value is smaller than the standard value under "active air-fuel ratio control"
  1. Gas leakage in exhaust system
  2. A/F sensor
  3. Heated oxygen sensor
  4. Front exhaust pipe assembly (3-way catalytic converter)

HINT:
  1. Sensor 1 refers to the sensor mounted before the TWC and is located near the engine assembly.
  2. Sensor 2 refers to the sensor mounted after the TWC and is located far from the engine assembly.


MONITOR STRATEGY


Related DTCs
P0420: Bank 1 catalyst is deteriorated
Required sensors/components
Main:
A/F sensor, heated oxygen sensor
Related:
Mass air flow meter, engine coolant temperature sensor, engine speed sensor, intake air temperature sensor
Frequency of operation
Once per driving cycle
Duration
30 seconds
MIL operation
2 driving cycles
Sequence of operation
None

TYPICAL ENABLING CONDITIONS


The monitor will run whenever the following DTCs are not present
P0011 (VVT system 1 - Advance)
P0012 (VVT system 1 - Retard)
P0031, P0032 (A/F sensor heater - Sensor 1)
P0037, P0038 (O2 sensor heater - Sensor 2)
P0100 - P0103 (MAF meter)
P0115 - P0118 (ECT sensor)
P0120 - P0223, P2135 (TP sensor)
P0125 (Insufficient ECT for closed loop)
P0136 (O2 sensor - Sensor 2)
P0171, P0172 (Fuel system)
P0300 - P0304 (Misfire)
P0335 (CKP sensor)
P0340, P0341 (CMP sensor)
P0351-P0354 (Igniter)
P0500 (VSS)
P2196 (A/F sensor - Rationality)
P2237 (A/F sensor - Open)
P2A00 (A/F sensor - Slow response)
Battery voltage
11.0 V or more
Intake air temperature
-10 °C (14°F) or more
Engine coolant temperature
70°C (158°F) or more
Atomospheric pressure
75.981 kPa (570 mmHg) or more
Idle
OFF
Engine speed
Less than 3,200 rpm
A/F sensor
Activated
Fuel system status
Closed-loop
Engine load
10 to 70 %
All of the following condition are met:
1.2 and 3
1. MAF
5 to 30 glsec.
2. Front catalyst temperature (estimated)
420 to 800°C (788 to 1472°F)
3. Rear catalyst temperature (estimated)
Less than 290°C (554°F)
A/F sensor monitor
Completed
Rear HO2S monitor
Completed

TYPICAL MALFUNCTION THRESHOLDS


Oxygen storage capacity (OSC) of catalyst
Less than 0.03 g

MONITOR RESULT

Refer to detailed information (Click here).

CONFIRMATION DRIVING PATTERN

  1. PURPOSE (Click here)

HINT:
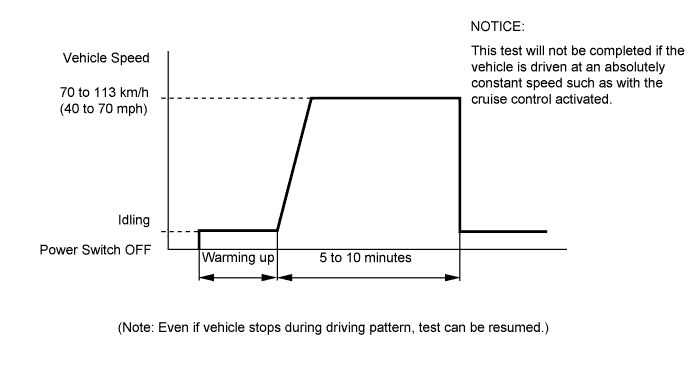
Performing this confirmation pattern will activate the catalyst monitoring by the ECM. This is very useful for verifying the completion of repairs.


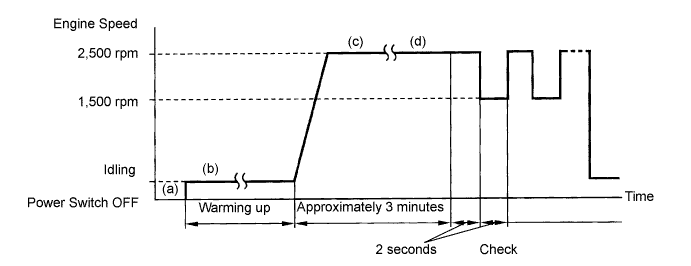
A154404E01

(a) Clear the DTCs.
(b) Connect Techstream to the DLC3.
(c) Enter the following menus: Powertrain / Engine and ECT / Monitor. Check that Catalyst Efficiency is incomplete.
(d) Drive the vehicle according to the confirmation driving pattern. Note the state of the Readiness Tests. They will change to complete as the Catalyst Efficiency evaluation monitors operate.
(e) Enter the following menus: Powertrain / Engine and ECT / Trouble Code / Pending. Check if any DTC (any pending code) is set.
If the READINESS CODE of Catalyst Efficiency was incomplete and any DTC (includes pending codes) was not set, extend the driving time.

NOTICE:
If you do not have Techstream, perform again the same confirmation driving pattern after turning OFF the power switch upon finishing the first confirmation driving pattern.


CONDITIONING FOR SENSOR TESTING


A092787E01

(a) Connect Techstream to the DLC3.
(b) Put the engine in inspection mode (Click here).
(c) Start the engine and warm it up with all the accessories switched OFF until the engine coolant temperature becomes stable.
(d) Run the engine at 2,500 rpm for approximately 3 minutes.
(e) Run the engine at 2,500 rpm for 2 seconds and then 1,500 rpm for 2 seconds.
(f) Check the waveform of the oxygen sensor (sensor 2).

HINT:
If output of the A/F sensor or the heated oxygen sensor does not fluctuate or has noise, the sensor may be malfunctioning.
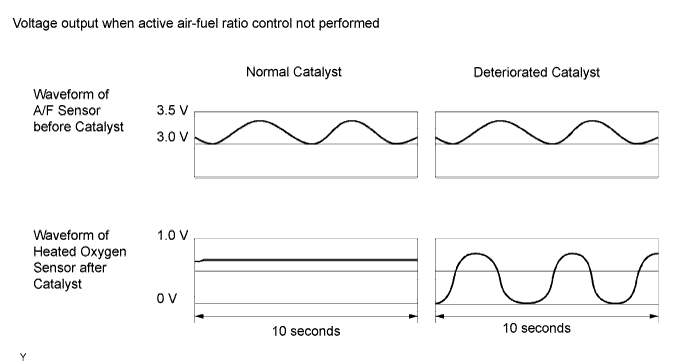
If voltage output of both sensors remain at LEAN or RICH, the air-fuel ratio may be extremely LEAN or RICH. In such a case, perform the following Control the Injection Volume for A/F Sensor operation in Active Test using Techstream. If the catalyst has deteriorated, the voltage output of the heated oxygen sensor fluctuates up and down widely even under normal driving ("active air-fuel ratio control" is not performed).


A076893E07


INSPECTION PROCEDURE

HINT:
  1. Read freeze frame data using Techstream. The ECM records vehicle and driving condition information as freeze frame data the moment a DTC is stored. When troubleshooting, freeze frame data can be helpful in determining whether the vehicle was running or stopped, whether the engine was warmed up or not, whether the air/fuel ratio was lean or rich, as well as other data recorded at the time of a malfunction.
  2. Malfunctioning areas can be found by performing the Control the Injection Volume for A/F Sensor operation. The Control the Injection Volume for A/F Sensor operation can determine if the A/F sensor, heated oxygen sensor or other potential trouble area are malfunctioning or not.
    (a) Perform the Control the Injection Volume for A/F Sensor operation.
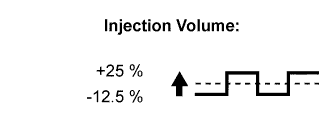
  3. The Control the Injection Volume for A/F Sensor operation lowers the injection volume 12.5% or increases the injection volume 25%.
    (1) Connect Techstream to the DLC3.
    (2) Turn the power switch ON (IG).
    (3) Put the engine in inspection mode (Click here).
    (4) Warm up the engine by running the engine at 2,500 rpm, depressing the accelerator pedal more than 60% for approximately 90 seconds.
    (5) Enter the following menus: Powertrain / Engine and ECT / Active Test / Control the Injection Volume for A/F Sensor.
    (6) Perform the Control the Injection Volume for A/F Sensor operation with the engine in an idle condition (press the right or left button).

    Result:
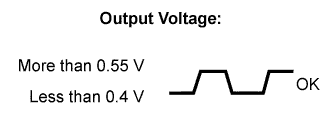
    A/F sensor reacts in accordance with increase and decrease of injection volume:
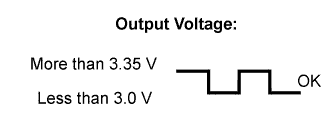
    +25% → rich output: Less than 3.0 V
    -12.5% → lean output: More than 3.35 V
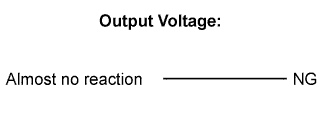
    Heated oxygen sensor reacts in accordance with increase and decrease of injection volume:
    +25% → rich output: More than 0.55 V
    -12.5% → lean output: Less than 0.4 V

NOTICE:
The A/F sensor output has a few seconds of delay and the heated oxygen sensor output has about 20 seconds of delay at maximum.


Case
A/F Sensor (Sensor 1)
Output Voltage
HO2 Sensor (Sensor 2)
Output Voltage
Main Suspected Trouble Area
1
A150444E03
A150447E02
A150444E03
A150446E02
-
2
A150444E03
A150445E02
A150444E03
A150446E02
  1. A/F sensor
  2. A/F sensor heater
  3. A/F sensor circuit
3
A150444E03
A150447E02
A150444E03
A150445E02
  1. HO2 sensor
  2. HO2 sensor heater
  3. HO2 sensor circuit
4
A150444E03
A150445E02
A150444E03
A150445E02
  1. Fuel pressure
  2. Gas leakage from exhaust system
    (Air-fuel ratio extremely lean or rich)
The following Control the Injection Volume for A/F Sensor procedure enables the technician to check and graph the voltage output of both A/F sensor and heated oxygen sensor.
To display the graph, enter Powertrain / Engine and ECT / Active Test / Control the Injection Volume for A/F Sensor / A/F Control System / AFS B1 S1 and O2S B1 S2 then press the graph button on the Data List view.
1.CHECK OTHER DTC OUTPUT (IN ADDITION TO DTC P0420)
  1. Connect Techstream to the DLC3.

  1. Turn the power switch ON (IG).

  1. Turn Techstream ON.

  1. Enter the following menus: Powertrain / Engine and ECT / Trouble Code.

  1. Read the DTCs.

    Result:
    Display (DTC Output)
    Proceed to
    P0420
    A
    P0420 and other DTCs
    B

    HINT:
    If any other codes besides P0420 are output, perform troubleshooting for those DTCs first.


B
GO TO DTC CHART
A


2.PERFORM ACTIVE TEST BY TECHSTREAM (A/F CONTROL)
  1. Connect Techstream to the DLC3.

  1. Put the engine in inspection mode (Click here).

  1. Turn the tester on.

  1. Warm up the engine at an engine speed of 2,500 rpm for approximately 90 seconds.

  1. On the tester, select the following menu items: Powertrain / Engine and ECT / Active Test / Control the Injection Volume for A/F sensor.

  1. Perform the Control the Injection Volume for A/F sensor operation with the engine in an idling condition (press the RIGHT or LEFT button to change the fuel injection volume).

  1. Monitor the voltage outputs of the A/F and HO2 sensors (AFS B1 S1 and O2S B1 S2) displayed on the tester.

    Result:
    A/F sensor reacts in accordance with increases and decreases in fuel injection volume:
    +25% = Rich output:
    Less than 3.0 V
    -12.5% = Lean output:
    More than 3.35 V

    NOTICE:
    The A/F sensor has an output delay of a few seconds and the HO2 sensor has a maximum output delay of approximately 20 seconds.


    Case
    A/F Sensor (Sensor 1)
    Output Voltage
    HO2 Sensor (Sensor 2)
    Output Voltage
    Main Suspected Trouble Area
    1
    A150444E03
    A150447E02
    A150444E03
    A150446E02
    -
    2
    A150444E03
    A150445E02
    A150444E03
    A150446E02
    1. A/F sensor
    2. A/F sensor heater
    3. A/F sensor circuit
    3
    A150444E03
    A150447E02
    A150444E03
    A150445E02
    1. HO2 sensor
    2. HO2 sensor heater
    3. HO2 sensor circuit
    4
    A150444E03
    A150445E02
    A150444E03
    A150445E02
    1. Fuel pressure
    2. Gas leakage from exhaust system
      (Air-fuel ratio extremely lean or rich)
    1. Following the Control the Injection Volume for A/F sensor procedure enables technicians to check and graph the voltage outputs of both the A/F and HO2 sensors.
    2. To display the graph, select the following menu items on the tester: Powertrain / Engine and ECT / Active Test / Control the Injection Volume for A/F Sensor / A/F Control System / AFS B1 S1 and O2S B1 S2 then press the graph button on the Data List view.

    Result:

    Result
    Proceed to
    Case 1
    A
    Case 2
    B
    Case 3
    C
    Case 4
    D


B
REPLACE AIR FUEL RATIO SENSOR

C
Go to step 4

D
CHECK AND REPAIR CAUSES OF EXTREMELY RICH OR LEAN ACTUAL AIR FUEL RATIO, AND GO TO STEP 3
A


3.INSPECT FOR EXHAUST GAS LEAK
  1. Check for exhaust gas leakage.

OK:
No gas leakage.


NG
REPAIR OR REPLACE EXHAUST GAS LEAKAGE POINT
OK

REPLACE FRONT EXHAUST PIPE ASSEMBLY 

4.INSPECT FOR EXHAUST GAS LEAK
  1. Check for exhaust gas leakage.

OK:
No gas leakage.


NG
REPAIR OR REPLACE EXHAUST GAS LEAKAGE POINT
OK

REPLACE HEATED OXYGEN SENSOR