Home › ENGINE › 1NZ-FXE ENGINE CONTROL SYSTEM › SFI SYSTEM

DTC    P2A00    A/F Sensor Circuit Slow Response (Bank 1 Sensor 1)

for Preparation Click here


DESCRIPTION

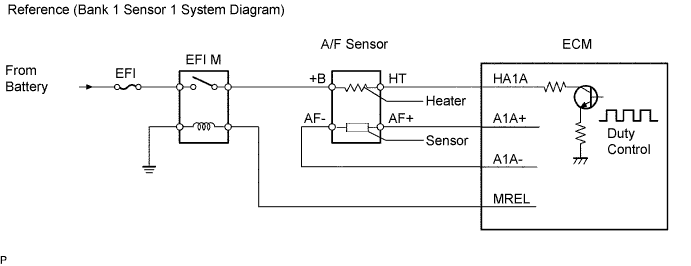
Refer to DTC P2195 (Click here).

DTC No.
DTC Detection Condition
Trouble Area
P2A00
When A/F sensor output voltage change is below compared to fuel trim change, ECM judges that A/F sensor circuit response is slow if conditions (a), (b) and (c) are met (2 trip detection logic):
(a) After engine is warmed up
(b) Engine speed is 1,100 rpm or more
(c) Vehicle speed 37.5 mph (60 km/h) or more
  1. Open or short in A/F sensor (bank 1 sensor 1) circuit
  2. A/F sensor (bank 1 sensor 1)
  3. A/F sensor heater
  4. EFI M relay
  5. A/F sensor heater and relay circuit
  6. Air induction system
  7. Fuel pressure
  8. Injector
  9. PCV hose connection
  10. ECM

HINT:
Sensor 1 refers to the sensor mounted before the TWC and is located near the engine assembly.


MONITOR DESCRIPTION


A082390E04

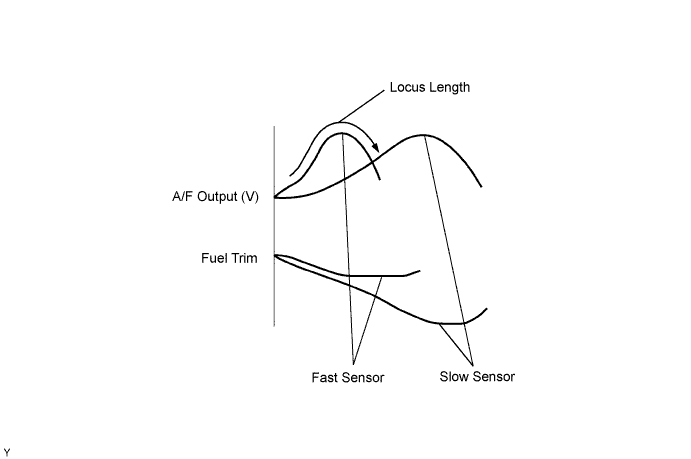
The air fuel-ratio (A/F) sensor varies its output voltage in proportion to the air-fuel ratio. Based on the output voltage, the ECM determines if the air-fuel ratio is RICH or LEAN and adjusts the stoichiometric air-fuel ratio.
The ECM also checks the fuel injection volume compensation value to check if the A/F sensor is deteriorating or not. The output voltage variation, known as locus length, should be high when the air-fuel ratio fluctuates.
When the A/F sensor response rate has deteriorated, the locus length should be short.
The ECM concludes that there is a malfunction in the A/F sensor when the locus length is short and the response rate has deteriorated.

MONITOR STRATEGY


Related DTCs
P2A00: A/F sensor circuit slow response
Required sensors/components
Main:
A/F sensor
Related:
Engine speed sensor, vehicle speed sensor
Frequency of operation
Once per driving cycle
Duration
60 seconds
MIL operation
2 driving cycles
Sequence of operation
None

TYPICAL ENABLING CONDITIONS


The monitor will run whenever the following DTCs are not present
P0031, P0032 (A/F sensor heater - Sensor 1)
P0100 - P0103 (MAF meter)
P0110 - P0113 (IAT sensor)
P0115 - P0118 (ECT sensor)
P0120 - P0223, P2135 (TP sensor)
P0125 (Insufficient ECT for closed loop)
P0171, P0172 (Fuel system)
P0300 - P0304 (Misfire)
P0335 (CKP sensor)
P0340, P0341 (CMP sensor)
P0442 - P0456 (EVAP system)
P0500 (VSS)
P2196 (A/F sensor - Rationality)
Engine
Running
Time after first engine start
120 seconds or more
Fuel system status
Closed-loop
A/F sensor status
Activated
Idle
OFF
Engine speed
1,100 rpm or more, and less than 3,400 rpm
Vehicle speed
37.5 mph (60 km/h) or more, and Less than 75 mph (120 km/h)
Fuel cut
OFF

TYPICAL MALFUNCTION THRESHOLDS


Response rate deterioration level
8 or more

COMPONENT OPERATING RANGE


Heated oxygen sensor heater current
0.4 to 1.0 A (during idling and battery voltage 11 to 14 V)

MONITOR RESULT

Refer to detailed information (Click here).

WIRING DIAGRAM

Refer to DTC P2195 .

INSPECTION PROCEDURE

HINT:
Malfunctioning areas can be found by performing the Powertrain / Engine and ECT / Active Test / Control the Injection Volume for A/F Sensor operation. The Control the Injection Volume for A/F Sensor operation can determine if the A/F sensor, heated oxygen sensor or other potential trouble area are malfunctioning or not.

(a) Perform the Control the Injection Volume for A/F Sensor operation.

HINT:
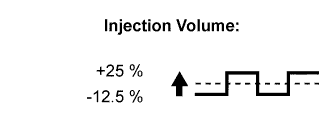
The Control the Injection Volume for A/F Sensor operation lowers the injection volume 12.5% or increases the injection volume 25%.

(1) Connect Techstream to the DLC3.
(2) Turn the power switch ON (IG).
(3) Put the engine in inspection mode (Click here).
(4) Warm up the engine by running the engine at 2,500 rpm, depressing the accelerator pedal more than 60% for approximately 90 seconds.
(5) Enter the following menus: Powertrain / Engine and ECT / Active Test / Control the Injection Volume for A/F Sensor.
(6) Perform the Control the Injection Volume for A/F Sensor operation with the engine in an idle condition (press the right or left button).

Result:
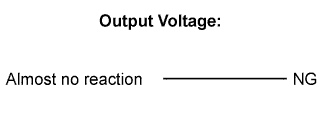
A/F sensor reacts in accordance with increase and decrease of injection volume:
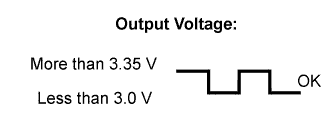
+25% → rich output: Less than 3.0 V
-12.5% → lean output: More than 3.35 V
Heated oxygen sensor reacts in accordance with increase and decrease of injection volume:
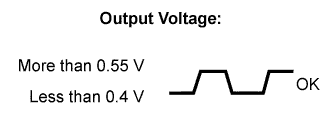
+25% → rich output: More than 0.55 V
-12.5% → lean output: Less than 0.4 V

NOTICE:
The A/F sensor output has a few seconds of delay and the heated oxygen sensor output has about 20 seconds of delay at maximum.


Case
A/F Sensor (Sensor 1)
Output Voltage
HO2 Sensor (Sensor 2)
Output Voltage
Main Suspected Trouble Area
1
A150444E03
A150447E02
A150444E03
A150446E02
-
2
A150444E03
A150445E02
A150444E03
A150446E02
  1. A/F sensor
  2. A/F sensor heater
  3. A/F sensor circuit
3
A150444E03
A150447E02
A150444E03
A150445E02
  1. HO2 sensor
  2. HO2 sensor heater
  3. HO2 sensor circuit
4
A150444E03
A150445E02
A150444E03
A150445E02
  1. Fuel pressure
  2. Gas leakage from exhaust system
    (Air-fuel ratio extremely lean or rich)
The following Control the Injection Volume for A/F Sensor procedure enables the technician to check and graph the voltage output of both A/F sensor and heated oxygen sensor.
To display the graph, enter Powertrain / Engine and ECT / Active Test / Control the Injection Volume for A/F Sensor / A/F Control System / AFS B1 S1 and O2S B1 S2 then press the graph button on the Data List view.

HINT:
  1. DTC P2A00 may be also detected, when the air-fuel ratio stays RICH or LEAN.
  2. Read freeze frame data using Techstream. The ECM records vehicle and driving condition information as freeze frame data the moment a DTC is stored. When troubleshooting, freeze frame data can be helpful in determining whether the vehicle was running or stopped, whether the engine was warmed up or not, whether the air/fuel ratio was lean or rich, as well as other data recorded at the time of a malfunction.
  3. A high A/F sensor voltage could be caused by a RICH air-fuel mixture. Check the conditions that would cause the engine to run with the RICH air-fuel mixture.
  4. A low A/F sensor voltage could be caused by a LEAN air-fuel mixture. Check the conditions that would cause the engine to run with the LEAN air-fuel mixture.

1.CHECK OTHER DTC OUTPUT (IN ADDITION TO A/F SENSOR DTC)
  1. Connect Techstream to the DLC3.

  1. Turn the power switch ON (IG).

  1. Turn the tester ON.

  1. Enter the following menus: Powertrain / Engine and ECT / Trouble Code.

  1. Read the DTCs.

    Result:
    Display (DTC Output)
    Proceed to
    P2A00
    A
    P2A00 and other DTCs
    B

    HINT:
    If any other code besides P2A00 are output, perform troubleshooting for those DTCs first.


B
GO TO DTC CHART
A


2.READ VALUE OF TECHSTREAM (OUTPUT VOLTAGE OF A/F SENSOR)
  1. Connect Techstream to the DLC 3.

  1. Put the engine in inspection mode (Click here).

  1. Warm up the A/F sensors (bank 1 sensor 1) by running the engine at 2,500 rpm with the accelerator pedal depressed more than 60% for approximately 90 seconds.

  1. Read A/F sensor voltage output on Techstream.

  1. Enter the following menus: Powertrain / Engine and ECT / Data List.

  1. Select "AFS B1 S1/Engine Speed" and press button "YES".

  1. Monitor the A/F sensor voltage carefully.

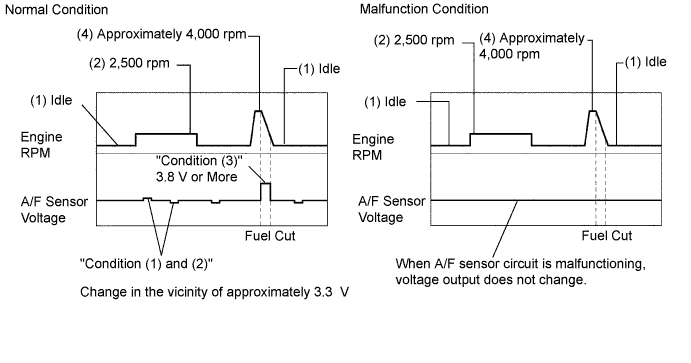
  1. Check the A/F sensor voltage output under the following conditions:

    1. Put the engine in inspection mode and allow the engine to idle for 30 seconds.

    2. Put the engine in inspection mode and running the engine at 2,500 rpm with the accelerator pedal depressed more than 60% (where engine RPM is not suddenly changed).

    3. Deactivate the inspection mode and drive the vehicle with the shift position in "B" range.

    4. Accelerate the vehicle to 70 km/h (44 mph) and quickly release the accelerator pedal so that the throttle valve is fully closed.
CAUTION:
  1. Strictly observe of posted speed limits, traffic laws, and road conditions when performing these drive patterns.
  2. Do not drive the vehicle without deactivating inspection mode, otherwise damaging the transaxle may result.

OK:
Condition (1) and (2)
Voltage changes in the vicinity of 3.3 V (between approximately 3.1 to 3.5 V) as shown in the illustration.
Condition (4)
A/F sensor voltage increases to 3.8 V or more during engine deceleration (when fuel cut) as shown in the illustration.


A072304E23

HINT:
  1. Whenever the output voltage of the A/F sensor remains at approximately 3.3 V (see diagram Malfunction Condition) under any condition as well as the above conditions, the A/F sensor may have an open-circuit. (This will happen also when the A/F sensor heater has an open-circuit.)
  2. Whenever the output voltage of the A/F sensor remains at a certain value of approximately 3.8 V or more, or 2.8 V or less (see diagram Malfunction Condition) under any condition as well as the above conditions, the A/F sensor may have a short-circuit.
  3. The ECM will stop fuel injection (fuel cut) during engine deceleration. This will cause a LEAN condition and should result in a momentary increase in A/F sensor voltage output.
  4. The ECM must establish a closed throttle position learned value to perform fuel cut. If the battery terminal was reconnected, the vehicle must be driven over 10 mph to allow the ECM to learn the closed throttle position.
  5. When the vehicle is driven:
    The output voltage of the A/F sensor may be below 2.8 V during fuel enrichment. For the vehicle, this translates to a sudden increase in speed with the accelerator pedal fully depressed when trying to overtake another vehicle. The A/F sensor is functioning normally.
  6. The A/F sensor is a current output element, and therefore the current is converted into voltage inside the ECM. If measuring voltage at connectors of A/F sensor or ECM, you will observe a constant voltage.


OK
Go to step 14
NG


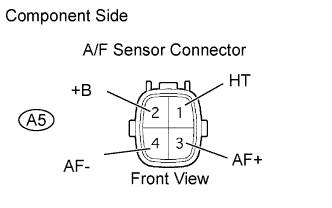
3.INSPECT AIR FUEL RATIO SENSOR (RESISTANCE OF A/F SENSOR HEATER)


    A085152E51
  1. Disconnect the A5 A/F sensor connector.

  1. Measure the resistance between the terminals of the A/F sensor.

    Standard resistance:
    Tester Connection
    Resistance
    1 (HT) - 2 (+B)
    1.8 to 3.4 Ω at 20°C (68°F)

  1. Reconnect the A/F sensor connector.


NG
REPLACE AIR FUEL RATIO SENSOR
OK


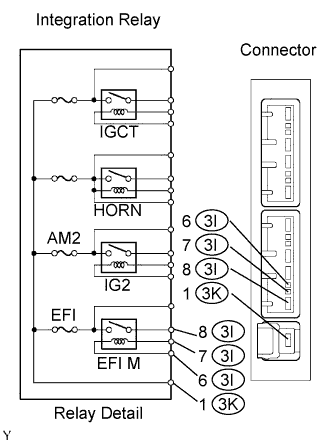
4.INSPECT INTEGRATION RELAY (EFI M RELAY)


    A082812E01
  1. Remove the integration relay from the engine room relay block.

  1. Inspect the EFI M relay.

    Standard resistance:
    Tester Connection
    Specified Condition
    3K-1 - 3I-8
    10 kΩ or higher
    3K-1 - 3I-8
    Below 1 Ω
    (Apply battery voltage to terminals 3I-6 and 3I-7)

  1. Reinstall the integration relay.


NG
REPLACE INTEGRATION RELAY
OK


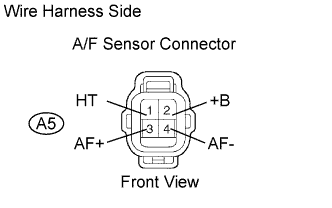
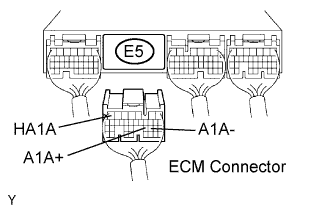
5.CHECK HARNESS AND CONNECTOR (A/F SENSOR - ECM)
A085153E07
A065745E71

B062793E17

  1. Disconnect the A5 A/F sensor connector.

  1. Disconnect the E5 ECM connector.

  1. Measure the resistance according to the value(s) in the table below.

    Standard resistance (Check for open):
    Tester Connection
    Specified Condition
    A5-3 (AF+) - E5-23 (A1A+)
    Below 1 Ω
    A5-4 (AF-) - E5-22 (A1A-)
    Below 1 Ω
    A5-1 (HT) - E5-7 (HA1A)
    Below 1 Ω

    Standard resistance (Check for short):
    Tester Connection
    Specified Condition
    A5-3 (AF+) or E5-23 (A1A+) - Body ground
    10 kΩ or higher
    A5-4 (AF-) or E5-22 (A1A-) - Body ground
    10 kΩ or higher
    A5-1 (HT) or E5-7 (HA1A) - Body ground
    10 kΩ or higher

  1. Reconnect the A/F sensor connector.

  1. Reconnect the ECM connector.


NG
REPAIR OR REPLACE HARNESS OR CONNECTOR
OK


6.CHECK AIR INDUCTION SYSTEM
  1. Check for vacuum leaks in the air induction system.

    OK:
    There is no leakage in the air induction system.


NG
REPAIR OR REPLACE AIR INDUCTION SYSTEM
OK


7.CHECK CONNECTION OF PCV HOSE

OK:
PCV hose is connected correctly and PCV hose has no damage.


NG
REPAIR OR REPLACE PCV HOSE
OK


8.CHECK FUEL PRESSURE

OK:
Fuel pressure: 304 to 343 kPa (3.1 to 3.5 kgf/cm2, 44 to 50 psi)


NG
REPAIR OR REPLACE FUEL SYSTEM
OK


9.INSPECT FUEL INJECTOR ASSEMBLY
  1. Check the injector injection (high or low fuel injection quantity or poor injection pattern).

    OK:
    Injection volume: 36 to 46 cm3 (2.1 to 2.8 cu in.) per 15 seconds.


NG
REPLACE FUEL INJECTOR ASSEMBLY
OK


10.REPLACE AIR FUEL RATIO SENSOR

NEXT


11.PERFORM CONFIRMATION DRIVING PATTERN

HINT:
Clear all DTCs prior to performing the confirmation driving pattern .


NEXT


12.READ OUTPUT DTC (SEE IF A/F SENSOR DTC IS OUTPUT AGAIN)
  1. Connect Techstream to the DLC3.

  1. Turn the power switch ON (IG).

  1. Turn the tester ON.

  1. Enter the following menus: Powertrain / Engine and ECT / Trouble Code.

  1. Read the DTCs.

    Result:
    Display (DTC Output)
    Proceed to
    No output
    A
    P2A00 is output again
    B


B
REPLACE ECM AND PERFORM CONFIRMATION DRIVING PATTERN
A


13.CONFIRM IF VEHICLE HAS RUN OUT OF FUEL IN PAST

OK:
The vehicle has run out of fuel in the past.


NO
CHECK FOR INTERMITTENT PROBLEMS
YES

DTC IS CAUSED BY RUNNING OUT OF FUEL 

14.PERFORM CONFIRMATION DRIVING PATTERN

HINT:
Clear all DTCs prior to performing the confirmation driving pattern .


GO


15.READ OUTPUT DTC (SEE IF A/F SENSOR DTC IS OUTPUT AGAIN)
  1. Connect Techstream to the DLC3.

  1. Turn the power switch ON (IG).

  1. Turn the tester ON.

  1. Enter the following menus: Powertrain / Engine and ECT / Trouble Code.

  1. Read the DTCs.

    Result:
    Display (DTC Output)
    Proceed to
    P2A00
    A
    No output
    B


B
Go to step 19
A


16.REPLACE AIR FUEL RATIO SENSOR

GO


17.PERFORM CONFIRMATION DRIVING PATTERN

HINT:
Clear all DTCs prior to performing the confirmation driving pattern .


GO


18.READ OUTPUT DTC (SEE IF A/F SENSOR DTC IS OUTPUT AGAIN)
  1. Connect Techstream to the DLC3.

  1. Turn the power switch ON (IG).

  1. Turn the tester ON.

  1. Enter the following menus: Powertrain / Engine and ECT / Trouble Code.

  1. Read the DTCs.

    Result:
    Display (DTC Output)
    Proceed to
    No output
    A
    P2A00
    B


B
REPLACE ECM AND PERFORM CONFIRMATION DRIVING PATTERN
A


19.CONFIRM IF VEHICLE HAS RUN OUT OF FUEL IN PAST

OK:
The vehicle has run out of fuel in the past.


NO
CHECK FOR INTERMITTENT PROBLEMS
YES

DTC IS CAUSED BY RUNNING OUT OF FUEL