HYBRID / BATTERY CONTROL MOTOR GENERATOR CONTROL COMPUTER REASSEMBLY
CAUTION / NOTICE / HINT
- NOTICE:
-
Do not cross-thread the bolts when installing them.
PROCEDURE

 1.REMOVE SEAL PACKING (FROM HYBRID CONVERTER KIT CONTACT SURFACE)
- NOTICE:
- ·
Do not touch the circuit board.
·Only remove seal packing which is uneven, has peeled off or seeped out from between the contact surfaces.
·Do not drop any removed seal packing into the hybrid vehicle converter kit.
·Do not bend the bus-bars.
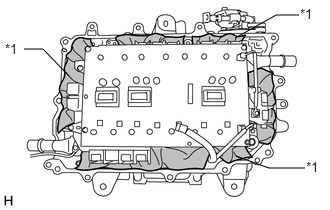
Put clean pieces of paper into the areas shown in the illustration to prevent any remaining seal packing from entering the hybrid vehicle converter kit.
| *1 | Paper |
Using a finger or a scraper with its tip wrapped with protective tape, remove any remaining seal packing which is uneven, has peeled off or seeped out from around the contact surface shown in the illustration and inside the bolt holes.
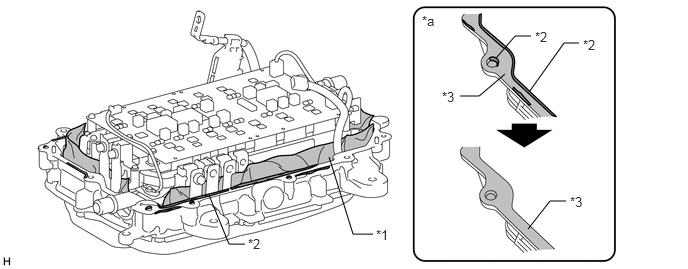
| *1 | Paper | *2 | Seeped Out or Uneven Seal Packing |
| *3 | Light Coat of Seal Packing Remaining on Contact Surface | - | - |
| *a | Minimum Requirement for Removal of Seal Packing | - | - |
- NOTICE:
-
Do not allow any moisture to come into contact with the circuit board.
2.REMOVE SEAL PACKING (FROM INVERTER CASE WITH CONDENSER CONTACT SURFACE)
- NOTICE:
- ·
Only remove seal packing which is uneven, has peeled off or seeped out from between the contact surfaces.
·Do not drop any removed seal packing into the inverter case with condenser.
·Do not bend the bus-bars.
Set the inverter case with condenser on its side as shown in the illustration.
- NOTICE:
-
To prevent the inverter case with condenser from falling over, hold it by hand or place an object behind it.
Using a finger or a scraper with its tip wrapped with protective tape, remove any remaining seal packing which is uneven, has peeled off or seeped out from around the contact surface shown in the illustration and inside the bolt holes.
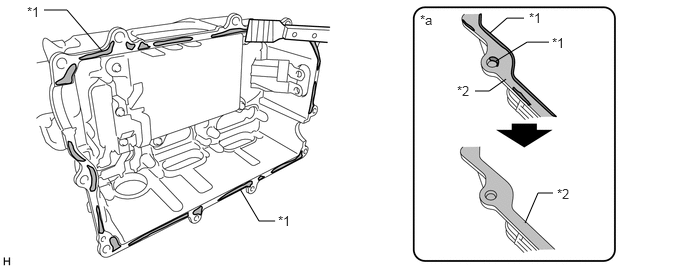
| *1 | Seeped Out or Uneven Seal Packing | *2 | Light Coat of Seal Packing Remaining on Contact Surface |
| *a | Minimum Requirement for Removal of Seal Packing | - | - |
3.REMOVE ADHESIVE (FROM NO. 1 AND NO. 2 INVERTER DRAIN PLUGS SEALING SURFACE)
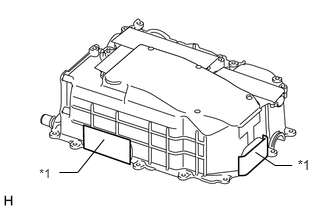
Remove the protective tape from the installation holes of the No. 1 and No. 2 inverter drain plugs.
| *1 | Protective Tape |
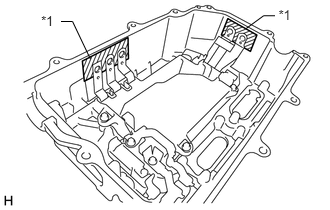
Apply protective tape to the installation holes of the No. 1 and No. 2 inverter drain plugs from the inside of the inverter case with condenser.
| *1 | Protective Tape |
- NOTICE:
-
Do not bend the bus-bars when applying protective tape.
Using a scraper with its tip wrapped with protective tape, remove any remaining adhesive from the sealing surfaces of the No. 1 and No. 2 inverter drain plugs.
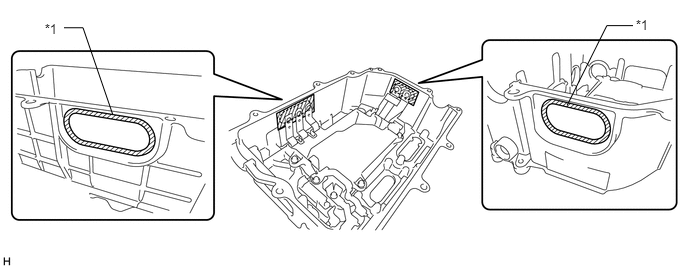
| *a | Sealing Surface | - | - |
- NOTICE:
-
Do not damage the sealing surfaces.
Remove any adhesive shavings using tape or equivalent.
Remove the protective tape from the inside of the inverter case with condenser.
Apply protective tape to the installation holes of the No. 1 and No. 2 inverter drain plugs as shown in the illustration.
| *1 | Protective Tape |
4.REMOVE RESIDUE (FROM INVERTER SIGNAL CONNECTOR COVER SEALING SURFACE)
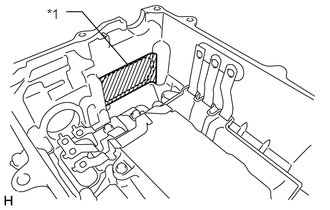
Apply protective tape to the area shown in the illustration to prevent removed residue from entering the inverter case with condenser.
| *1 | Protective Tape |
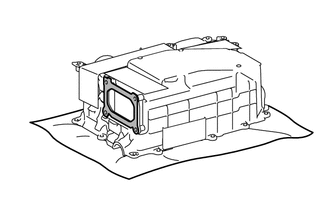
Using 600-grit sandpaper, remove the residue from each grommet sealing surface until it feels smooth.
- NOTICE:
- ·
Use 600-grit or higher sandpaper.
·Do not allow removed residue to enter the inverter case with condense.
·Do not touch or allow grease or oil to contact the sealing surfaces of the inverter case with condenser.
Remove any residue particles using tape or equivalent.
Remove the protective tape.
Thoroughly wash your hands after performing this step.
- HINT:
-
It is not necessary to perform this step if performing the "Remove Residue (from Grommet Sealing Surface)" procedure next.
5.REMOVE RESIDUE (FROM GROMMET SEALING SURFACE)
- HINT:
-
Perform the following procedure only when there is residue on the grommet sealing surfaces:
Apply protective tape to the areas shown in the illustration to prevent removed residue from entering the inverter case with condenser and hybrid vehicle converter kit.
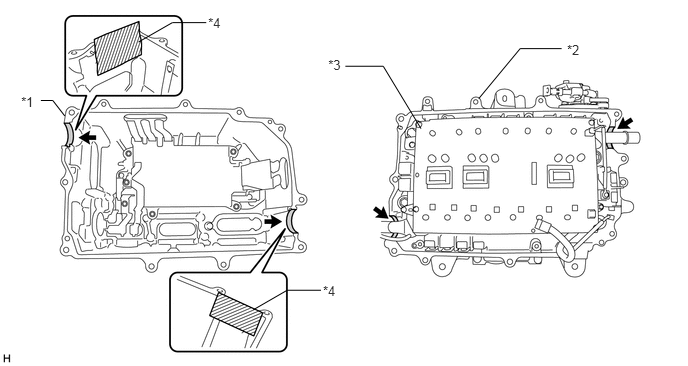
| *1 | Inverter Case with Condenser | *2 | Hybrid Vehicle Converter Kit |
| *3 | Power Module Intelligent Transistor Kit | 4 | Protective Tape |
Using 600-grit sandpaper, remove the residue from each grommet sealing surface until it feels smooth.
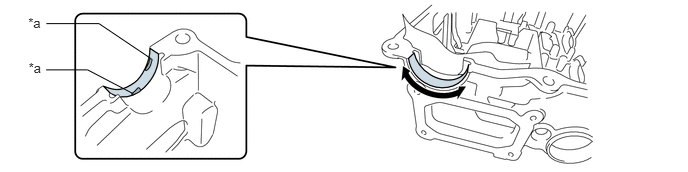
| *a | Residue | - | - |
- NOTICE:
- ·
Use 600-grit or higher sandpaper.
·Do not allow removed residue to enter the inverter case with condenser or hybrid vehicle converter kit
Remove any adhesive shavings particles using tape or equivalent.
Remove the protective tape.
Thoroughly wash your hands after performing this step.
6.CLEAN INVERTER SIGNAL CONNECTOR COVER
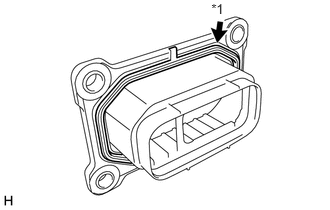
Remove the gasket from the inverter signal connector cover. Wash the gasket and inverter signal connector cover with water and dry them completely.
| *1 | Gasket |
- NOTICE:
-
Do not damage the gasket.
Thoroughly wash your hands after performing this step.
7.INSTALL MG CONTROL COMPUTER WITH BRACKET SUB-ASSEMBLY
- NOTICE:
- ·
Do not touch the circuit board.
·Do not allow any moisture to come into contact with the circuit board.
Align the guide pins of the MG control computer with bracket sub-assembly with the holes of the hybrid vehicle converter kit and temporarily install the MG control computer with bracket sub-assembly to the hybrid vehicle converter kit.
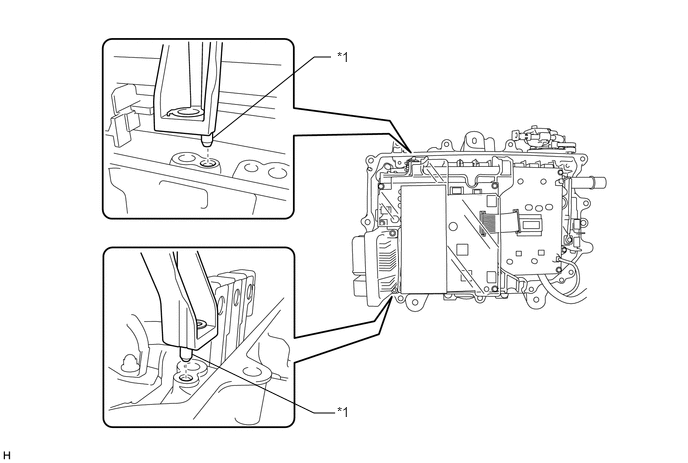
| *1 | Guide Pins | - | - |
- NOTICE:
-
Make sure to align the guide pins correctly.
Install the MG control computer with bracket sub-assembly with the 4 bolts.
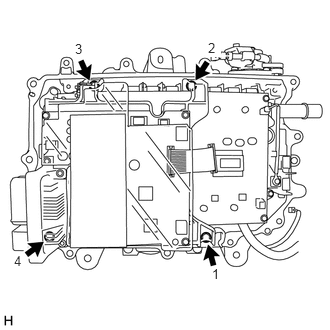
Temporarily tighten the 4 bolts evenly in several steps in the order shown in the illustration, then fully tighten them.
- Torque:
- 4.5 N*m (46 kgf*cm, 40 in.*lbf)
Engage the 2 wire harnesses to the 4 clamps.
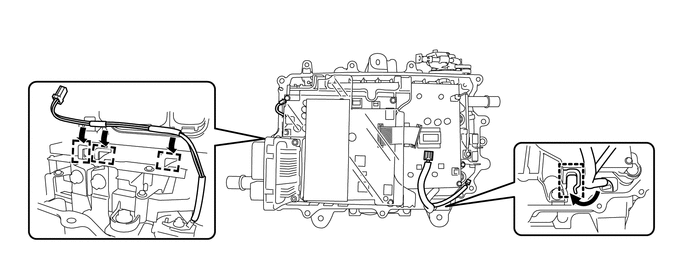
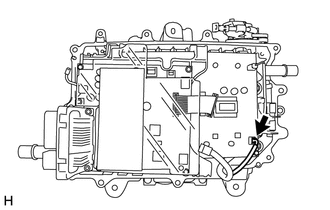
Connect the connector.
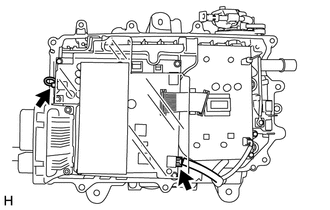
Connect the 2 connectors.
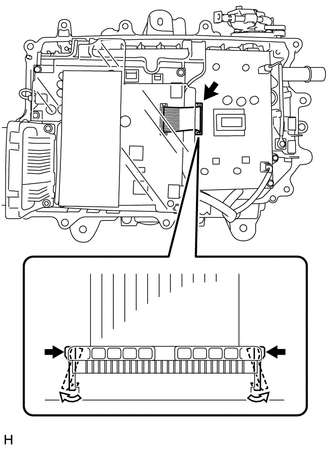
Disengage the lock claws of the white resin connector and connect the flat cable to the power module intelligent transistor kit.
Check that the flat cable is connected securely.
- NOTICE:
-
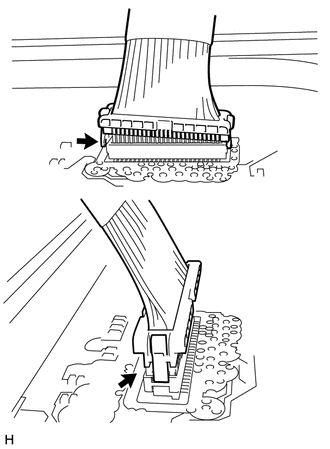
-
If the flat cable is not fully connected, connect it securely.
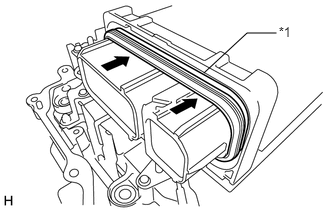
If the gasket of the inverter signal connector is protruding, fully push it in.
| *1 | Gasket |
- HINT:
-
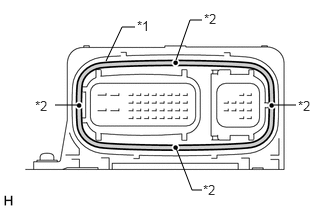 1.833,0.625 1.979,0.208 1.979,0.208 2.104,0.208 false 2.854,1.094 3.083,1.094 false 0.573,1.094 0.802,1.094 false 1.104,0.635 1.271,0.281 1.271,0.281 1.406,0.281 false 1.833,1.542 2,1.979 2,1.979 2.104,1.979 false 2.115,1.896 2.385,2.073 0.271,0.177 10 false *2 2.125,0.115 2.396,0.292 0.271,0.177 10 false *2 3.104,1.021 3.313,1.198 0.208,0.177 10 false *2 0.365,1.021 0.573,1.198 0.208,0.177 10 false *2 1.427,0.188 1.698,0.365 0.271,0.177 10 false *1
-
If the gasket is misaligned, install it so that each mark is at the center of each side.
Text in Illustration *1 Gasket *2 Mark
8.INSTALL INVERTER TERMINAL WITH SENSOR SUB-ASSEMBLY
- NOTICE:
- ·
Do not touch the circuit board.
·Do not allow any moisture to come into contact with the circuit board.
Align the guide pins of the inverter terminal with sensor sub-assembly with the holes of the hybrid vehicle converter kit and temporarily install the inverter terminal with sensor sub-assembly to the hybrid vehicle converter kit.
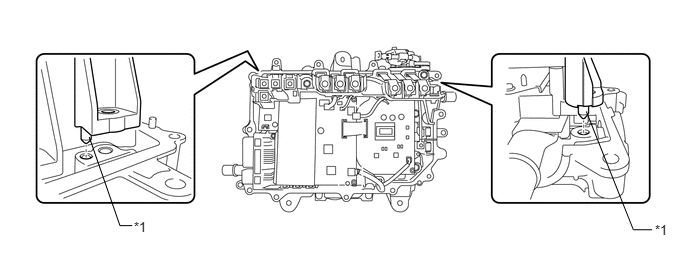
| *1 | Guide Pins | - | - |
- NOTICE:
-
Make sure to align the guide pins correctly.
Install the inverter terminal with sensor sub-assembly with the 4 bolts.
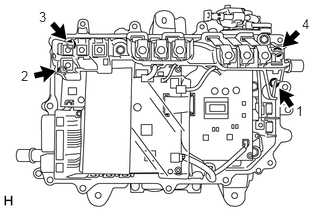
Temporarily tighten the 4 bolts evenly in several steps in the order shown in the illustration, then fully tighten them.
- Torque:
- 4.5 N*m (46 kgf*cm, 40 in.*lbf)
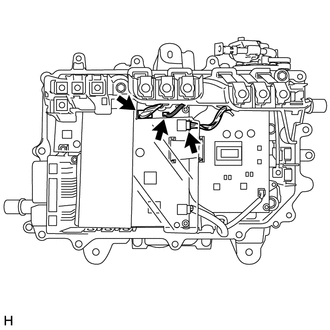
Connect the 3 connectors.
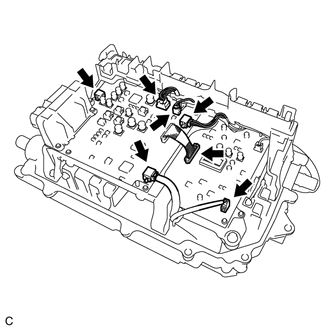
Check that the 6 connectors and flat cable are connected securely as shown in the illustration.
Check the installation condition of the pen sheet.
- NOTICE:
- ·
Do not touch the circuit board.
·Do not allow any moisture to come into contact with the circuit board.
While ensuring that the pen sheet does not interfere with components of the circuit board, insert the pen sheet between the inverter terminal with sensor sub-assembly and MG control computer with bracket sub-assembly.
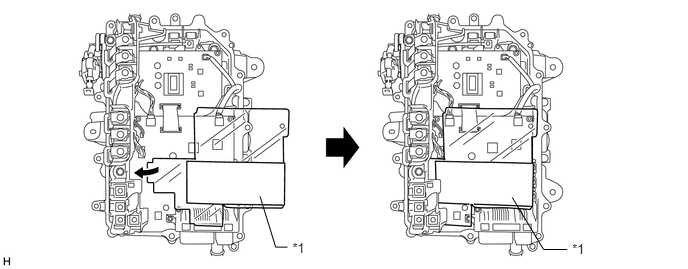
| *1 | Pen Sheet | - | - |
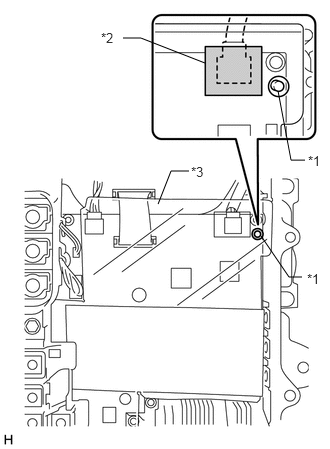
Set the pen sheet so that the guide hole is aligned with the pin of the MG control computer sub-assembly as shown in the illustration.
| *1 | Guide Pin |
| *2 | Double-sided Tape |
| *3 | Pen Sheet |
Attach the double-sided tape of the pen sheet to the connector as shown in the illustration.
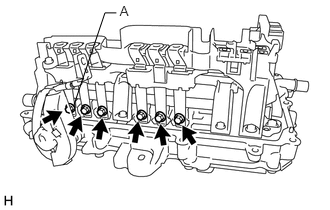
Install the 6 bolts.
- Torque:
- 6.0 N*m (61 kgf*cm, 53 in.*lbf)
- NOTICE:
-
Do not touch the bus-bars.
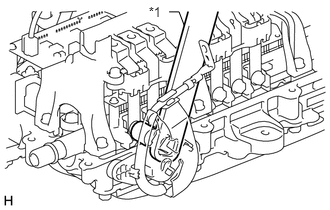
If the No. 2 engine room wire is installed, install the bolt (A) using SST as shown in the illustration.
- SST
- 09961-00950
- Torque:
- without SST : 6.0 N*m (61 kgf*cm, 53 in.*lbf)
- with SST : 3.3 N*m (34 kgf*cm, 29 in.*lbf)
| *1 | SST |
- NOTICE:
-
This torque value is effective when SST is parallel to the torque wrench.
- HINT:
- ·
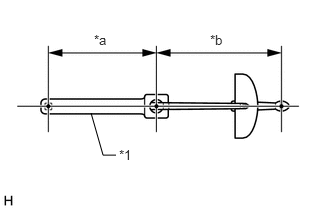 0.948,1.177 1.073,1.615 1.073,1.615 1.208,1.615 false 1.24,1.531 1.51,1.708 0.271,0.177 10 false *1 0.979,0.333 1.25,0.51 0.271,0.177 10 false *a 2.188,0.333 2.458,0.51 0.271,0.177 10 false *b
The "with SST" torque value is effective when using SST with a fulcrum length of 150 mm (5.91 in.).
Text in Illustration *1 SST *2 Length of SST 150 mm (5.91 in.) *3 Length of Torque Wrench 185 mm (7.28 in.)
·The "with SST" torque value is effective when using a torque wrench with a fulcrum length of 185 mm (7.28 in.)
·If using a torque wrench with a different length, or connecting the torque wrench and SST at an angle, refer to the alternate torque values. (See page General>INTRODUCTION>REPAIR INSTRUCTION>PRECAUTION)
·Loosen the nut of the No. 2 engine room wire to secure enough space to perform work.
9.INSTALL INVERTER CASE WITH CONDENSER
- NOTICE:
- ·
Do not touch the circuit board.
·Do not allow any moisture to come into contact with the circuit board.
·Do not touch or allow grease or oil to contact the sealing surfaces of the hybrid vehicle converter kit and inverter case with condenser.
Apply seal packing (diameter: 2.0 to 3.0 mm (0.0787 to 0.118 in.)) in a continuous line to the locations shown in the illustration.
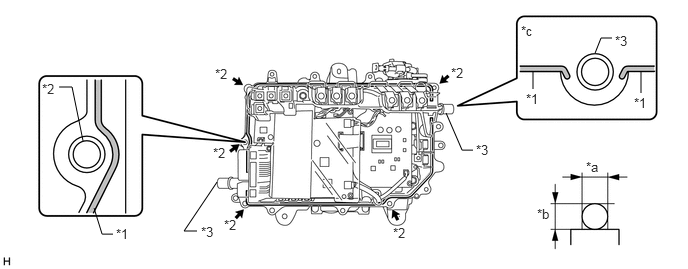
| *1 | Seal Packing | *2 | Bolt Hole |
| *3 | Coolant Pipes | - | - |
| *a | 2.0 to 3.0 mm (0.0787 to 0.118 in.) | *b | 2.0 to 3.0 mm (0.0787 to 0.118 in.) |
| *c | Around Coolant Pipe | - | - |
- Seal Packing:
Toyota Genuine Seal Packing 1282B, Three Bond 1282B or equivalent
- NOTICE:
- ·
Install the inverter case with condenser within 3 minutes of applying seal packing.
·Tighten the bolts within 15 minutes of applying seal packing.
·Keep the coolant pipes free from seal packing.
Install the inverter case with condenser.
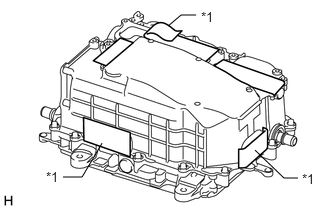
Peel back the protective tape to the extent that the following steps can be performed.
| *1 | Protective Tape |
- NOTICE:
-
Do not touch or allow grease or oil to contact the sealing surfaces of the inverter case with condenser.
Align the holes of the inverter case with condenser with the guide pins of the hybrid vehicle converter kit so that the bus-bar (A) does not contact the protrusion of the inverter terminal with sensor sub-assembly (B).
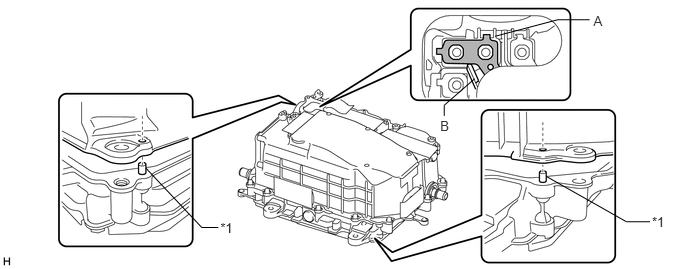
| *1 | Guide Pins | - | - |
- NOTICE:
- ·
Make sure to align the guide pins correctly.
·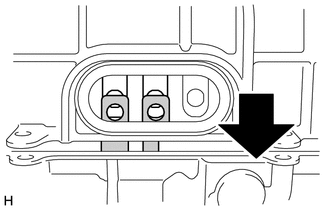
Check that the bus-bars of the hybrid vehicle converter kit overlap the bus-bars of the inverter case with condenser.
·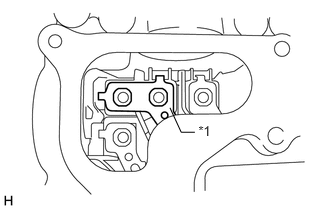 2.066,1.277 2.338,1.458 0.272,0.181 10 *1 1.77,1.122 1.887,1.377 1.887,1.377 2.03,1.377 false
Make sure that the bus-bar (A) is not resting on the resin part of the inverter terminal with sensor sub-assembly as shown in the illustration.
| *1 | Bus-bar (A) |
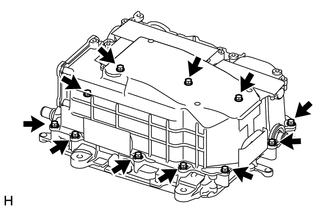
Temporarily install the inverter case with condenser with the 11 bolts.
- Torque:
- 4.0 N*m (41 kgf*cm, 35 in.*lbf)
Fully tighten the 11 bolts.
- Torque:
- 9.2 N*m (94 kgf*cm, 81 in.*lbf)
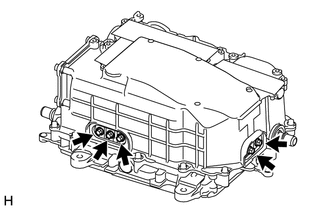
Install the 5 bolts.
- Torque:
- 6.0 N*m (61 kgf*cm, 53 in.*lbf)
- NOTICE:
-
Do not touch the bus-bars.
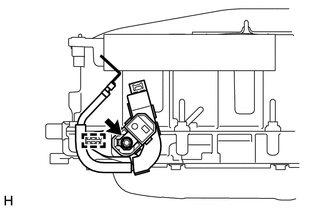
Install the No. 2 engine room wire to the inverter with converter assembly with the nut.
- Torque:
- 8.0 N*m (82 kgf*cm, 71 in.*lbf)
- NOTICE:
-
Check that the nut is not cross-threaded and the terminal is not loose.
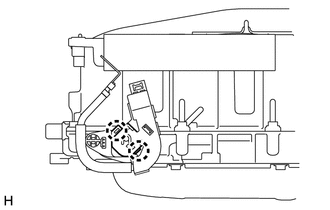
Close the terminal cover and engage the 2 claws.
10.INSTALL INVERTER UNION GROMMET
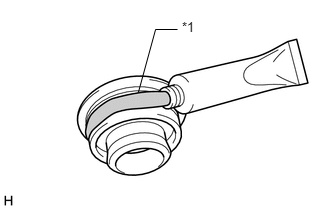
Apply a light coat of seal packing to 2 new inverter union grommets.
| *1 | Seal Packing |
- Seal Packing:
Toyota Genuine Seal Packing 1282B, Three Bond 1282B or equivalent
- NOTICE:
- ·
Install the inverter union grommets within 60 minutes of installing the inverter case with condenser.
·Apply a light coat of seal packing to the entire surface of the area shown in the illustration. If seal packing is applied excessively, it may seep out, however, sealing quality will not be affected.
·Install the inverter union grommets within 3 minutes of applying seal packing.
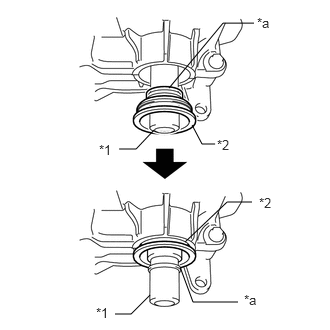
Push in the inverter union grommet until it passes over the flange of the coolant pipe.
| *1 | Coolant Pipe |
| *2 | Inverter Union Grommet |
| *a | Flange |
- NOTICE:
-
Do not damage the coolant pipes.
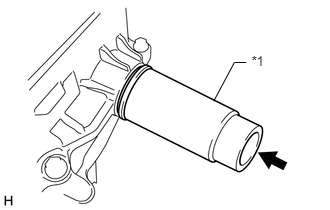
Using a 30 mm socket, install the inverter union grommet.
| *1 | 30 mm Socket |
- HINT:
-
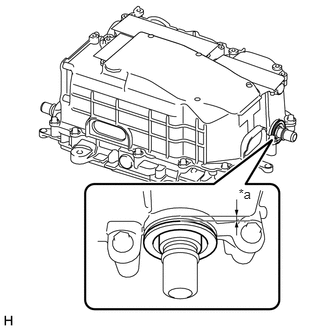 2.485,1.939 2.757,2.121 0.272,0.181 10 *a
-
Make sure that the clearance between the inverter union grommet and inverter case with condenser is 2.0 mm (0.0787 in.) or less.
Text in Illustration *a 2.0 mm (0.0787 in.) or less
Perform the same procedure to install the other inverter union grommet.
11.INSTALL NO. 1 AND NO. 2 INVERTER DRAIN PLUGS
- NOTICE:
-
Do not touch or allow grease or oil to contact the sealing surfaces of the inverter case with condenser.
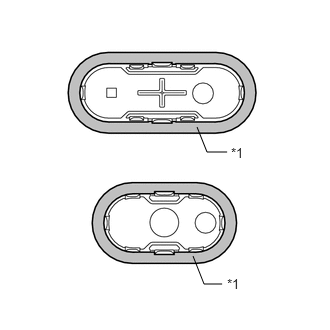
Make sure that the sealing surfaces of the No. 1 and No. 2 inverter drain plugs are covered with aluminum tape.
| *1 | Aluminum Tape |
- NOTICE:
-
If the sealing surfaces of the No. 1 and No. 2 inverter drain plugs are not covered with aluminum tape, do not use them as they cannot be securely installed with only seal packing.
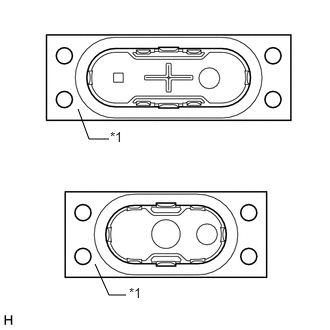
Remove the release film from the No. 1 and No. 2 inverter drain plugs.
| *1 | Release Film |
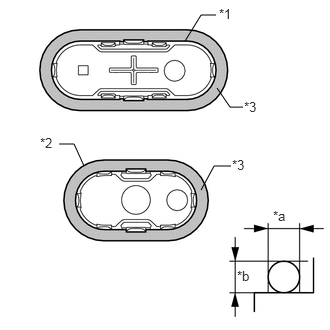
Apply seal packing (diameter: 3.0 mm (0.118 in.)) to new No. 1 and No. 2 inverter drain plugs.
| *1 | No. 1 Inverter Drain Plug |
| *2 | No. 2 Inverter Drain Plug |
| *3 | Seal Packing |
| *a | Approximately 3.0 mm (0.118 in.) |
| *b | Approximately 3.0 mm (0.118 in.) |
- Seal Packing:
Toyota Genuine Seal Packing 1282B, Three Bond 1282B or equivalent
- NOTICE:
- ·
Be sure to use the specified type of seal packing.
·Install the No. 1 and No. 2 inverter drain plugs within 3 minutes of applying seal packing.
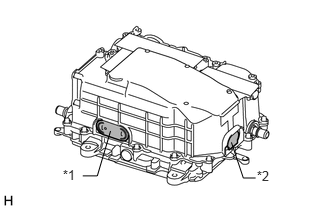
Install the No. 1 and No. 2 inverter drain plugs to the inverter with converter assembly.
| *1 | No. 1 Inverter Drain Plug |
| *2 | No. 2 Inverter Drain Plug |
12.INSTALL INVERTER SIGNAL CONNECTOR COVER
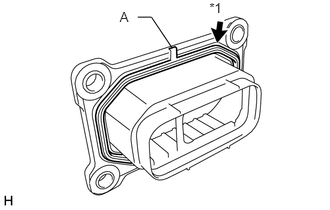
Install the gasket to the inverter signal connector cover.
- HINT:
-
Make sure that the protrusion (A) of the gasket is securely inserted into the groove of the inverter signal connector cover.
| *1 | Gasket |
Clean the installation surface.
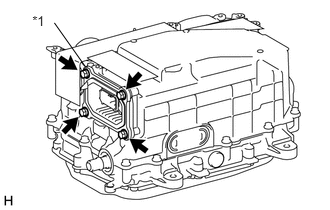
Install the inverter signal connector cover with the 4 bolts.
- Torque:
- 6.0 N*m (61 kgf*cm, 53 in.*lbf)
| *1 | Inverter Signal Connector Cover |
G9221
13.INSTALL INVERTER COVER
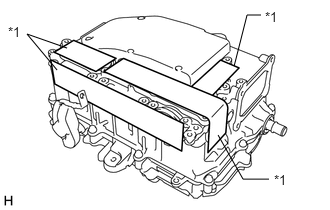
Remove the protective tape.
| *1 | Protective Tape |
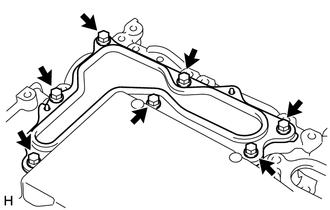
Temporarily install the inverter cover with the 7 bolts to prevent any foreign matter or water from entering the inverter with converter assembly.
- NOTICE:
-
Visually confirm that the inverter cover waterproofing rubber is securely installed before installing the inverter cover.
G9223
14.INSTALL INVERTER TERMINAL COVER
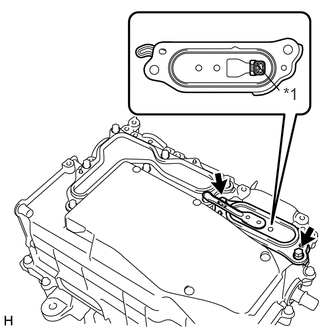
Temporarily install the inverter terminal cover to the inverter with converter assembly with the 2 bolts.
| *1 | Interlock Connector |
- NOTICE:
- ·
Visually confirm that the inverter terminal cover waterproofing rubber is securely installed before installing the inverter terminal cover.
·Make sure that the interlock connector is fully engaged.
G9200
15.INSTALL INVERTER WITH CONVERTER ASSEMBLY
16. CHECK FOR COOLANT LEAK (for Inverter)
Remove the reserve tank cap.
- CAUTION:
-
Do not remove the reserve tank cap while the coolant (for inverter) is still hot. Pressurized, hot coolant and steam may be released and cause serious burns.
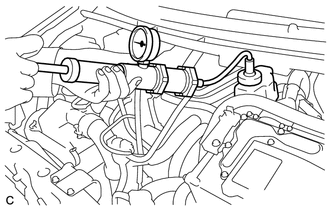
Install the radiator cap tester.
Pump the radiator cap tester to 122 kPa (1.2 kgf/ cm2, 17.7 psi), and then check that the pressure does not drop.
- HINT:
-
If the pressure drops, check the hoses, radiator, water pump, inverter with converter, and hybrid vehicle transaxle assembly for leaks.
Install the reserve tank cap.
17. OPERATION CHECK
- HINT:
- ·
After performing repair, check the operation as follows. Then check for DTCs again.
·The current at the AMD terminal cannot be measured directly because of space limitations. Measure the current flow at the auxiliary battery instead.
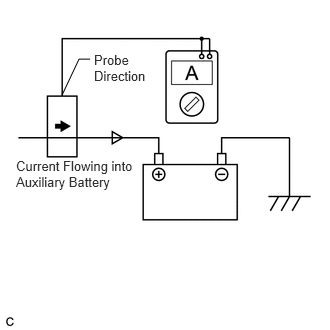
Connect an AC/DC 400 A probe from an ammeter to the positive (+) auxiliary battery cable.
Turn the power switch on (READY) and leave the vehicle as is until the electric current flowing into the auxiliary battery becomes 10 A or less.
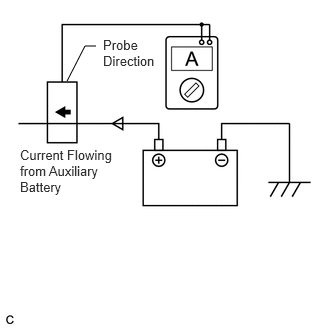
Change the orientation of the AC/DC 400A probe.
Measure the current flowing from the auxiliary battery with the power switch on (READY), the high beam headlights on and blower motor switch in the HI position, and rear window defogger turned on.
- Standard Current:
Item Switch Condition Specified Condition Current flowing from auxiliary battery Power switch on (READY)
(High beam headlights on and blower motor switch in HI position, rear window defogger on)0 A or less
(No current from auxiliary battery)
Turn the power switch off.