DOOR LOCK FRONT DOOR LOCK REMOVAL
PROCEDURE

 1. PRECAUTION
- NOTICE:
-
After turning the power switch off, waiting time may be required before disconnecting the cable from the negative (-) auxiliary battery terminal. Therefore, make sure to read the disconnecting the cable from the negative (-) auxiliary battery terminal notices before proceeding with work (See page General>INTRODUCTION>REPAIR INSTRUCTION>PRECAUTION).
58165F
2.REMOVE FRONT FLOOR COVER RH
3.DISCONNECT CABLE FROM NEGATIVE AUXILIARY BATTERY TERMINAL
- NOTICE:
-
When disconnecting the cable, some systems need to be initialized after the cable is reconnected (See page General>INTRODUCTION>REPAIR INSTRUCTION>INITIALIZATION).
4.REMOVE POWER WINDOW REGULATOR MASTER SWITCH ASSEMBLY WITH FRONT DOOR ARMREST BASE PANEL (for Driver Side)
5.REMOVE POWER WINDOW REGULATOR SWITCH ASSEMBLY WITH FRONT DOOR ARMREST BASE PANEL (for Front Passenger Side)
67602
6.REMOVE FRONT DOOR TRIM BOARD SUB-ASSEMBLY
86160P
7.REMOVE FRONT NO. 2 SPEAKER ASSEMBLY
67832
8.REMOVE FRONT DOOR SERVICE HOLE COVER
68102
9.REMOVE FRONT DOOR GLASS SUB-ASSEMBLY
68151D
10.REMOVE FRONT DOOR GLASS RUN
67404F
11.REMOVE FRONT DOOR REAR LOWER FRAME SUB-ASSEMBLY
12.REMOVE FRONT DOOR OUTSIDE HANDLE COVER WITH LOCK CYLINDER ASSEMBLY (w/ Lock Cylinder)
69320
13.REMOVE FRONT DOOR LOCK ASSEMBLY
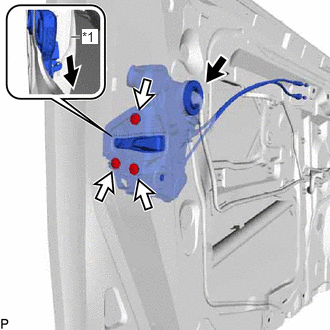
Disconnect the connector.
| *1 | Front Door Lock Open Rod |
Using a T30 "TORX" socket wrench, remove the 3 screws.
Move the front door lock assembly downward and disconnect the front door lock open rod, and then remove the front door lock assembly.
When reusing the front door lock assembly:
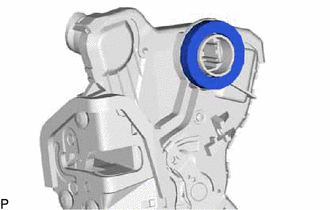
Remove the door lock wiring harness seal from the front door lock assembly.
69720C
14.REMOVE FRONT DOOR LOCK REMOTE CONTROL CABLE ASSEMBLY
69760C
15.REMOVE FRONT DOOR INSIDE LOCKING CABLE ASSEMBLY