DOOR LOCK REAR DOOR LOCK REMOVAL
PROCEDURE

 1. PRECAUTION
- NOTICE:
-
After turning the power switch off, waiting time may be required before disconnecting the cable from the negative (-) auxiliary battery terminal. Therefore, make sure to read the disconnecting the cable from the negative (-) auxiliary battery terminal notices before proceeding with work (See page General>INTRODUCTION>REPAIR INSTRUCTION>PRECAUTION).
58165F
2.REMOVE FRONT FLOOR COVER RH
3.DISCONNECT CABLE FROM NEGATIVE AUXILIARY BATTERY TERMINAL
- NOTICE:
-
When disconnecting the cable, some systems need to be initialized after the cable is reconnected (See page General>INTRODUCTION>REPAIR INSTRUCTION>INITIALIZATION).
67674A
4.REMOVE REAR DOOR FRAME GARNISH
5.REMOVE REAR POWER WINDOW REGULATOR SWITCH ASSEMBLY WITH REAR DOOR ARMREST BASE PANEL
67604
6.REMOVE REAR DOOR TRIM BOARD SUB-ASSEMBLY
67872
7.DISCONNECT REAR DOOR WEATHERSTRIP
67842E
8.REMOVE REAR DOOR SERVICE HOLE COVER
68152C
9.REMOVE REAR DOOR GLASS RUN
67408E
10.REMOVE REAR DOOR WINDOW DIVISION BAR SUB-ASSEMBLY
68124B
11.REMOVE REAR DOOR QUARTER WINDOW GLASS
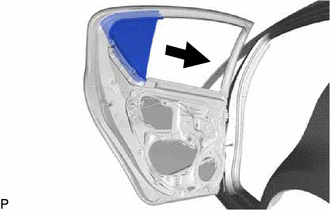
Remove the rear door quarter window glass as shown in the illustration.
68104
12.REMOVE REAR DOOR GLASS SUB-ASSEMBLY
69340
13.REMOVE REAR DOOR LOCK ASSEMBLY
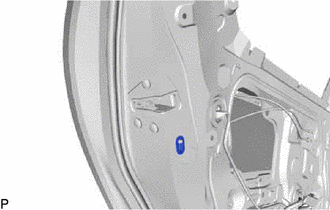
Remove the rear door lock child protection cover.
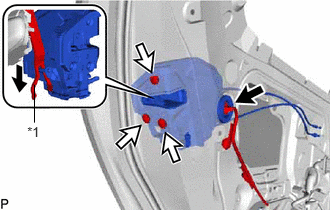
Disconnect the connector.
Using a T30 "TORX" socket wrench, remove the 3 screws.
Move the rear door lock assembly downward and pull the release plate out of the rear door outside handle frame.
| *1 | Release Plate |
When reusing the rear door lock assembly:
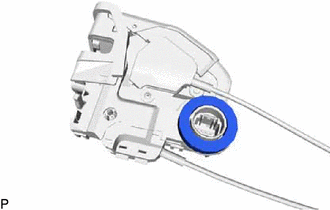
Remove the door lock wiring harness seal from the rear door lock assembly.
69740D
14.REMOVE REAR DOOR LOCK REMOTE CONTROL CABLE ASSEMBLY
69780B
15.REMOVE REAR DOOR INSIDE LOCKING CABLE ASSEMBLY