HEATING / AIR CONDITIONING AIR CONDITIONING SYSTEM ECO Switch Circuit
DESCRIPTION
When the ECO mode switch (eco switch assembly) is turned on, the air conditioning amplifier assembly receives an ECO mode switch (eco switch assembly) ON signal and controls the air conditioning to enhance fuel efficiency.
WIRING DIAGRAM
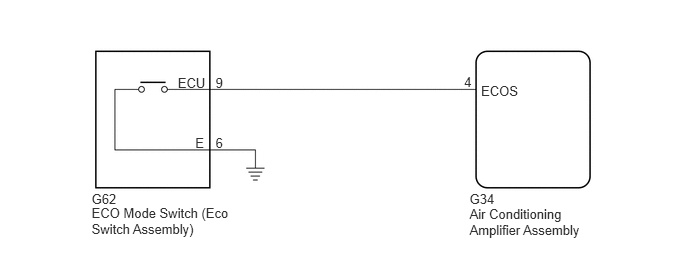
PROCEDURE
Connect the intelligent tester to the DLC3.
Turn the power switch on (IG).
Turn the intelligent tester on.
Enter the following menus: Body / Air Conditioner / Data Test.
Check the values by referring to the table below.
| Tester Display | Measurement Item/Range | Control Range | Diagnostic Note |
|---|---|---|---|
| ECO Switch | ECO mode switch (eco switch assembly) /
OFF or ON |
ECO mode switch (eco switch assembly) not operated: OFF
(when switch is not pressed) |
- |
| ECO mode switch (eco switch assembly) operated: ON
(when switch is pressed) |
- OK:
ECO mode switch (eco switch assembly) condition displayed on the intelligent tester changes with the actual switch operation.
OK
(See pageVehicle Interior>HEATING / AIR CONDITIONING>AIR CONDITIONING SYSTEM>PROBLEM SYMPTOMS TABLE)
NG
Remove the ECO mode switch (eco switch assembly) (See page Vehicle Interior>HEATING / AIR CONDITIONING>ECO SWITCH>REMOVAL).
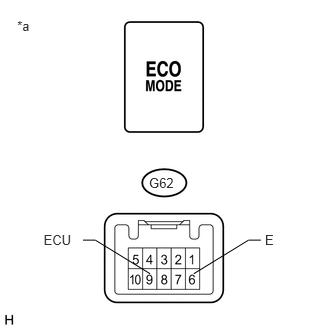
Measure the resistance according to the value(s) in the table below.
- Standard Resistance:
Tester Connection Condition Specified Condition G62-9 (ECU) - G62-6 (E) ECO mode switch (eco switch assembly) off
(when switch is not pressed)10 kΩ or higher G62-9 (ECU) - G62-6 (E) ECO mode switch (eco switch assembly) on
(when switch is pressed)Below 1 Ω
| *a | Component without harness connected
(ECO Mode Switch (Eco Switch Assembly)) |
OK
NG
Disconnect the G34 air conditioning amplifier assembly connector.
Measure the resistance according to the value(s) in the table below.
- Standard Resistance:
Tester Connection Condition Specified Condition G34-4 (ECOS) - G62-9 (ECU) Always Below 1 Ω G34-4 (ECOS) - Body ground Always 10 kΩ or higher
OK
NG
Measure the resistance according to the value(s) in the table below.
- Standard Resistance:
Tester Connection Condition Specified Condition G34-6 (E) - Body ground Always Below 1 Ω
OK
NG