INTERIOR PANELS / TRIM LOWER INSTRUMENT PANEL INSTALLATION
PROCEDURE

 1.INSTALL LOWER INSTRUMENT PANEL SUB-ASSEMBLY (for LHD)
When using a new lower instrument panel subassembly:
Immediately before installing the lower instrument panel sub-assembly, twist and cut off the portion shown in the illustration.
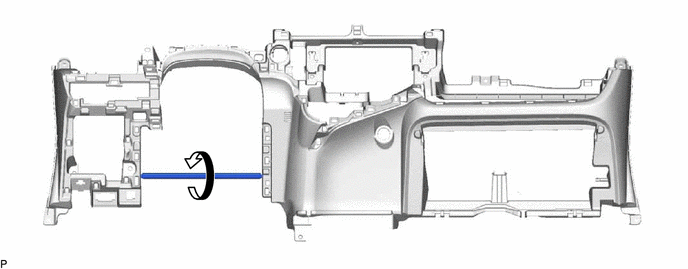
Install the lower instrument panel sub-assembly with the 2 bolts <A>, 7 screws <C> and screw <B>.
Engage the 2 claws to connect the DLC3.
Connect each connector.
Engage each clamp.
2.REMOVE LOWER INSTRUMENT PANEL SUB-ASSEMBLY (for RHD)
When using a new lower instrument panel subassembly:
Immediately before installing the lower instrument panel sub-assembly, twist and cut off the portion shown in the illustration.
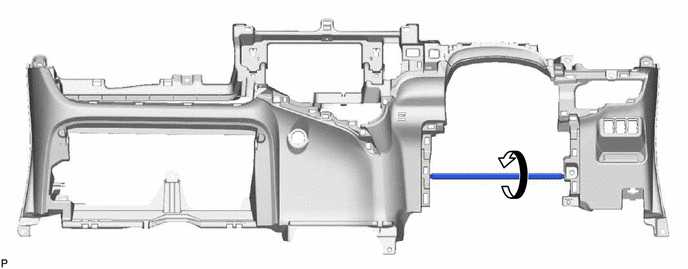
Install the lower instrument panel sub-assembly with the 2 bolts <A>, 7 screws <C> and screw <B>.
Engage the 2 claws to connect the DLC3.
Connect each connector.
Engage each clamp.
53601
3.CONNECT HOOD LOCK CONTROL LEVER SUB-ASSEMBLY
Engage the claw and 2 guides to connect the hood lock control lever sub-assembly.
62111C
4.INSTALL COWL SIDE TRIM BOARD RH
- HINT:
-
Use the same procedure as for the LH side.
67913
5.INSTALL FRONT DOOR SCUFF PLATE RH
- HINT:
-
Use the same procedure as for the LH side.
62112
6.INSTALL COWL SIDE TRIM BOARD LH
67914
7.INSTALL FRONT DOOR SCUFF PLATE LH
55550
8.INSTALL GLOVE COMPARTMENT DOOR ASSEMBLY
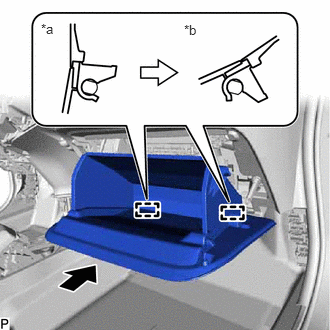
With the glove compartment door assembly opened approximately 55° from its closed position, engage the 2 hinges horizontally.
| *a | Opened approximately 55° |
| *b | Closed |
- NOTICE:
-
Engaging the hinges from the top will deform the hinges. Be sure to install the glove compartment door assembly horizontally.
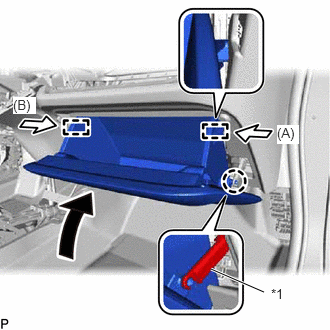
Slightly bend the stoppers (A) and (B) in the directions indicated by the arrows in the illustration and engage the stoppers to install the glove compartment door assembly.
| *1 | Glove Compartment Door Stopper Sub-assembly |
Engage the claw and connect the glove compartment door stopper sub-assembly.
55440D
9.INSTALL INSTRUMENT PANEL BOX ASSEMBLY
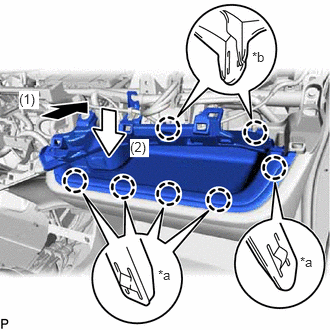
Push the instrument panel box assembly in the direction indicated by the arrow (1) to engage the 2 claws (B) as shown in the illustration.
| *a | Claw (A) |
| *b | Claw (B) |
Push the instrument panel box assembly in the direction indicated by the arrow (2) to engage the 5 claws (A) as shown in the illustration.
Install the instrument panel box assembly with the screw.
for LHD:
Engage the 3 clamps.
10.INSTALL REAR CONSOLE BOX ASSEMBLY
58919B
11.INSTALL CONSOLE BOX PLATE
58811A
12.INSTALL FRONT CONSOLE BOX
58821C
13.INSTALL UPPER CONSOLE PANEL
58917A
14.INSTALL REAR CONSOLE BOX COVER
88625Q
15.INSTALL ROOM TEMPERATURE SENSOR (COOLER THERMISTOR)
55900
16.INSTALL AIR CONDITIONING CONTROL ASSEMBLY
55479D
17.INSTALL LOWER INSTRUMENT CLUSTER FINISH PANEL GARNISH
for LHD:
Engage the 3 claws, 8 clips and 3 guides to install the lower instrument cluster finish panel garnish.
for RHD:
Engage the 2 claws, 8 clips and 4 guides to install the lower instrument cluster finish panel garnish.
18.INSTALL RADIO TUNER OPENING COVER WITH BRACKET (w/o Radio Receiver)
Install the radio tuner opening cover with bracket with the 4 screws <C>.
19.INSTALL RADIO RECEIVER ASSEMBLY WITH BRACKET (w/ Radio Receiver)
55840C
20.INSTALL NO. 6 HEATER TO REGISTER DUCT ASSEMBLY
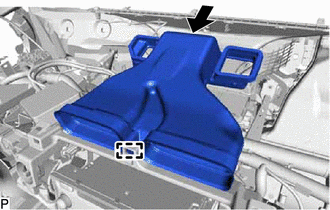
Engage the guide as shown in the illustration.
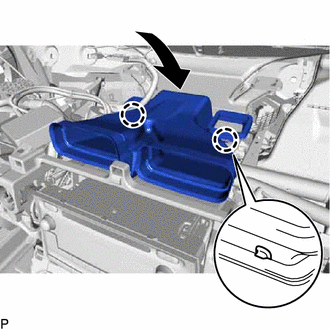
Engage the 2 claws as shown in the illustration.
Engage the clamp to install the No. 6 heater to register duct assembly.
73900
21.INSTALL LOWER NO. 1 INSTRUMENT PANEL AIRBAG ASSEMBLY
45287
22.INSTALL LOWER STEERING COLUMN COVER
55433C
23.INSTALL LOWER INSTRUMENT PANEL FINISH PANEL LH (for LHD)
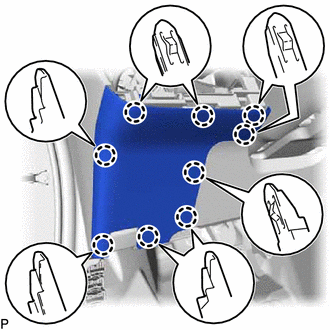
Engage the 9 claws to install the lower instrument panel finish panel LH as shown in the illustration.
55446A
24.INSTALL NO. 1 SWITCH HOLE BASE
for LHD:
Connect each connector.
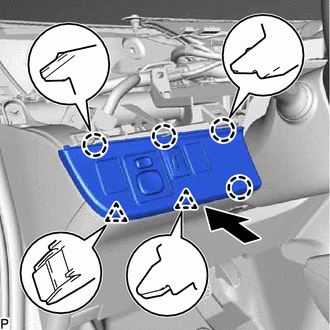
Engage the 4 claws and 2 clips to install the No. 1 switch hole base.
for RHD:
Connect each connector.
Engage the 2 claws and 3 clips to install the No. 1 switch hole base.
25.INSTALL UPPER INSTRUMENT PANEL ASSEMBLY