INTERIOR PANELS / TRIM ROOF HEADLINING REASSEMBLY
PROCEDURE

 82171
1.INSTALL NO. 1 ROOF WIRE
Align the positioning tape (Red) on the front part of the No. 1 roof wire with the front tab of the roof headlining.
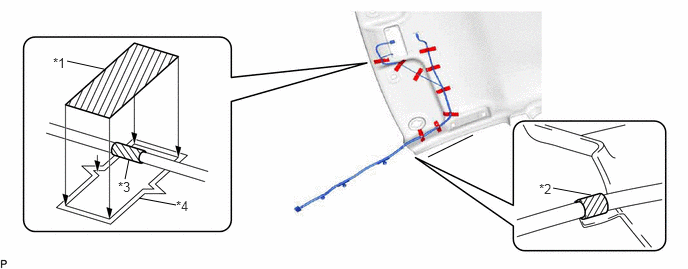
| *1 | Adhesive Tape | *2 | Positioning Tape (Red) |
| *3 | Positioning Tape | *4 | Marking |
Align the No. 1 roof wire positioning tape with the markings of the roof headlining.
Install the No. 1 roof wire onto the roof headlining with the adhesive tape.
- NOTICE:
- ·
Apply the tape securely in place.
·Do not touch the adhesive surface when applying the tape to prevent adhesion failure.
63359
2.INSTALL ROOF HEADLINING END PAD
Remove the release paper from a new roof headlining end pad.
- HINT:
-
After removing the release paper, keep the exposed adhesive free from foreign matter.
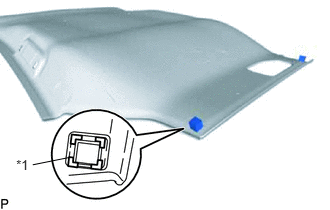
Align the markings on the roof headlining with the 2 roof headlining end pads and install the pads as shown in the illustration.
| *1 | Marking |
66425B
3.INSTALL REAR NO. 2 SIDE RAIL SPACER LH
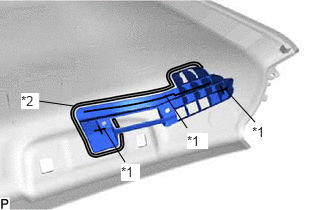
Align the markings on the roof headlining with a new rear No. 2 side rail spacer LH and install the spacer using hot-melt glue as shown in the illustration.
| *1 | Hot-melt Glue |
| *2 | Marking |
66414A
4.INSTALL REAR NO. 2 SIDE RAIL SPACER RH
- HINT:
-
Use the same procedure as for the LH side.
63343
5.INSTALL NO. 3 ROOF SILENCER PAD
w/ Silencer Pad:
Align the markings on the roof headlining with a new No. 3 roof silencer pad and install the pad using hot-melt glue as shown in the illustration.
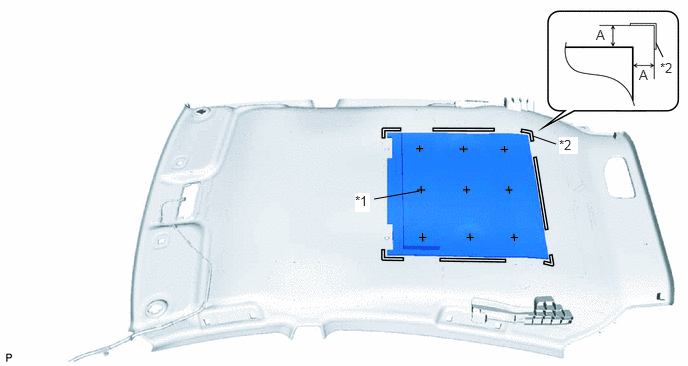
| *1 | Hot-melt Glue | *2 | Marking |
- Standard Measurement:
Dimension Measurement A 20 mm (0.787 in.)
63342
6.INSTALL NO. 2 ROOF SILENCER PAD
w/ Silencer Pad:
Align the markings on the roof headlining with a new No. 2 roof silencer pad and install the pad using hot-melt glue as shown in the illustration.
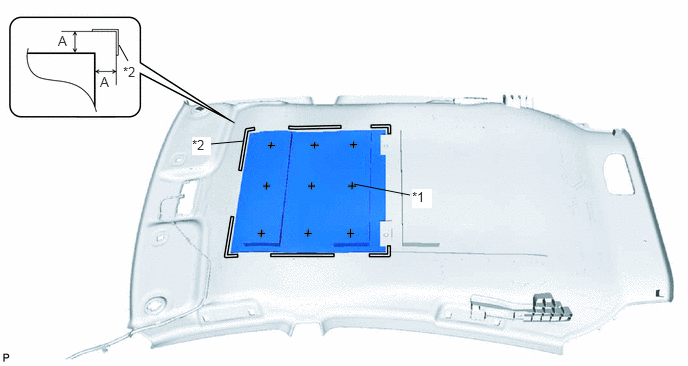
| *1 | Hot-melt Glue | *2 | Marking |
- Standard Measurement:
Dimension Measurement A 20 mm (0.787 in.)
63341
7.INSTALL NO. 1 ROOF SILENCER PAD
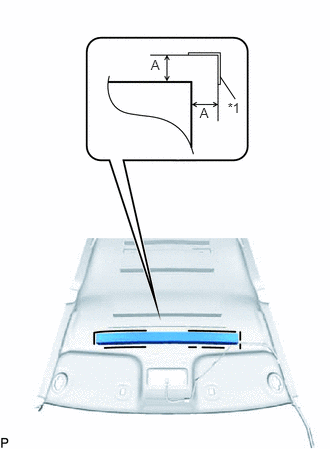
Align the markings on the roof headlining with a new No. 1 roof silencer pad and install the pad using hot-melt glue as shown in the illustration.
| *1 | Marking |
- Standard Measurement:
Dimension Measurement A 20 mm (0.787 in.)
63341D
8.INSTALL FRONT ROOF SILENCER PAD
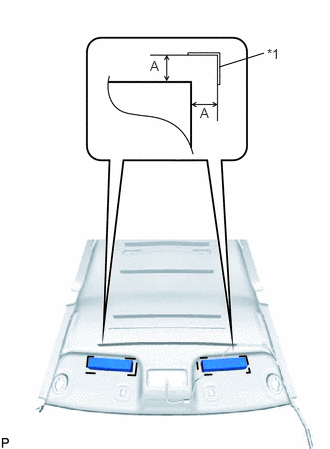
Align the markings on the roof headlining with a new 2 roof headlining silencer pads and install the pads using hot-melt glue as shown in the illustration.
| *1 | Marking |
- Standard Measurement:
Dimension Measurement A 20 mm (0.787 in.)
73137A
9.INSTALL UPPER SHOULDER BELT ANCHOR COVER
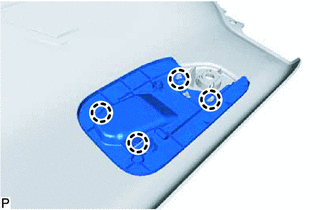
Install the rear seat shoulder belt cover RH to the roof headlining.
Engage the 4 claws to install the seat belt anchor cover.
86101J
10.INSTALL NO. 2 ANTENNA CORD SUB-ASSEMBLY
86730C
11.INSTALL AMPLIFIER MICROPHONE ASSEMBLY
63359B
12.INSTALL ROOF HEADLINING RETAINER COVER