1NZ-FXE FUEL FUEL PUMP(w/o Canister Pump Module) INSTALLATION
PROCEDURE

 77020A
1.INSTALL FUEL SUCTION TUBE WITH PUMP AND GAUGE ASSEMBLY
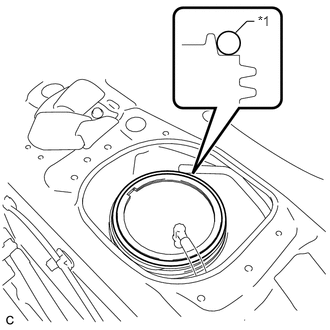
| *1 | Fuel Suction Tube Set Gasket |
Install a new fuel suction tube set gasket to the fuel tank assembly.
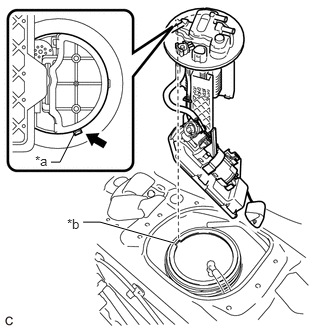
| *a | Protrusion |
| *b | Notch |
Set the fuel suction tube with pump and gauge assembly to the fuel tank assembly.
- NOTICE:
-
Be careful not to bend the arm of the fuel sender gauge assembly.
Align the protrusions of the fuel suction tube with pump and gauge assembly with the notches of the fuel tank assembly.
- NOTICE:
- ·
Make sure the horizontal angle of the fuel suction plate sub-assembly is less than 90°.
·To avoid applying excessive force to the tip of the fuel sender gauge assembly, tilt the fuel sub-tank sub-assembly diagonally and insert it into the fuel tank assembly as shown in the illustration.
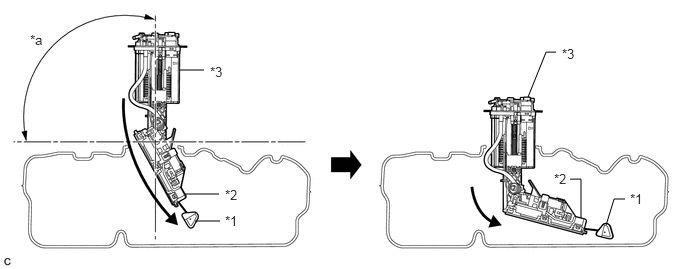 1.865,0.729 2.125,0.729 false 1.927,2.021 2.281,2.021 false 2.031,2.302 2.292,2.302 false 5.5,1.01 5.688,0.542 5.688,0.542 5.792,0.542 false 5.938,1.865 6.052,1.865 6.052,1.865 6.052,2.271 false 6.313,2.344 6.396,2.073 6.396,2.073 6.51,2.073 false 2.344,2.219 2.656,2.375 0.313,0.156 10 false *1 2.344,1.948 2.656,2.104 0.313,0.156 10 false *2 2.188,0.667 2.5,0.823 0.313,0.156 10 false *3 0.313,0.333 0.625,0.49 0.313,0.156 10 false *a 6.563,1.99 6.875,2.146 0.313,0.156 10 false *1 5.771,1.781 6.083,1.938 0.313,0.156 10 false *2 5.854,0.479 6.167,0.635 0.313,0.156 10 false *3
*1 Fuel Sender Gauge Assembly *2 Fuel Sub-tank Sub-assembly *3 Fuel Suction Plate Sub-assembly - - *a 90° - -
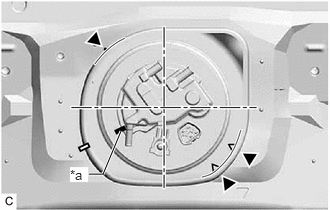
| *a | Paint Mark |
Place a paint mark on the fuel suction tube with pump and gauge assembly as shown in the illustration.
- HINT:
-
Perform this step only when replacing the fuel suction tube with pump and gauge assembly.
77169A
2.INSTALL FUEL PUMP GAUGE RETAINER
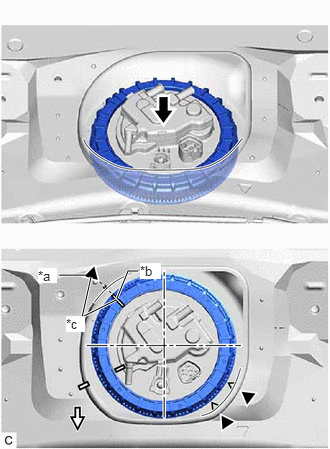
| *a | Copy of Start of Threads Mark |
| *b | Start of Threads of the Fuel Pump Gauge Retainer |
| *c | Align |

|
Press down |

|
Front |
Align the start of the threads of a new fuel pump gauge retainer with the start of threads mark that was copied onto the vehicle body and while pushing down the fuel suction tube with pump and gauge assembly, attach the fuel pump gauge retainer.
Install SST to the fuel pump gauge retainer.
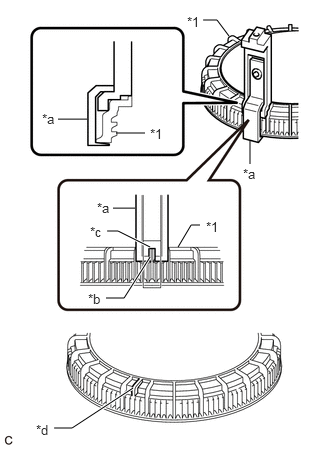
| *1 | Fuel Pump Gauge Retainer |
| *a | SST (Claw Set) |
| *b | Protrusion |
| *c | Notch |
| *d | Do not install SST (Claw Set) |
Set 4 SST (claw set) to the fuel pump gauge retainer.
- SST
- 09808-14031 (09808-01080, 09808-01090, 09808-01100)
- NOTICE:
- ·
Align the notch of SST (claw set) with the protrusion of the fuel pump gauge retainer.
·Do not install SST (claw set) to the start of threads location of the fuel pump gauge retainer.
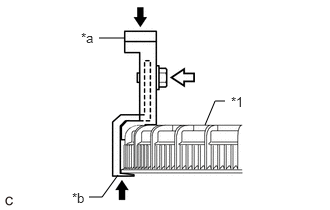
| *1 | Fuel Pump Gauge Retainer |
| *a | SST (Claw Set) |
| *b | Hook |
|
|
Push |
|
|
SST (Bolt) |
Push SST (claw set) against the fuel pump gauge retainer and tighten SST (bolt).
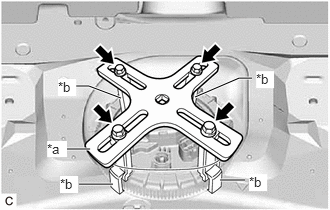
| *a | SST (Plate) |
| *b | SST (Claw Set) |
|
|
SST (Bolt) |
Temporarily install SST (plate) to SST (claw set) with 4 SST (bolt).
- SST
- 09808-14031 (09808-01030, 09808-01090)
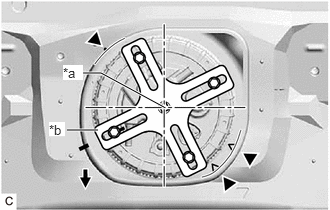
| *a | Center Point of Fuel Pump Gauge Retainer |
| *b | SST (Plate) |
|
|
Front |
Adjust the position of SST (claw set) so that the hole in SST (plate) for installing SST (handle) is in the center of the fuel pump gauge retainer.
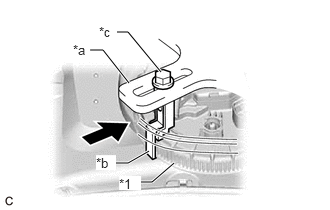
| *1 | Fuel Pump Gauge Retainer |
| *a | SST (Plate) |
| *b | SST (Claw Set) |
| *c | SST (Bolt) |
|
|
Press |
Press SST (claw set) against the rib of the fuel pump gauge retainer and tighten SST (bolt).
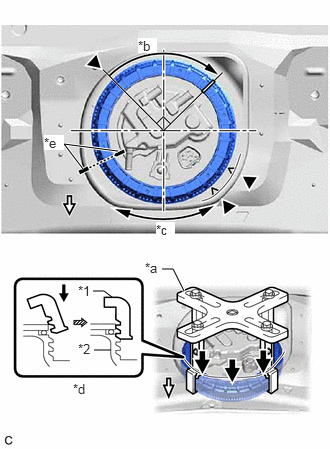
| *1 | Fuel Pump Gauge Retainer |
| *2 | Fuel Tank Assembly |
| *a | SST (Plate) |
| *b | Tighten approximately 90° |
| *c | Fuel pump gauge retainer rises up |
| *d | Cross Section |
| *e | Paint Mark |
|
|
Press quickly and firmly |
|
|
Front |
While pressing down on the fuel suction tube with pump and gauge assembly, have another person firmly press the fuel pump gauge retainer against the threads of the fuel tank assembly, and tighten the fuel pump gauge retainer by approximately 90°.
- NOTICE:
- ·
To prevent damage to parts, do not turn SST too vigorously.
·Do not turn the fuel pump gauge retainer if the paint marks become misaligned.
Quickly and firmly press down on the part of the fuel pump gauge retainer closest to the front of the vehicle to keep it from rising up.
- HINT:
- ·
If the fuel pump gauge retainer cannot be properly pressed down due to the position of SST, set SST in a different position.
·When fully pressing down the fuel pump gauge retainer, there will be a sound or tactile sensation of parts contacting each other, and at this point the fuel suction tube with pump and gauge assembly will stop rising up.
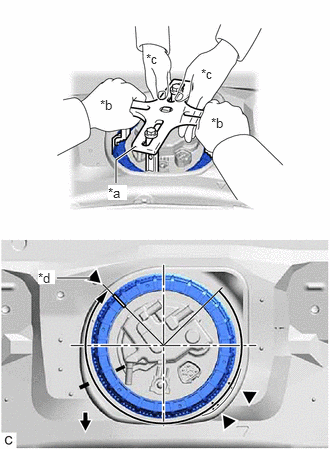
| *a | SST (Plate) |
| *b | One Person in Charge of Tightening |
| *c | One Person in Charge of Pressing Down |
| *d | Copy of Start of Threads Mark |
|
|
Front |
While pressing down on the fuel suction tube with pump and gauge assembly, have another person slowly tighten the fuel pump gauge retainer until it reaches the start of threads mark.
| *1 | Fuel Pump Gauge Retainer |
| *2 | Fuel Tank Assembly |
| *a | Measurement Position |
| *b | Vernier Caliper |
|
|
Front |
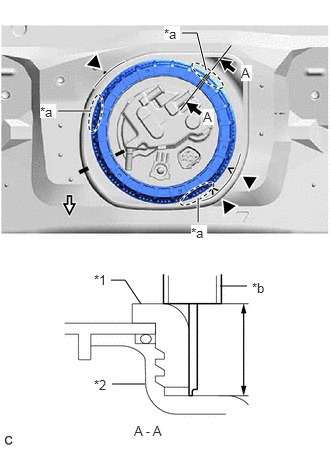
Check the tightening status of the fuel pump gauge retainer.
Using a vernier caliper, measure the distance from the fuel tank assembly to the upper surface of the fuel pump gauge retainer at 3 positions as shown in the illustration.
- Standard:
Difference between the 3 measured values is 3 mm (0.118 in.) or less.
- NOTICE:
-
If the difference between measurements is approximately 6 mm (0.236 in.), the threads are cross-threaded by 1 row (6 mm (0.236 in.)), so remove and reinstall the fuel pump gauge retainer.
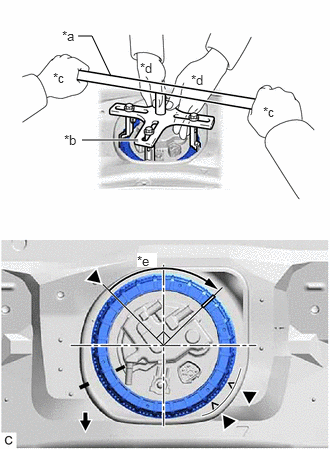
| *a | SST (Handle) |
| *b | SST (Plate) |
| *c | One Person in Charge of Tightening |
| *d | One Person in Charge of Pressing Down |
| *e | Approximately 90° |
|
|
Front |
Install SST (handle) to SST (plate).
- SST
- 09808-14031 (09808-01010, 09808-01020)
While pressing down on the fuel suction tube with pump and gauge assembly, have another person use SST (handle) to slowly tighten the fuel pump gauge retainer approximately 90°.
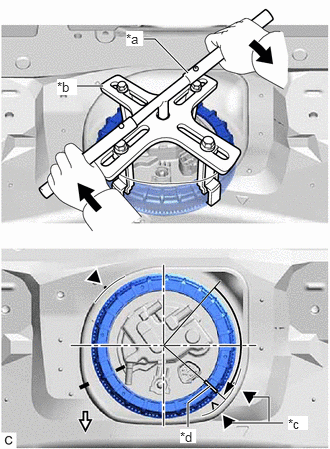
| *a | SST (Handle) |
| *b | SST (Plate) |
| *c | Copy of Fully Tightened Mark |
| *d | Start of Threads of the Fuel Pump Gauge Retainer |
|
|
Tighten |
|
|
Front |
Slowly tighten the fuel pump gauge retainer until it reaches between the fully tightened marks that were copied onto the vehicle body.
77209F
3.CONNECT FUEL TANK MAIN TUBE SUB-ASSEMBLY
Push the fuel tube joint onto the plug of the fuel suction plate sub-assembly, then install the tube joint clip.
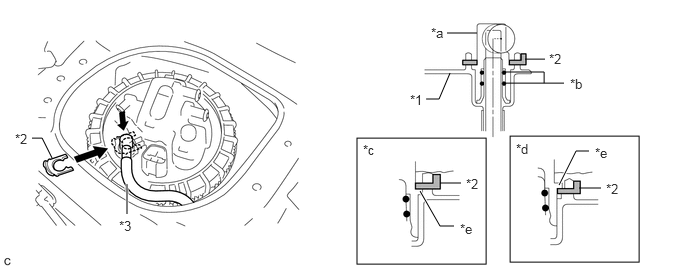
| *1 | Fuel Suction Plate Sub-assembly | *2 | Tube Joint Clip |
| *3 | Fuel Tank Main Tube Sub-assembly | - | - |
| *a | Fuel Tube Joint | *b | O-ring |
| *c | Correct | *d | Incorrect |
| *e | Collar | - | - |
- NOTICE:
- ·
Check that there are no scratches or foreign matter around the connecting parts of the fuel tube joint and plug before performing this work.
·Check that the fuel tube joint is securely inserted to the end.
·Check that the tube joint clip is on the collar of the fuel tube joint as shown in the illustration.
·After installing the tube joint clip, check that the fuel tank main tube sub-assembly is securely connected by pulling on it.
4. CHECK AIRTIGHTNESS
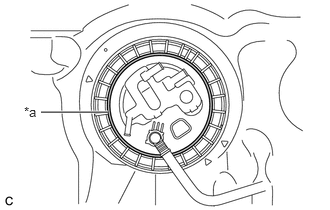
| *a | Soapy Water Application Area |
Apply soapy water to the contact areas between the fuel suction tube with pump and gauge assembly and fuel pump gauge retainer.
- NOTICE:
-
Cover the connector of the fuel suction tube with pump and gauge assembly with protective tape.
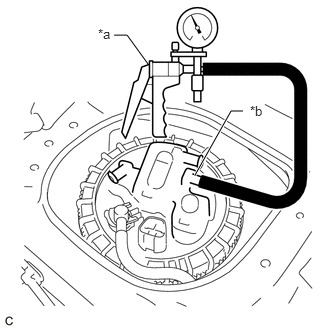
| *a | Vacuum Pump |
| *b | Port (B) |
Install a vacuum pump to the port (B) of the fuel suction tube with pump and gauge assembly as shown in the illustration.
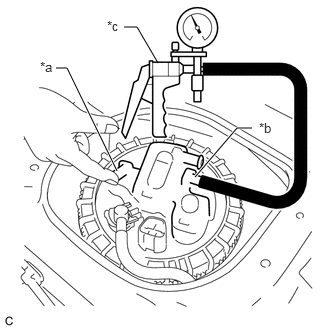
| *a | Port (A) |
| *b | Port (B) |
| *c | Vacuum Pump |
Close the port (A) and using the vacuum pump, apply 5 kPa (0.1 kgf/cm2, 0.7 psi) of compressed air to the port (B) as shown in the illustration.
- NOTICE:
-
Do not apply more compressed air than necessary.
Check that the contact areas between the fuel suction tube with pump and gauge assembly and fuel pump gauge retainer are airtight.
- NOTICE:
- ·
If air bubbles appear, remove and reinstall the fuel pump gauge retainer.
·After a fuel pump gauge retainer and fuel suction tube set gasket have been used once, replace them with new parts.
·When removing and reinstalling the fuel pump gauge retainer, make sure to clean away the soapy water to prevent the fuel suction tube set gasket from slipping out of position and being assembled incorrectly.
- HINT:
-
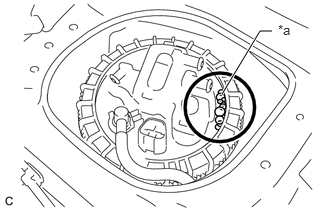 2.313,0.979 2.708,0.323 2.708,0.323 2.833,0.323 true 2.896,0.229 3.208,0.385 0.313,0.156 10 false *a
*a Air Bubbles
-
If the assembled components are not airtight due to improper installation of the fuel pump gauge retainer, etc., air bubbles will appear as shown in the illustration.
77701W
5.CONNECT NO. 1 CANISTER OUTLET HOSE SUB-ASSEMBLY
Connect the No. 1 canister outlet hose sub-assembly to the fuel suction tube with pump and gauge assembly.
77262
6.CONNECT NO. 2 FUEL EMISSION TUBE
Connect the No. 2 fuel emission tube to the fuel suction tube with pump and gauge assembly and slide the clip to secure it.
7.CONNECT CABLE TO NEGATIVE AUXILIARY BATTERY TERMINAL
- NOTICE:
-
When disconnecting the cable, some systems need to be initialized after the cable is reconnected.
-
Click hereGeneral>INTRODUCTION>REPAIR INSTRUCTION>INITIALIZATION
8.INSPECT FOR FUEL LEAK
58325E
9.INSTALL REAR FLOOR SERVICE HOLE COVER
Remove any remaining butyl tape from the rear floor service hole cover and vehicle body.
Clean the installation surfaces of the rear floor service hole cover and vehicle body.
Connect the fuel pump connector.
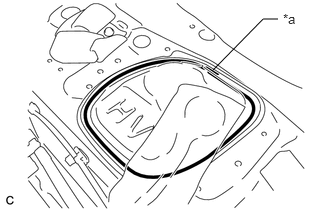
| *a | Butyl Tape |
Install the rear floor service hole cover with new butyl tape.
73705B
10.INSTALL CROSS ANCHOR BRACKET SUB-ASSEMBLY