HYBRID / BATTERY CONTROL WATER PUMP WITH MOTOR INSTALLATION
PROCEDURE

 G9031A
1.INSTALL HV WATER PUMP BRACKET SUB-ASSEMBLY
- HINT:
-
Perform this procedure only when replacement of the HV water pump bracket sub-assembly is necessary.
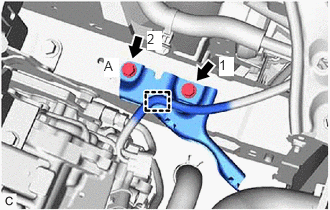
Temporarily install the HV water pump bracket sub-assembly with the bolt (A).
Fully tighten the 2 bolts in the order shown in the illustration.
- Torque:
- 19.5 N*m (199 kgf*cm, 14 ft.*lbf)
Connect the clamp.
G9110
2.INSTALL INVERTER BRACKET ASSEMBLY
- HINT:
-
Perform this procedure only when replacement of the HV water pump bracket sub-assembly is necessary.
Click hereEngine / Hybrid System>1NZ-FXE (ENGINE MECHANICAL)>ENGINE ASSEMBLY>INSTALLATION
G9200
3.INSTALL INVERTER WITH CONVERTER ASSEMBLY
- HINT:
-
Perform this procedure only when replacement of the HV water pump bracket sub-assembly is necessary.
Click hereEngine / Hybrid System>HYBRID / BATTERY CONTROL>INVERTER WITH CONVERTER>INSTALLATION
G9040
4.INSTALL INVERTER WATER PUMP ASSEMBLY
Install the inverter water pump assembly with the 2 bolts.
- Torque:
- 6.1 N*m (62 kgf*cm, 54 in.*lbf)
- NOTICE:
-
If the inverter water pump assembly has been struck or dropped, replace it.
Connect the inverter water pump assembly connector.
G922F
5.CONNECT NO. 1 HYBRID WATER PUMP OUTLET HOSE
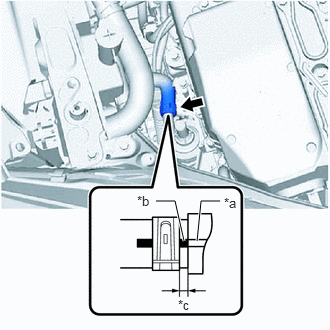
| *a | Rib |
| *b | Alignment Mark (Yellow) |
| *c | 2 to 7 mm (0.0787 to 0.276 in.) |
Connect the No.1 hybrid water pump outlet hose to the inverter water pump assembly and slide the hose clip to secure it.
- NOTICE:
-
To prevent foreign matter from entering the inverter water pump assembly and inverter cooling system, do not remove the pieces of cloth from the pipes and disconnected hoses until installation.
- HINT:
-
Make sure to align the alignment mark of the hose with the rib of the inverter water pump assembly.
G922E
6.CONNECT HYBRID WATER PUMP INLET HOSE
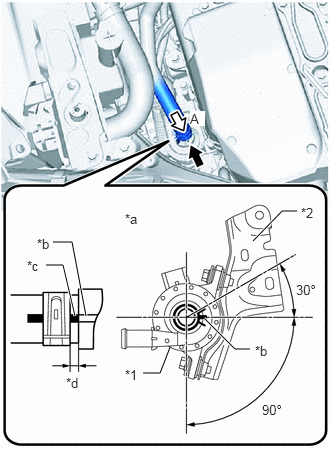
| *1 | Inverter Water Pump Assembly |
| *2 | HV Water Pump Bracket Sub-assembly |
| *a | View A |
| *b | Rib |
| *c | Alignment Mark (White) |
| *d | 2 to 7 mm (0.0787 to 0.276 in.) |
Connect the hybrid water pump inlet hose to the inverter water pump assembly and slide the hose clip to secure it.
- NOTICE:
-
To prevent foreign matter from entering the inverter water pump assembly and inverter cooling system, do not remove the pieces of cloth from the pipes and disconnected hoses until installation.
- HINT:
- ·
Make sure to align the alignment mark of the hose with the rib of the inverter water pump assembly.
·Make sure that the clip are positioned as shown in the illustration.
7.ADD COOLANT (for Inverter)
8.INSPECT FOR COOLANT LEAK (for Inverter)