HYBRID / BATTERY CONTROL HYBRID BATTERY SYSTEM P0A82-123 Hybrid Battery Pack Cooling Fan 1 Performance / Stuck OFF
DESCRIPTION
Refer to the circuit description for DTC P0A84-123 (See page Engine / Hybrid System>HYBRID / BATTERY CONTROL>HYBRID BATTERY SYSTEM>P0A84-123).
| DTC No. | INF Code | DTC Detection Condition | Trouble Area |
|---|---|---|---|
| P0A82 | 123 | The speed of the battery cooling blower assembly is not within the specified range (1 trip detection) | ·
Battery cooling blower assembly ·
Battery smart unit ·
Power management control ECU ·
Intake duct ·
Wire harness or connector ·
Exhaust duct |
- HINT:
-
The above DTC can be stored while the battery cooling blower assembly operates. When performing a reproduction test, drive the vehicle until "Temp of batt TB1to6" is stored in the Freeze Frame Data and then start the battery cooling blower assembly. This DTC is not detected when performing an Active Test of "Driving the Battery Cooling Fan".
WIRING DIAGRAM
Refer to the wiring diagram for DTC P0A84-123 (See page Engine / Hybrid System>HYBRID / BATTERY CONTROL>HYBRID BATTERY SYSTEM>P0A84-123).
CAUTION / NOTICE / HINT
- CAUTION:
- ·
Before inspecting the high-voltage system or disconnecting the low voltage connector of the inverter with converter assembly, take safety precautions such as wearing insulated gloves and removing the service plug grip to prevent electrical shocks. After removing the service plug grip, put it in your pocket to prevent other technicians from accidentally reconnecting it while you are working on the high-voltage system.
·After removing the service plug grip, wait for at least 10 minutes before touching any of the high-voltage connectors or terminals. After waiting for 10 minutes, check the voltage at the terminals in the inspection point in the inverter with converter assembly. The voltage should be 0 V before beginning work (See page Engine / Hybrid System>HYBRID / BATTERY CONTROL>HYBRID BATTERY SYSTEM>PRECAUTION).
- HINT:
-
Waiting for at least 10 minutes is required to discharge the high-voltage capacitor inside the inverter with converter assembly.
- NOTICE:
-
After turning the power switch off, waiting time may be required before disconnecting the cable from the negative (-) auxiliary battery terminal. Therefore, make sure to read the disconnecting the cable from the negative (-) auxiliary battery terminal notices before proceeding with work (See page General>INTRODUCTION>REPAIR INSTRUCTION>PRECAUTION).
PROCEDURE
A
B
Remove the console box assembly (See page Vehicle Interior>INTERIOR PANELS / TRIM>FRONT CONSOLE BOX>REMOVAL).
Turn over the front floor carpet.
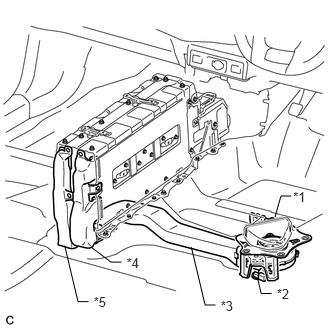
Check that the duct and battery cooling blower are not disconnected, damaged, or clogged with foreign matter, and that the acoustical materials have not peeled.
| *1 | Intake Duct |
| *2 | Hybrid Cooling Blower Assembly |
| *3 | No. 2 Intake Duct |
| *4 | No. 4 Intake Duct |
| *5 | Exhaust Duct |
- OK:
The duct and blower are not disconnected, damaged, or clogged with foreign matter and the acoustical materials have not peeled.
Install the front floor carpet.
Install the console box assembly.
OK
NG
OK
NG
OK
NG
Remove the power management control ECU (See page Power Source / Network>POWER DISTRIBUTION>POWER MANAGEMENT CONTROL ECU>COMPONENTS).
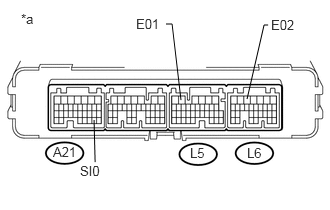
Measure the resistance according to the value(s) in the table below.
- Standard Resistance:
Tester Connection Condition Specified Condition A21-29 (SI0) - L5-5 (E01) Power switch off 10 kΩ or higher A21-29 (SI0) - L6-5 (E02) Power switch off 10 kΩ or higher
| *a | Component without harness connected
(Power Management Control ECU) |
Install the power management control ECU.
OK
NG
A
B
OK
NG
OK
NG