2ZR-FXE ENGINE MECHANICAL CAMSHAFT REMOVAL
PROCEDURE

 1.REMOVE ENGINE ASSEMBLY WITH TRANSAXLE
2.INSTALL ENGINE STAND
3.REMOVE ENGINE HANGER
22210
4.REMOVE THROTTLE BODY ASSEMBLY
11409
5.REMOVE ENGINE OIL LEVEL DIPSTICK GUIDE
25610
6.REMOVE EGR PIPE ASSEMBLY
25620
7.REMOVE EGR VALVE WITH COOLER ASSEMBLY
17111
8.REMOVE INTAKE MANIFOLD
23818
9.REMOVE FUEL VAPOR FEED PIPE
23807
10.REMOVE FUEL DELIVERY PIPE SUB-ASSEMBLY
23807V
11.REMOVE NO. 1 DELIVERY PIPE SPACER
23250
12.REMOVE FUEL INJECTOR ASSEMBLY
19500
13.REMOVE IGNITION COIL ASSEMBLY
11201
14.REMOVE CYLINDER HEAD COVER SUB-ASSEMBLY
11213
15.REMOVE CYLINDER HEAD COVER GASKET
11193
16.REMOVE SPARK PLUG TUBE GASKET
17.SET NO. 1 CYLINDER TO TDC/COMPRESSION
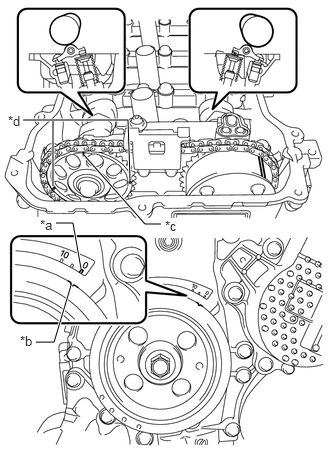
| *a | Timing Mark |
| *b | Timing Notch |
| *c | Timing Mark (Rectangle) |
| *d | Mark (Circle) |
Turn the crankshaft pulley until its notch and timing mark "0" of the timing chain cover are aligned.
- NOTICE:
-
There are 3 marks on the camshaft timing sprocket. Make sure that the timing mark (rectangle) is at the top.
Check that the timing marks on both the camshaft timing sprocket and the camshaft timing gear are facing upward as shown in the illustration.
If not, turn the crankshaft 1 complete revolution (360°) and align the marks as above.
13471
18.REMOVE CRANKSHAFT PULLEY
13540
19.REMOVE NO. 1 CHAIN TENSIONER ASSEMBLY
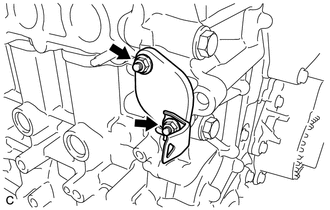
Remove the 2 nuts, bracket, chain tensioner and gasket.
- NOTICE:
-
Do not turn the crankshaft without the No. 1 chain tensioner installed.
11302
20.REMOVE TIMING CHAIN COVER SUB-ASSEMBLY
11302A
21.REMOVE TIMING CHAIN COVER OIL SEAL
13559
22.REMOVE CHAIN TENSIONER SLIPPER
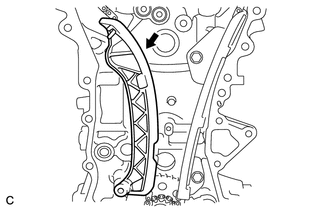
Remove the chain tensioner slipper from the cylinder block.
13561
23.REMOVE NO. 1 CHAIN VIBRATION DAMPER
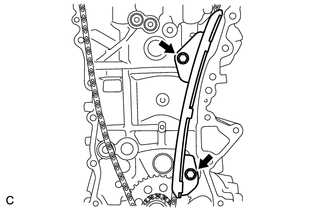
Remove the 2 bolts and chain vibration damper.
13562
24.REMOVE NO. 2 CHAIN VIBRATION DAMPER
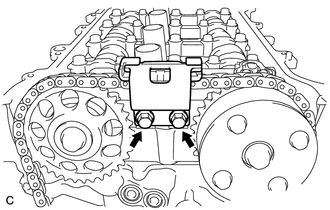
Remove the 2 bolts and No. 2 chain vibration damper.
13506
25.REMOVE CHAIN SUB-ASSEMBLY
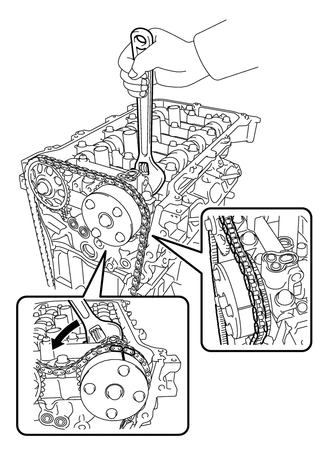
Hold the hexagonal portion of the camshaft with a wrench and turn the camshaft timing gear counterclockwise to loosen the chain between the camshaft timing gears.
With the chain loosened, release the chain from the camshaft timing gear and place it on the camshaft timing gear.
- HINT:
-
Be sure to release the chain from the sprocket completely.
Turn the camshaft clockwise to return it to the original position and remove the chain.
13050
26.INSPECT CAMSHAFT TIMING GEAR ASSEMBLY
Inspect the lock of the camshaft timing gear.
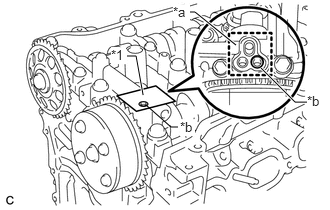
After cleaning and degreasing the VVT oil hole on the intake side of the No. 1 camshaft bearing cap, completely seal the oil hole with adhesive tape or equivalent as shown in the illustration to prevent air from leaking.
| *1 | Adhesive Tape |
| *a | Adhesive Tape Sealing Area |
| *b | Prick a Hole |
- NOTICE:
-
Be sure to cover the oil hole completely because air leaks due to insufficient sealing will prevent the lock pin from being released.
Prick a hole in the tape covering the oil hole as shown in the illustration. (Procedure A)
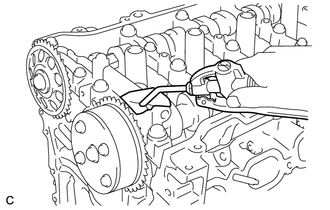
Apply approximately 150 kPa (1.5 kgf/cm2, 22 psi) of air pressure to the hole pricked in procedure A to release the lock pin.
- NOTICE:
- ·
If air leaks out, reattach the adhesive tape.
·Cover the oil hole with a piece of cloth when applying air pressure to prevent oil from spraying.
Forcibly turn the camshaft timing gear in the advance direction (counterclockwise).
- HINT:
-
Depending on the air pressure applied, the camshaft timing gear may turn in the advance direction without assistance.
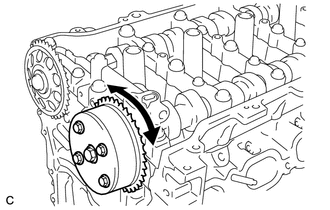
Turn the camshaft timing gear within its movable range (26.5 to 28.5°) 2 or 3 times without turning it to the most retarded position. Make sure that the camshaft timing gear turns smoothly.
Remove the adhesive tape from the No. 1 camshaft bearing cap.
13050
27.REMOVE CAMSHAFT TIMING GEAR ASSEMBLY
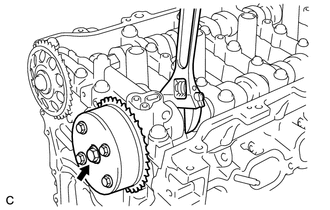
Remove the flange bolt while holding the hexagonal portion of the camshaft with a wrench, and then remove the camshaft timing gear.
| *1 | Flange Bolt |
| *a | Do not remove |
- NOTICE:
- ·
Before removing the camshaft timing gear, make sure that the lock pin has been released.
·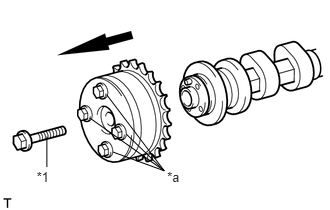 1.741,1.762 1.920,1.929 0.179,0.168 10 *a 0.381,1.759 0.564,1.907 0.183,0.149 10 *1 1.176,1.583 1.711,1.779 1.711,1.779 1.317,1.398 false 0.488,1.422 0.488,1.741 false 0.935,1.229 1.711,1.779 1.711,1.779 1.11,0.985 false
Be sure not to remove the other 4 bolts.
·Keep the camshaft timing gear horizontal while removing it from the camshaft.
13523G
28.REMOVE CAMSHAFT TIMING SPROCKET
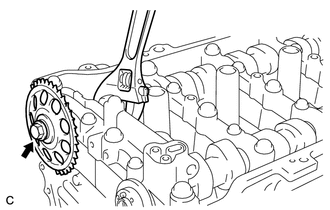
Remove the flange bolt while holding the hexagonal portion of the camshaft with a wrench, and then remove the camshaft timing sprocket.
29.REMOVE CAMSHAFT BEARING CAP
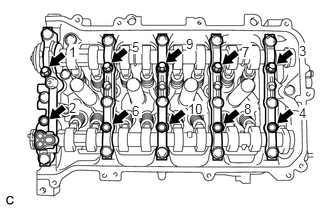
Uniformly loosen and remove the 10 bearing cap bolts in the sequence shown in the illustration.
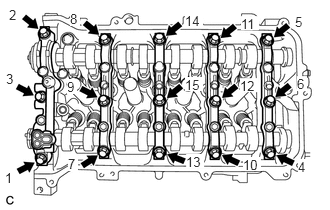
Uniformly loosen and remove the 15 bearing cap bolts in the sequence shown in the illustration.
- NOTICE:
-
Uniformly loosen the bearing cap bolts while keeping the camshaft housing level.
Remove the 5 bearing caps.
- HINT:
-
Arrange the removed parts in the correct order.
13511
30.REMOVE CAMSHAFT
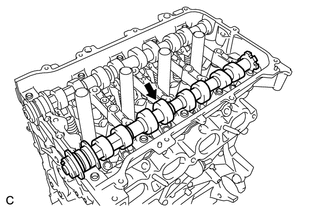
Remove the camshaft.
13512
31.REMOVE NO. 2 CAMSHAFT
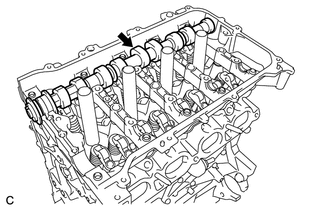
Remove the No. 2 camshaft.
11811
32.REMOVE NO. 1 CAMSHAFT BEARING
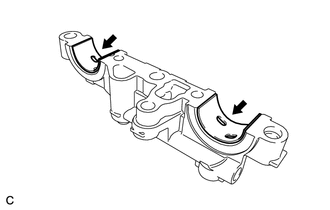
Remove the 2 No. 1 camshaft bearings.
11821
33.REMOVE NO. 2 CAMSHAFT BEARING
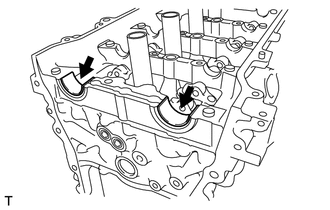
Remove the 2 No. 2 camshaft bearings.
11103
34.REMOVE CAMSHAFT HOUSING SUB-ASSEMBLY
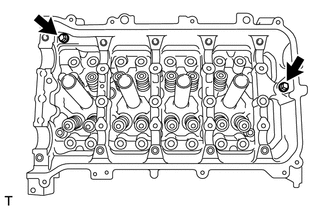
Remove the 2 bolts.
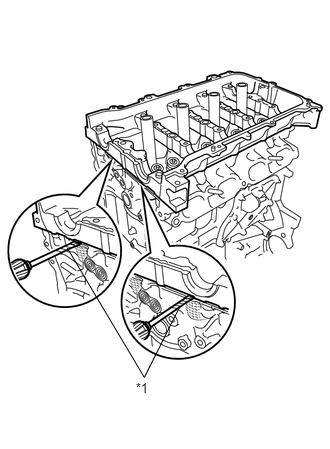
Remove the camshaft housing by prying between the cylinder head and camshaft housing with a screwdriver.
| *1 | Protective Tape |
- NOTICE:
-
Be careful not to damage the contact surfaces of the cylinder head and camshaft housing.
- HINT:
-
Tape the screwdriver tip before use.