2ZR-FXE LUBRICATION OIL PUMP INSTALLATION
PROCEDURE

 15100
1.INSTALL OIL PUMP ASSEMBLY
Install the oil pump with the 3 bolts.
- Torque:
- 21 N*m (214 kgf*cm, 16 ft.*lbf)
12102A
2.INSTALL NO. 2 OIL PAN SUB-ASSEMBLY
Remove any old packing material and be careful not to drop any oil on the contact surfaces of the cylinder block and oil pan.
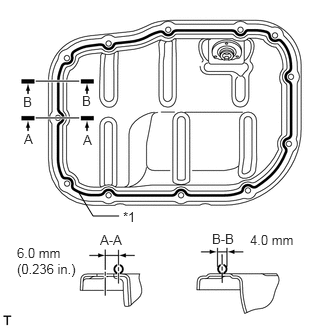
Apply a continuous bead of seal packing (diameter 4.0 mm (0.157 in.)) as shown in the illustration.
| *1 | Seal Packing |
- Seal packing:
Toyota Genuine Seal Packing Black, Three Bond 1207B or equivalent
- NOTICE:
- ·
Remove any oil from the contact surfaces.
·Install the oil pan within 3 minutes of applying seal packing.
·Do not start the engine for at least 2 hours after installing the oil pan.
Install the No. 2 oil pan with the 10 bolts and 2 nuts.
- Torque:
- 10 N*m (102 kgf*cm, 7 ft.*lbf)
12101A
3.INSTALL OIL PAN DRAIN PLUG
13521A
4.INSTALL CRANKSHAFT TIMING GEAR KEY
19315
5.INSTALL NO. 1 CRANKSHAFT POSITION SENSOR PLATE
13507
6.INSTALL NO. 2 CHAIN SUB-ASSEMBLY
Temporarily install the crankshaft pulley bolt.
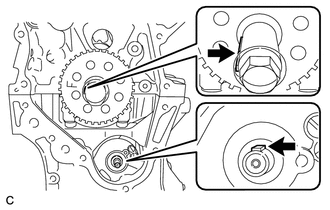
Turn the crankshaft counterclockwise to position the timing gear key at the 9 o'clock position.
Turn the drive shaft so that the cutout faces the 12 o'clock position.
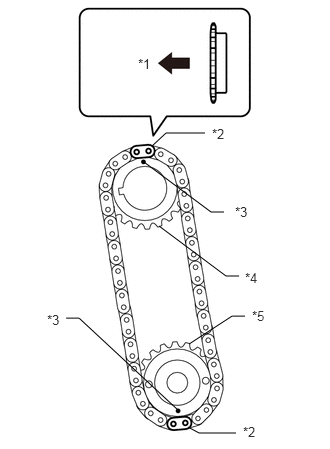
Align the yellow mark links with the timing marks of each gear as shown in the illustration.
| *1 | Front |
| *2 | Mark Plate (Yellow) |
| *3 | Timing Mark |
| *4 | Oil Pump Drive Gear |
| *5 | Oil Pump Drive Shaft Gear |
- HINT:
-
Be sure to position the mark plates at the front of the engine.
Install the gears onto the crankshaft and oil pump shaft with the chain on the gears.
Temporarily tighten the oil pump drive shaft gear with the nut.
Insert the damper spring into the adjusting hole, and then install the chain tensioner plate with the bolt.
- Torque:
- 10 N*m (102 kgf*cm, 7 ft.*lbf)
Temporarily tighten the crankshaft pulley with the bolt.
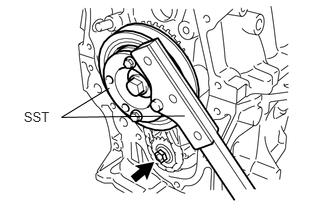
Using SST, install the oil pump drive shaft gear nut while holding the crankshaft pulley.
- SST
- 09213-58014 (91551-80840)
09330-00021
- Torque:
- 28 N*m (286 kgf*cm, 21 ft.*lbf)
Remove the crankshaft pulley and bolt.
13521
7.INSTALL CRANKSHAFT TIMING SPROCKET
Install the crankshaft timing sprocket.
13561
8.INSTALL NO. 1 CHAIN VIBRATION DAMPER
9.SET NO. 1 CYLINDER TO TDC / COMPRESSION
13506
10.INSTALL CHAIN SUB-ASSEMBLY