2ZR-FXE ENGINE MECHANICAL CAMSHAFT INSTALLATION
PROCEDURE

 11811
1.INSTALL NO. 1 CAMSHAFT BEARING
Clean both surfaces of the bearings.
Install the 2 No. 1 camshaft bearings.
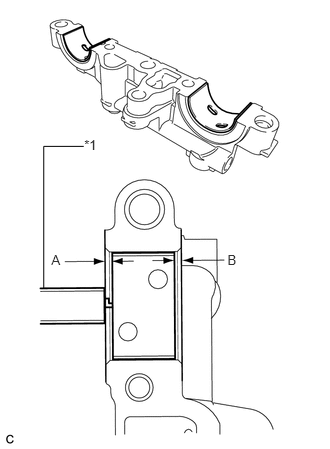
Using a vernier caliper, measure the distance between the bearing cap edge and the camshaft bearing edge.
| *1 | Vernier Caliper |
- Standard dimension (A - B):
0.7 mm (0.0276 in.) or less
- NOTICE:
-
Position the bearings to the center of the bearing cap by measuring dimensions A and B.
11821
2.INSTALL NO. 2 CAMSHAFT BEARING
Clean both surfaces of the bearings.
Install the 2 No. 2 camshaft bearings.
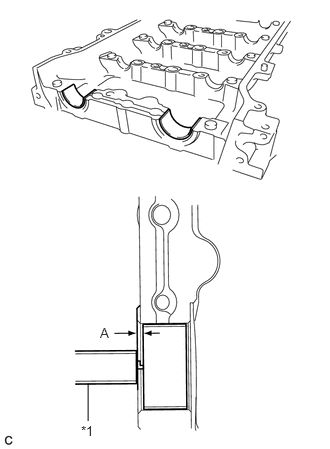
Using a vernier caliper, measure the distance between the bearing cap edge and the camshaft bearing edge.
| *1 | Vernier Caliper |
- Standard dimension (A):
1.05 to 1.75 mm (0.0413 to 0.0689 in.)
- NOTICE:
-
Position the bearings to the center of the bearing cap by measuring dimension A.
13512
3.INSTALL NO. 2 CAMSHAFT
Clean the camshaft journals.
Apply a light coat of engine oil to the camshaft journals, camshaft housings and bearing caps.
Install the No. 2 camshaft to the camshaft housing.
13511
4.INSTALL CAMSHAFT
Clean the camshaft journals.
Apply a light coat of engine oil to the camshaft journals, camshaft housings and bearing caps.
Install the camshaft to the camshaft housing.
5.INSTALL BEARING CAP
Apply engine oil to the camshaft journals, camshaft housings and bearing caps.
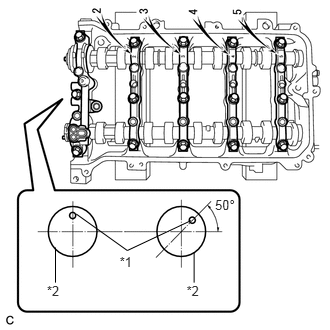
Make sure of the marks and numbers on the camshaft bearing caps and place them in each proper position and direction.
| *1 | Knock Pin |
| *2 | Camshaft |
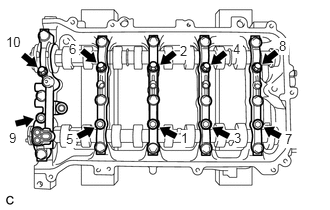
Tighten the 10 bolts in the order shown in the illustration.
- Torque:
- 16 N*m (163 kgf*cm, 12 ft.*lbf)
11103
6.INSTALL CAMSHAFT HOUSING SUB-ASSEMBLY
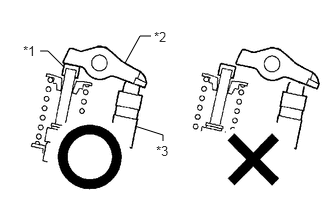
Check that the valve rocker arms are installed as shown in the illustration.
| *1 | Valve Stem Cap |
| *2 | Valve Rocker Arm |
| *3 | Valve Lash Adjuster |
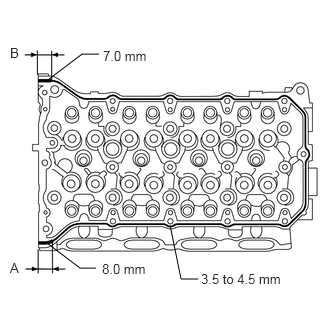
Apply seal packing in a continuous line as shown in the illustration.
- Seal packing:
Toyota Genuine Seal Packing Black, Three Bond 1207B or equivalent
- Standard Seal Diameter:
Area Specified Condition Continuous line 3.5 to 4.5 mm (0.138 to 0.177 in.) A 8.0 mm (0.315 in.) B 7.0 mm (0.276 in.)
- Application Length A and B:
15 mm (0.591 in.)
- NOTICE:
- ·
Remove any oil from the contact surfaces.
·Install the camshaft housing within 3 minutes and tighten the bolts within 10 minutes of applying seal packing.
·Do not start the engine for at least 2 hours after installation.
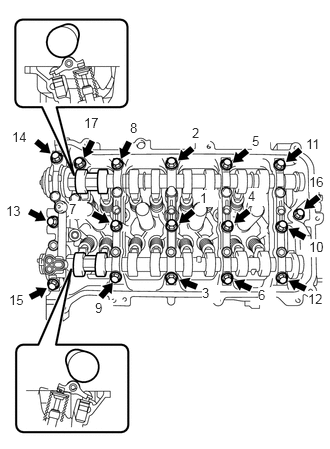
Set the camshaft and No. 2 camshaft as shown in the illustration.
Install the camshaft housing with the 17 bolts and tighten them in the order shown in the illustration.
- Torque:
- 27 N*m (275 kgf*cm, 20 ft.*lbf)
- NOTICE:
- ·
After installing the camshaft housing, make sure that the cam lobes are positioned as shown in the illustration.
·If any of the bolts is loosened during installation, remove the camshaft housing, clean the installation surfaces, and reapply seal packing.
·If the camshaft housing is removed because any of the bolts is loosened during installation, make sure that the previously applied seal packing does not enter any oil passages.
·After installing the camshaft housing, wipe off any seal packing that seeped out from between the housing and cylinder head.
13523G
7.INSTALL CAMSHAFT TIMING SPROCKET
Tighten the flange bolt with the camshaft timing sprocket secured in place.
- Torque:
- 54 N*m (551 kgf*cm, 40 ft.*lbf)
13050
8.INSTALL CAMSHAFT TIMING GEAR ASSEMBLY
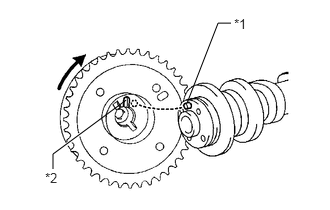
Put the camshaft timing gear and camshaft together with the straight pin and key groove misaligned as shown in the illustration.
| *1 | Straight Pin |
| *2 | Key Groove |
- NOTICE:
-
Do not forcefully push in the camshaft timing gear. This may cause the camshaft straight pin tip to damage the installation surface of the camshaft timing gear.
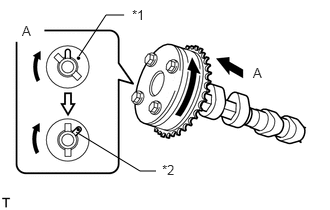
Turn the camshaft timing gear as shown in the illustration while pushing it gently against the camshaft. Push further at the position where the pin fits into the groove.
| *1 | Straight Pin |
| *2 | Key Groove |
- NOTICE:
-
Do not turn the camshaft timing gear in the retard direction (clockwise).
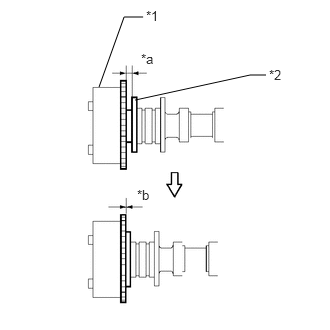
Check that there is no clearance between the camshaft timing gear and camshaft flange.
| *1 | Camshaft Timing Gear |
| *2 | Flange |
| *a | Clearance |
| *b | No Clearance |
Tighten the flange bolt with the camshaft timing gear secured in place.
- Torque:
- 54 N*m (551 kgf*cm, 40 ft.*lbf)
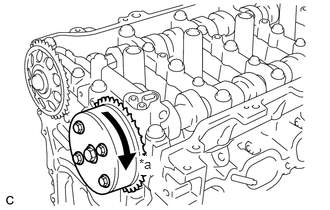
Check that the camshaft timing gear can move in the retard direction (clockwise) and lock it in the most retarded position.
| *a | Lock |
13561
9.INSTALL NO. 1 CHAIN VIBRATION DAMPER
Install the chain vibration damper with the 2 bolts.
- Torque:
- 21 N*m (214 kgf*cm, 15 ft.*lbf)
10.SET NO. 1 CYLINDER TO TDC/COMPRESSION
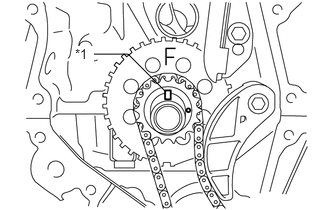
Temporarily install the crankshaft pulley bolt.
| *1 | Timing Gear Key |
Turn the crankshaft to position the timing gear key to the top.
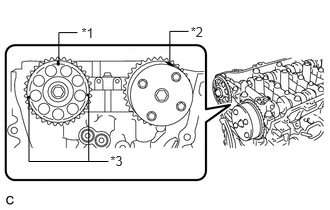
Check that the timing marks on the camshaft timing gear and camshaft timing sprocket are aligned as shown in the illustration.
| *1 | Timing Mark (Rectangle) |
| *2 | Timing Mark |
| *3 | Mark (Circle) |
- NOTICE:
-
There are 3 marks on the camshaft timing sprocket. Make sure that the timing mark (rectangle) is at the top.
Remove the crankshaft pulley bolt.
13506
11.INSTALL CHAIN SUB-ASSEMBLY
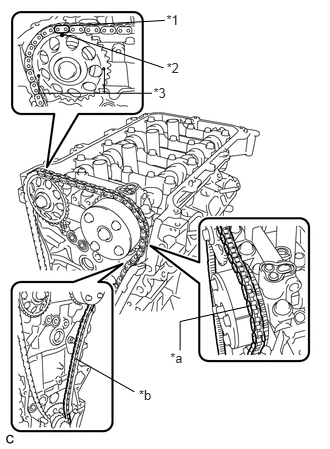
Align the mark plate (orange) with the timing mark as shown in the illustration and install the chain.
| *1 | Mark Plate (Orange) |
| *2 | Timing Mark (Rectangle) |
| *3 | Mark (Circle) |
| *a | Place the Chain on the Sprocket |
| *b | Pass the Chain through the Damper |
- NOTICE:
-
There are 3 marks on the camshaft timing sprocket. Make sure to align the mark plate with the timing mark (rectangle).
- HINT:
- ·
Be sure to position the mark plate at the front of the engine.
·The mark plate on the camshaft side is colored orange.
·Do not pass the chain around the sprocket of the camshaft timing gear. Only place it on the sprocket.
·Pass the chain through the No. 1 vibration damper.
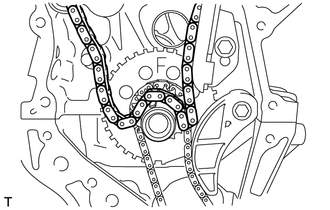
Place the chain on the crankshaft without passing it around the shaft.
Hold the hexagonal portion of the camshaft with a wrench and turn the camshaft timing gear counterclockwise to align the mark plate (orange) and timing mark, and then install the chain.
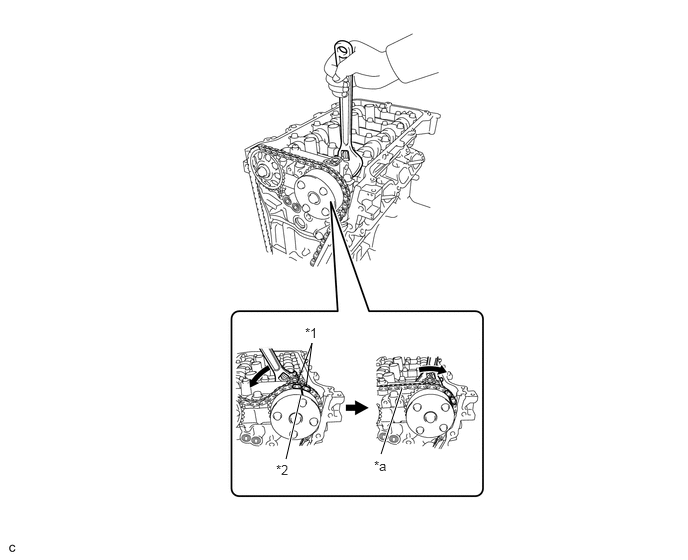
| *1 | Mark Plate (Orange) |
| *2 | Timing Mark |
| *a | Tension the Chain |
Hold the hexagonal portion of the camshaft with a wrench and turn the camshaft timing gear clockwise.
- HINT:
-
To tension the chain, slowly turn the camshaft timing gear clockwise to prevent the chain from being misaligned.
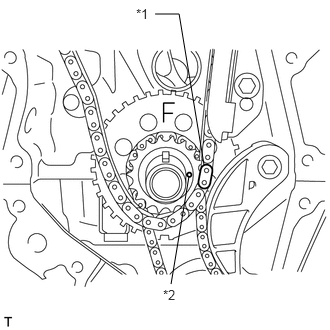
Align the mark plate (pink) and timing mark and install the chain to the crankshaft timing gear.
| *1 | Mark Plate (Pink) |
| *2 | Timing Mark |
12.CHECK NO. 1 CYLINDER TO TDC/COMPRESSION
Check each timing mark at TDC/compression.
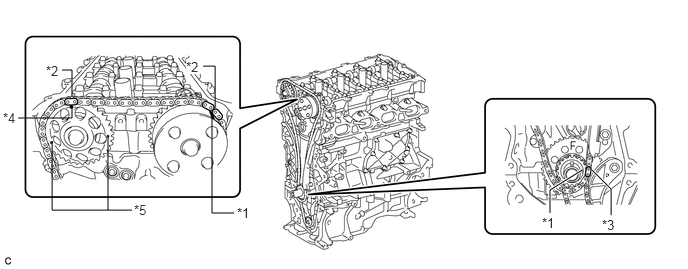
| *1 | Timing Mark | *2 | Mark Plate (Orange) |
| *3 | Mark Plate (Pink) | *4 | Timing Mark (Rectangle) |
| *5 | Mark (Circle) | - | - |
- NOTICE:
-
There are 3 marks on the camshaft timing sprocket. Make sure that the timing mark (rectangle) is at the top.
13562
13.INSTALL NO. 2 CHAIN VIBRATION DAMPER
Install the No. 2 chain vibration damper with the 2 bolts.
- Torque:
- 10 N*m (102 kgf*cm, 7 ft.*lbf)
13559
14.INSTALL CHAIN TENSIONER SLIPPER
Install the chain tensioner slipper to the cylinder block.
11302A
15.INSTALL TIMING CHAIN COVER OIL SEAL
11302
16.INSTALL TIMING CHAIN COVER SUB-ASSEMBLY
13471
17.INSTALL CRANKSHAFT PULLEY
13540
18.INSTALL NO. 1 CHAIN TENSIONER ASSEMBLY
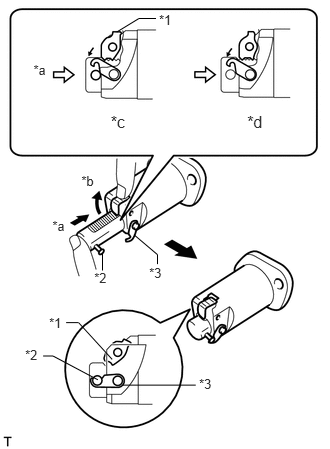
Release the cam, and then fully push in the plunger and engage the hook to the pin so that the plunger is in the position shown in the illustration.
| *1 | Cam |
| *2 | Pin |
| *3 | Hook |
| *a | Push |
| *b | Raise |
| *c | CORRECT |
| *d | INCORRECT |
- NOTICE:
-
Make sure that the cam engages the first tooth of the plunger to allow the hook to pass over the pin.
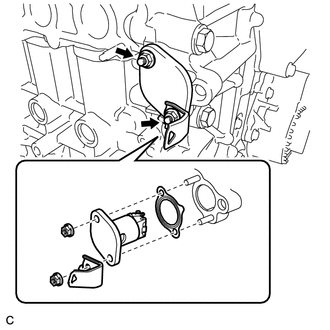
Install a new gasket, the bracket and chain tensioner with the 2 nuts.
- Torque:
- 12 N*m (122 kgf*cm, 9 ft.*lbf)
- NOTICE:
-
If the hook releases the plunger while the chain tensioner is being installed, set the hook again.
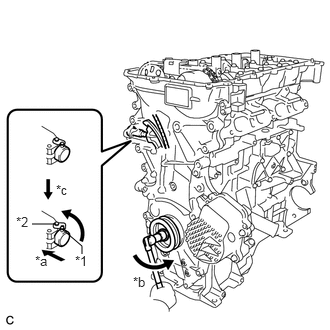
Rotate the crankshaft counterclockwise slightly and check that the hook is released.
| *1 | Pin |
| *2 | Hook |
| *a | Push |
| *b | Turn |
| *c | Disconnect |
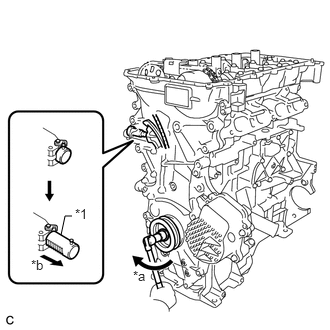
Turn the crankshaft clockwise and check that the plunger is extended.
| *1 | Plunger |
| *a | Turn |
| *b | Plunger Extended |
11193
19.INSTALL SPARK PLUG TUBE GASKET
11213
20.INSTALL CYLINDER HEAD COVER GASKET
11201
21.INSTALL CYLINDER HEAD COVER SUB-ASSEMBLY
19500
22.INSTALL IGNITION COIL ASSEMBLY
23250
23.INSTALL FUEL INJECTOR ASSEMBLY
23807V
24.INSTALL NO. 1 DELIVERY PIPE SPACER
23807
25.INSTALL FUEL DELIVERY PIPE SUB-ASSEMBLY
23818
26.INSTALL FUEL VAPOR FEED PIPE
17111
27.INSTALL INTAKE MANIFOLD
25620
28.INSTALL EGR VALVE WITH COOLER ASSEMBLY
25610
29.REMOVE EGR PIPE ASSEMBLY
11409
30.INSTALL ENGINE OIL LEVEL DIPSTICK GUIDE
22210
31.INSTALL THROTTLE BODY ASSEMBLY
32.INSTALL ENGINE HANGER
33.REMOVE ENGINE STAND
34.INSTALL ENGINE ASSEMBLY WITH TRANSAXLE