2ZR-FXE ENGINE MECHANICAL ENGINE UNIT REASSEMBLY
PROCEDURE

 1.INSTALL STIFFENING CRANKCASE RING PIN
- NOTICE:
-
It is not necessary to remove a ring pin unless it is being replaced.
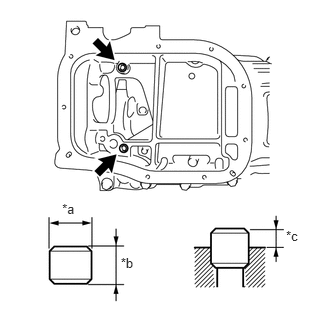
| *a | Width |
| *b | Height |
| *c | Protrusion Height |
Using a plastic-faced hammer, tap in 2 new ring pins until they stop.
- Standard Ring Pin:
Item Protrusion Height Height Width Ring pin 3.0 mm (0.118 in.) 11 mm (0.433 in.) 8 mm (0.315 in.)
11421
2.INSTALL STIFFENING CRANKCASE STUD BOLT
- NOTICE:
-
If a stud bolt is deformed or the threads are damaged, replace it.
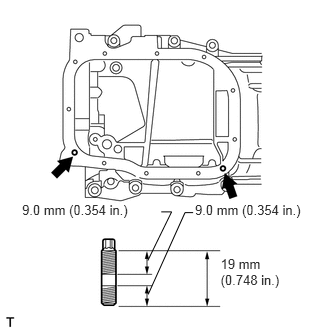
Using an E6 "TORX" socket wrench, install the stud bolts as shown in the illustration.
- Torque:
- 5.0 N*m (51 kgf*cm, 44 in.*lbf)
11420
3.INSTALL STIFFENING CRANKCASE ASSEMBLY
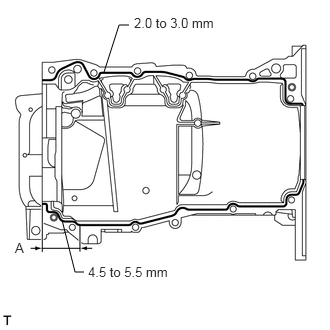
Apply seal packing in a continuous line as shown in the illustration.
- Seal packing:
Toyota Genuine Seal Packing Black, Three bond 1207B or equivalent
- Standard Seal Diameter:
Area Specified Condition Continuous Line 2.0 to 3.0 mm (0.0787 to 0.118 in.) A 4.5 to 5.5 mm (0.177 to 0.217 in.)
- Application Length A:
56 mm (2.20 in.)
- NOTICE:
- ·
Remove any oil from the contact surfaces.
·Install the crankcase within 3 minutes and tighten the bolts within 15 minutes of applying seal packing.
·Do not start the engine for at least 2 hours after installing the stiffening crankcase assembly.
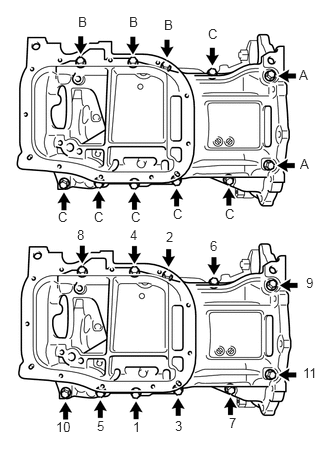
Install the stiffening crankcase with the 11 bolts in the sequence shown in the illustration.
- Torque:
- 21 N*m (214 kgf*cm, 15 ft.*lbf)
- Bolt Length:
Item Specified Condition Bolt A 138 mm (5.43 in.) Bolt B 35 mm (1.38 in.) Bolt C 70 mm (2.76 in.)
Recheck the torque for bolts 1 and 2.
- Torque:
- 21 N*m (214 kgf*cm, 15 ft.*lbf)
Wipe off any excess seal packing with a clean piece of cloth.
15100
4.INSTALL OIL PUMP ASSEMBLY
12102A
5.INSTALL NO. 2 OIL PAN SUB-ASSEMBLY
12101A
6.INSTALL OIL PAN DRAIN PLUG
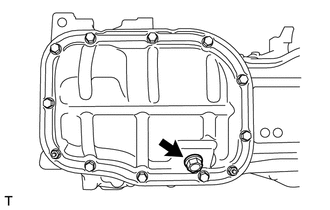
Install a new gasket and the drain plug.
- Torque:
- 37 N*m (377 kgf*cm, 27 ft.*lbf)
11401L
7.INSTALL ENGINE REAR OIL SEAL
11432A
8.INSTALL NO. 1 TAPER SCREW PLUG
Type A:
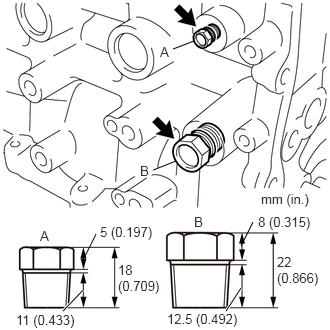
Apply adhesive to 2 or 3 threads of the No. 1 taper screw plug, and install the No. 1 taper screw plug (A).
- Torque:
- 25 N*m (255 kgf*cm, 18 ft.*lbf)
- Adhesive:
Toyota Genuine Adhesive 1344, Three Bond 1344 or equivalent
- NOTICE:
- ·
Install the plug within 3 minutes of applying adhesive.
·Do not start the engine within 1 hour of installing the plug.
Apply adhesive to 2 or 3 threads of the No. 1 taper screw plug, and install the No. 1 taper screw plug (B).
- Torque:
- 43 N*m (439 kgf*cm, 32 ft.*lbf)
- Adhesive:
Toyota Genuine Adhesive 1324, Three Bond 1324 or equivalent
- NOTICE:
- ·
Install the plug within 3 minutes of applying adhesive.
·Do not start the engine within 1 hour of installing the plug.
Type B:
Apply adhesive to 2 or 3 threads of the No. 1 taper screw plug, and install the No. 1 taper screw plug.
- Torque:
- 43 N*m (438 kgf*cm, 32 ft.*lbf)
- Adhesive:
Toyota Genuine Adhesive 1324, Three Bond 1324 or equivalent
- NOTICE:
- ·
Install the No. 1 taper screw plug within 3 minutes of applying adhesive.
·Do not start the engine for at least 1 hour after installing the No. 1 taper screw plug.
12204
9.INSTALL VENTILATION VALVE SUB-ASSEMBLY
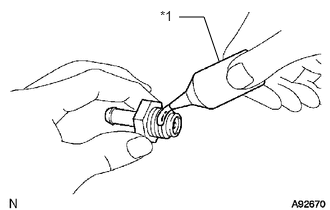
Apply adhesive to the threads of the ventilation valve sub-assembly.
| *1 | Adhesive |
- Adhesive:
Toyota Genuine Adhesive 1324, Three Bond 1324 or equivalent
- NOTICE:
- ·
Install the ventilation valve sub-assembly within 3 minutes after applying seal packing.
·Do not start the engine for at least 2 hours after installing the ventilation valve sub-assembly.
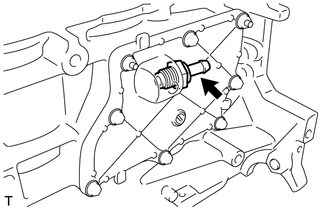
Install the ventilation valve sub-assembly.
- Torque:
- 20 N*m (204 kgf*cm, 15 ft.*lbf)
11115
10.INSTALL CYLINDER HEAD GASKET
11101
11.INSTALL CYLINDER HEAD SUB-ASSEMBLY
13716
12.INSTALL VALVE STEM CAP
Apply a light coat of engine oil to the valve stem ends.
Install the 16 valve stem caps to the cylinder head.
- NOTICE:
-
Do not drop the valve stem caps into the cylinder head.
13750
13.INSTALL VALVE LASH ADJUSTER ASSEMBLY
Inspect each valve lash adjuster before installing it (See page Engine / Hybrid System>2ZR-FXE (ENGINE MECHANICAL)>ENGINE UNIT>INSPECTION).
Install the 16 valve lash adjusters to the cylinder head.
- NOTICE:
-
Install the valve lash adjuster to the same place it was removed from.
13801
14.INSTALL NO. 1 VALVE ROCKER ARM SUB-ASSEMBLY
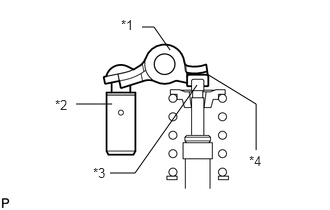
Apply engine oil to the valve lash adjuster tips and valve stem cap ends.
| *1 | Valve Rocker Arm |
| *2 | Valve Lash Adjuster |
| *3 | Valve Stem |
| *4 | Valve Stem Cap |
Make sure that the No. 1 valve rocker arms are installed as shown in the illustration.
11114A
15.INSTALL CAMSHAFT HOUSING STRAIGHT PIN
- NOTICE:
-
It is not necessary to remove a straight pin unless it is being replaced.
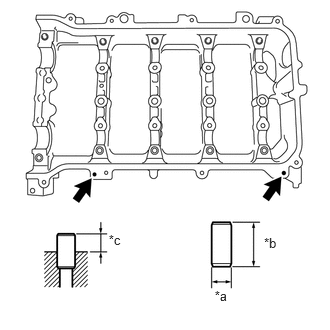
| *a | Width |
| *b | Height |
| *c | Protrusion Height |
Using a plastic-faced hammer, tap in a new straight pin to the specified protrusion height.
- Standard Straight Pin:
Item Protrusion Height Height Width Straight pin 6.5 to 7.5 mm (0.256 to 0.295 in.) 14 mm (0.551 in.) 6.0 mm (0.236 in.)
11811
16.INSTALL NO. 1 CAMSHAFT BEARING
15678A
17.INSTALL OIL CONTROL VALVE FILTER
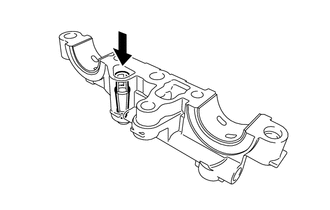
Check that no foreign matter is on the mesh part of the oil control valve filter.
Install the oil control valve filter.
- NOTICE:
-
Do not touch the mesh when installing the oil control valve filter.
11821
18.INSTALL NO. 2 CAMSHAFT BEARING
13512
19.INSTALL NO. 2 CAMSHAFT
13511
20.INSTALL CAMSHAFT
21.INSTALL CAMSHAFT BEARING CAP
11103
22.INSTALL CAMSHAFT HOUSING SUB-ASSEMBLY
13523G
23.INSTALL CAMSHAFT TIMING SPROCKET
13050
24.INSTALL CAMSHAFT TIMING GEAR ASSEMBLY
13521A
25.INSTALL CRANKSHAFT TIMING GEAR KEY
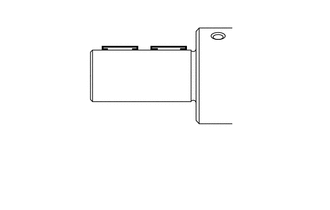
Using a plastic-faced hammer, tap in the 2 crankshaft timing gear keys.
- HINT:
-
Tap in the crankshaft timing gear keys until they contact the crankshaft as shown in the illustration.
19315
26.INSTALL NO. 1 CRANKSHAFT POSITION SENSOR PLATE
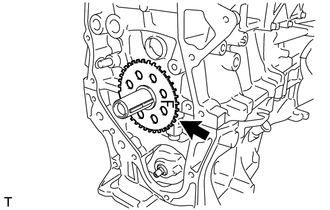
Install the crankshaft position sensor plate with the "F" mark facing forward.
13507
27.INSTALL NO. 2 CHAIN SUB-ASSEMBLY
13521
28.INSTALL CRANKSHAFT TIMING SPROCKET
13561
29.INSTALL NO. 1 CHAIN VIBRATION DAMPER
30.SET NO. 1 CYLINDER TO TDC/COMPRESSION
13506
31.INSTALL CHAIN SUB-ASSEMBLY
32.CHECK NO. 1 CYLINDER TO TDC/COMPRESSION
13559
33.INSTALL CHAIN TENSIONER SLIPPER
13562
34.INSTALL NO. 2 CHAIN VIBRATION DAMPER
35.INSTALL WATER INLET SUB-ASSEMBLY STUD BOLT
- NOTICE:
-
If a stud bolt is deformed or the threads are damaged, replace it.
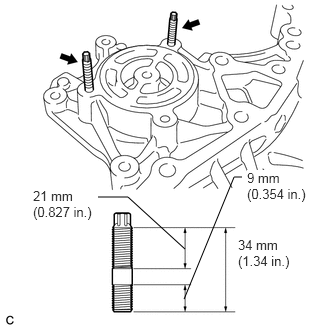
Using an E5 "TORX" socket wrench, install the stud bolts as shown in the illustration.
- Torque:
- 5.0 N*m (51 kgf*cm, 44 in.*lbf)
16031
36.INSTALL WATER INLET SUB-ASSEMBLY
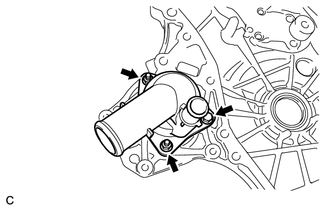
Type A:
Install a new gasket and the water inlet sub-assembly with the bolt and 2 nuts.
- Torque:
- 10 N*m (102 kgf*cm, 7 ft.*lbf)
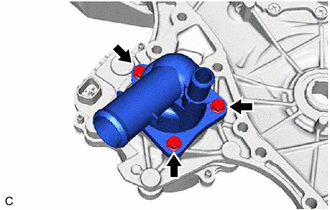
Type B:
Install a new gasket and the water inlet sub-assembly with the 3 bolts.
- Torque:
- 10 N*m (102 kgf*cm, 7 ft.*lbf)
11302A
37.INSTALL TIMING CHAIN COVER OIL SEAL
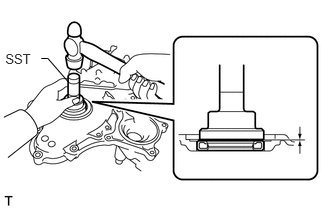
Using SST and a hammer, tap in a new oil seal until its surface is flush with the timing chain cover edge.
- NOTICE:
- ·
Keep the lip free from foreign matter.
·Do not tap on the oil seal at an angle.
·Make sure that the oil seal edge does not stick out of the timing chain case.
- HINT:
-
Tap in the oil seal so that it is positioned within 1.0 mm (0.0394 in.) from the edge of the timing chain case.
Apply MP grease to the lip of the oil seal.
11302
38.INSTALL TIMING CHAIN COVER SUB-ASSEMBLY
Remove any old packing (FIPG) material and be careful not to drop any oil on the contact surfaces of the timing chain cover, cylinder head and cylinder block.
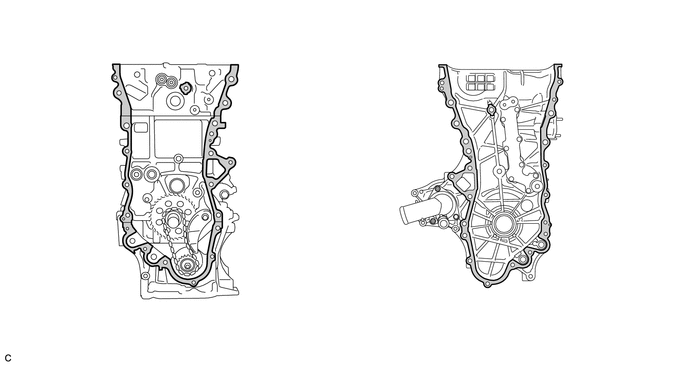

|
Clean and degrease | - | - |
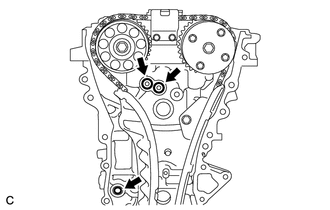
Install 3 new O-rings.
Apply seal packing as shown in the illustration.
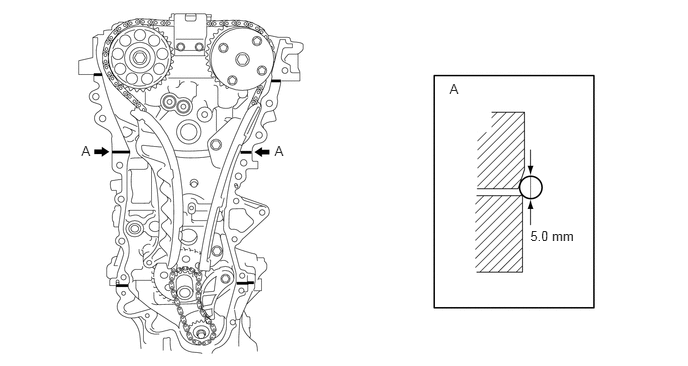
- Seal packing:
Toyota Genuine Seal Packing Black, Three Bond 1207B or equivalent
- Seal diameter:
5.0 mm (0.197 in.)
- NOTICE:
- ·
Remove any oil from the contact surfaces.
·Install the chain cover within 3 minutes of applying seal packing.
·Do not start the engine for at least 2 hours after installing the timing chain cover sub-assembly.
Apply seal packing to the timing chain cover in a line as shown in the following illustration.
- NOTICE:
- ·
When the contact surfaces are wet, wipe them with an oil-free cloth before applying seal packing.
·Install the chain cover within 3 minutes and tighten the bolts within 15 minutes of applying seal packing.
·Do not start the engine for at least 2 hours after installation.
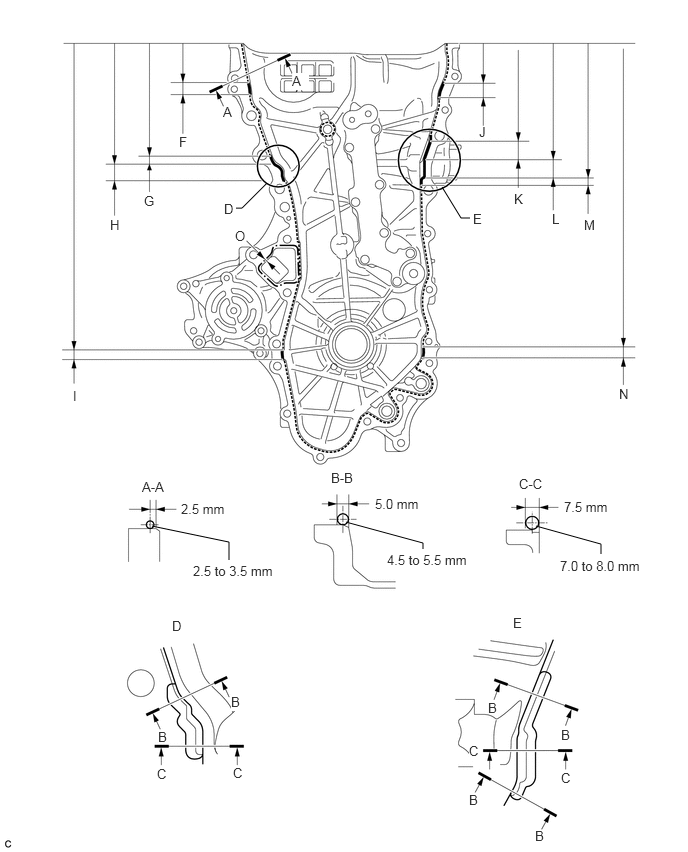
- Seal Packing:
Item Seal Packing Dashed line Toyota Genuine Seal Packing Black, Three Bond 1207B or equivalent Continuous line Alternate long and short dashed line Toyota Genuine Seal Packing 1282B, Three Bond 1282B or equivalent
- Application Specification:
Area Seal Packing Diameter Distance from Edge of Cover to: Seal Packing Application Length Distance from Top of Cover to Top of Seal Packing Dashed line 2.5 to 3.0 mm (0.0984 to 0.118 in.) Center of seal packing
2.5 mm (0.0984 in.)- - Continuous line 4.5 to 5.5 mm (0.177 to 0.217 in.) or 7.0 to 8.0 mm (0.276 to 0.315 in.) - - - Alternate long and short dashed line 4.0 mm (0.157 in.) Center of seal packing
3.0 mm (0.118 in.)- - A - A 2.5 to 3.5 mm (0.0984 to 0.138 in.) Center of seal packing
2.5 mm (0.0984 in.)- - B - B 4.5 to 5.5 mm (0.177 to 0.217 in.) Opposite edge of seal packing
5.0 mm (0.197 in.)- - C - C 7.0 to 8.0 mm (0.276 to 0.315 in.) Opposite edge of seal packing
7.5 mm (0.295 in.)- - F 4.5 to 5.5 mm (0.177 to 0.217 in.) - 15.5 mm (0.610 in.) 50.4 mm (1.98 in.) G 4.5 to 5.5 mm (0.177 to 0.217 in.) - 10.3 mm (0.406 in.) 143.1 mm (5.63 in.) H 7.0 to 8.0 mm (0.276 to 0.315 in.) - 19.5 mm (0.768 in.) 153.4 mm (6.04 in.) I 4.5 to 5.5 mm (0.177 to 0.217 in.) - 16.0 mm (0.630 in.) 385.8 mm (1.27 ft.) J 4.5 to 5.5 mm (0.177 to 0.217 in.) - 18.6 mm (0.732 in.) 51.4 mm (2.02 in.) K 4.5 to 5.5 mm (0.177 to 0.217 in.) - 25.3 mm (0.996 in.) 121.9 mm (4.80 in.) L 7.0 to 8.0 mm (0.276 to 0.315 in.) - 25.8 mm (1.02 in.) 147.2 mm (5.80 in.) M 4.5 to 5.5 mm (0.177 to 0.217 in.) - 5.1 mm (0.201 in.) 173.0 mm (6.81 in.) N 4.5 to 5.5 mm (0.177 to 0.217 in.) - 14.6 mm (0.575 in.) 385.8 mm (1.27 ft.) O 4.0 mm (0.157 in.) Center of seal packing
3.0 mm (0.118 in.)- -
- NOTICE:
- ·
When the contact surfaces are wet, wipe them with an oil-free cloth before applying seal packing.
·Install the timing chain cover within 3 minutes and tighten the bolts within 10 minutes of applying seal packing.
·After applying seal packing to the timing chain cover, install the engine mounting bracket and oil filter bracket within 10 minutes.
·Do not add engine oil for at least 2 hours after installation.
Clean the bolt and fitting hole.
Install the timing chain cover.
Temporarily tighten the engine mounting bracket RH with the 3 bolts.
- NOTICE:
- ·
Install the mounting bracket within 10 minutes of installing the chain cover.
·Do not start the engine for at least 2 hours after installation.
- Bolt Length:
Item Length Bolt 80 mm (3.15 in.)
Install 2 new O-rings.
Temporarily tighten the oil filter bracket with the 4 bolts.
- NOTICE:
- ·
Install the oil filter bracket within 10 minutes of installing the chain cover.
·Do not start the engine for at least 2 hours after installation.
- Bolt Length:
Item Length Bolt 35 mm (1.38 in.)
Install the timing chain cover with the 25 bolts and a new gasket as shown in the illustration.
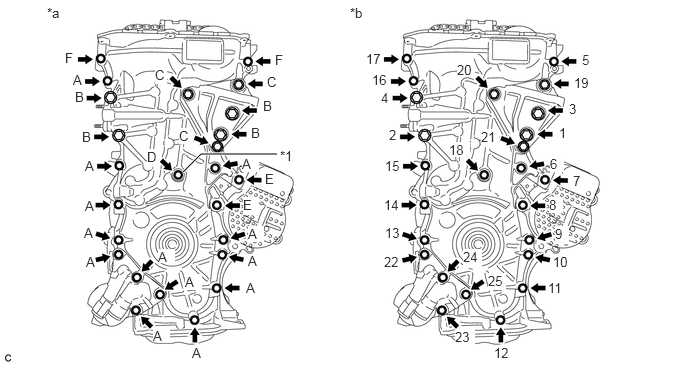
| *1 | Gasket | - | - |
| *a | Torque | *b | Bolt Torque Order |
- Torque:
- Bolt A, E, F : 26 N*m (260 kgf*cm, 19 ft.*lbf)
- Bolt B, C : 51 N*m (520 kgf*cm, 38 ft.*lbf)
- Bolt D : 10 N*m (102 kgf*cm, 7 ft.*lbf)
- NOTICE:
- ·
Apply adhesive 1324 to the threads of the bolt F.
·When the contact surfaces are wet, wipe them with an oil-free cloth before applying seal packing.
·Install the chain cover within 3 minutes and tighten the bolts within 15 minutes of applying the seal packing.
·Do not add engine oil for at least 2 hours after installing the chain cover.
·Do not start the engine for at least 2 hours after installing the chain cover.
- Bolt Length:
Item Length Bolt A, F 35 mm (1.38 in.) Bolt B, E 55 mm (2.16 in.) Bolt C 80 mm (3.15 in.) Bolt D 40 mm (1.57 in.)
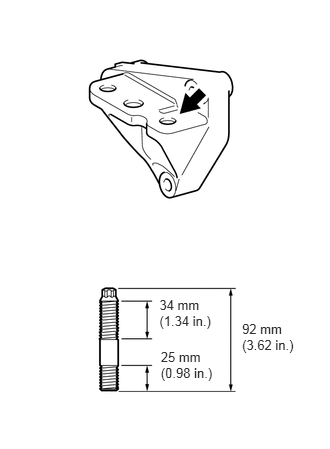
Using a 8mm deep socket wrench, install the stud bolt from the engine mounting bracket RH.
- Torque:
- 10 N*m (102 kgf*cm, 7 ft.*lbf)
13471
39.INSTALL CRANKSHAFT PULLEY
13540
40.INSTALL NO. 1 CHAIN TENSIONER ASSEMBLY
41.INSTALL OIL FILTER
11193
42.INSTALL SPARK PLUG TUBE GASKET
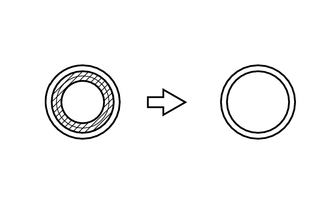
Using a cutter knife, cut off the seal part of the removed gasket.

|
Part to Cut Off |
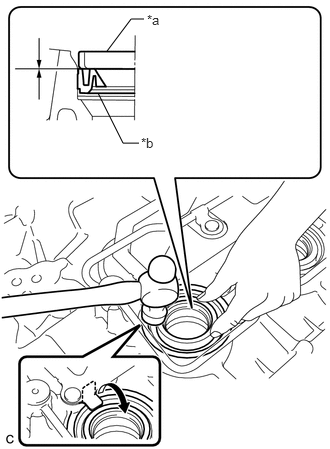
Using a hammer and the plug tube gasket which has had the sealing part cut off, uniformly tap in a new plug tube gasket all the way.
| *a | Plug Tube Gasket without Sealing Part |
| *b | New Plug Tube Gasket |
- NOTICE:
- ·
Keep the lip free of foreign matter.
·Do not tap in the plug tube gasket.
- HINT:
-
If a plug tube gasket that will be used to install a new gasket is deformed, and cannot be positioned on a new gasket, correct the deformation using pliers.
Return the claws of the ventilation baffle plate to their original positions.
11213
43.INSTALL CYLINDER HEAD COVER GASKET
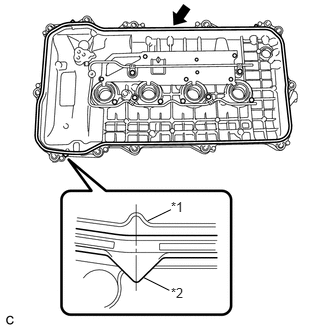
Install a new cylinder head cover gasket to the cylinder head cover.
| *1 | Cylinder Head Cover |
| *2 | Cylinder Head Cover Gasket |
- NOTICE:
- ·
Remove any oil from the contact surfaces.
·Misalignment between the center of the cylinder head cover rib and the center of the cylinder head gasket tab should be within 4.0 mm (0.157 in.).
11201
44.INSTALL CYLINDER HEAD COVER SUB-ASSEMBLY
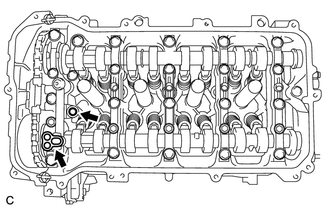
Install 2 new gaskets to the camshaft bearing cap.
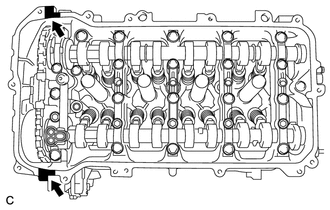
Apply seal packing as shown in the illustration.
- Seal packing:
Toyota Genuine Seal Packing Black, Three Bond 1207B or equivalent
- Standard diameter:
4.0 mm (0.157 in.)
- NOTICE:
- ·
Remove any oil from the contact surfaces.
·Install the cylinder head cover sub-assembly within 3 minutes and tighten the bolts within 15 minutes of applying seal packing.
·Do not start the engine for at least 2 hours after the installation.
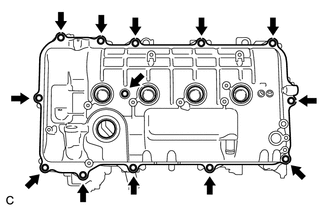
Install the cylinder head cover with a new seal washer and the 13 bolts.
- Torque:
- 10 N*m (102 kgf*cm, 7 ft.*lbf)
- NOTICE:
-
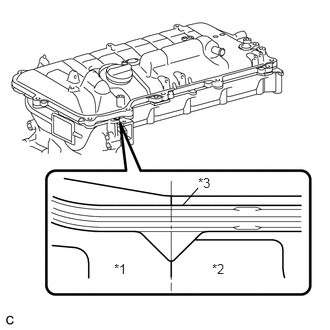 2.063,1.958 1.906,2.135 false 1.188,2.719 1.354,2.875 0.167,0.156 10 false *1 2.208,2.719 2.375,2.875 0.167,0.156 10 false *2 2.063,1.823 2.229,1.979 0.167,0.156 10 false *3
-
Misalignment between the contact surfaces of the timing chain cover and the camshaft housing and the center of the cylinder head gasket tab should be within 4.0 mm (0.157 in.).
| *1 | Timing Chain Cover |
| *2 | Camshaft Housing |
| *3 | Cylinder Head Cover Gasket |
83530
45.INSTALL ENGINE OIL PRESSURE SWITCH ASSEMBLY
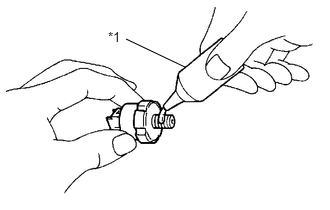
Apply adhesive to 2 or 3 threads of the engine oil pressure switch assembly.
| *1 | Adhesive |
- Adhesive:
Toyota Genuine Adhesive 1344, Three Bond 1344 or equivalent
- NOTICE:
- ·
Install the oil pressure switch within 3 minutes after applying adhesive.
·Do not start the engine within 1 hour after installation.
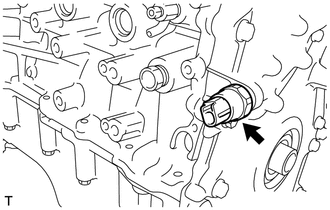
Using a 24 mm deep socket wrench, install the engine oil pressure switch assembly.
- Torque:
- 15 N*m (153 kgf*cm, 11 ft.*lbf)
89429E
46.INSTALL ENGINE COOLANT TEMPERATURE SENSOR
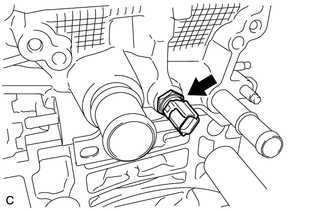
Install a new gasket and the engine coolant temperature sensor.
- Torque:
- 20 N*m (204 kgf*cm, 15 ft.*lbf)
89615
47.INSTALL KNOCK SENSOR
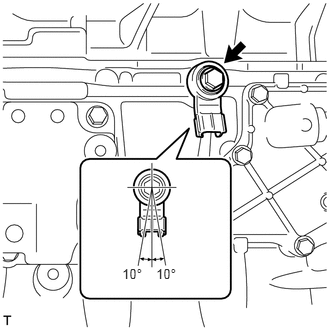
Install the knock sensor with the bolt.
- Torque:
- 20 N*m (204 kgf*cm, 15 ft.*lbf)
- NOTICE:
-
Make sure that the knock sensor is in the correct position.
11401G
48.INSTALL CRANKSHAFT POSITION SENSOR
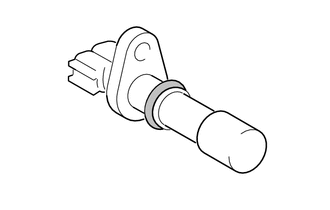
Apply a light coat of engine oil to the O-ring of the sensor.
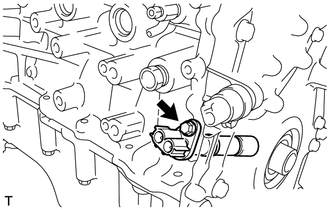
Install the crankshaft position sensor with the bolt.
- Torque:
- 10 N*m (102 kgf*cm, 7 ft.*lbf)
11101J
49.INSTALL CAMSHAFT TIMING OIL CONTROL VALVE ASSEMBLY
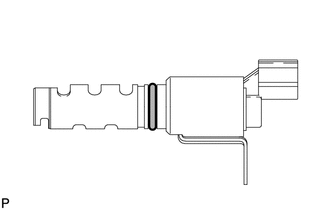
Apply a light coat of engine oil to a new O-ring and install it to the camshaft timing oil control valve.
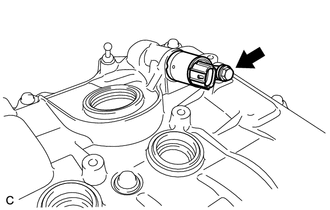
Install the camshaft timing oil control valve with the bolt.
- Torque:
- 10 N*m (102 kgf*cm, 7 ft.*lbf)
- NOTICE:
- ·
Do not allow foreign matter to contact the oil seal face of the oil control valve (connecting surface with cylinder head cover).
·Be careful that the O-ring is not cracked or moved out of place when installing the oil control valve.
11101W
50.INSTALL CAMSHAFT POSITION SENSOR
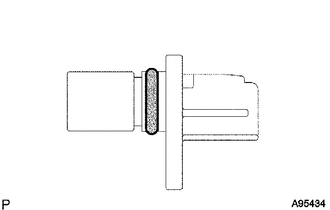
Apply a light coat of engine oil to the O-ring of the sensor.
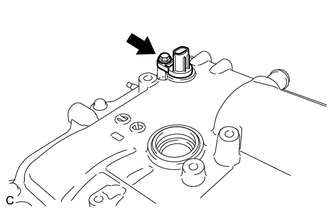
Install the camshaft position sensor with the bolt.
- Torque:
- 10 N*m (102 kgf*cm, 7 ft.*lbf)
- NOTICE:
-
Make sure that the O-ring is not cracked or jammed when installing the sensor.
19100P
51.INSTALL SPARK PLUG
52.INSTALL ENGINE COVER JOINT BOLT
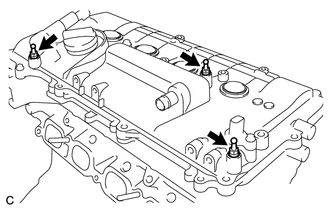
Install the 3 engine cover joint bolts.
- Torque:
- 10 N*m (102 kgf*cm, 7 ft.*lbf)
53.INSTALL WIRING HARNESS CLAMP BRACKET
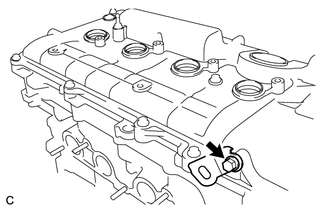
Install the wiring harness clamp bracket with the bolt.
- Torque:
- 10 N*m (102 kgf*cm, 7 ft.*lbf)
12108A
54.INSTALL OIL FILLER CAP GASKET
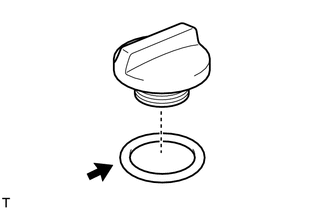
Install the gasket to the oil filler cap.
12108
55.INSTALL OIL FILLER CAP SUB-ASSEMBLY
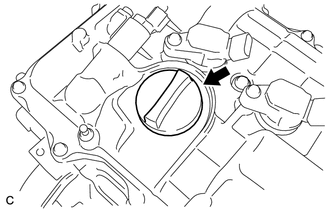
Install the oil filler cap.