CRUISE CONTROL MILLIMETER WAVE RADAR SENSOR ADJUSTMENT
PROCEDURE

 88211B
1.ADJUST MILLIMETER WAVE RADAR SENSOR ASSEMBLY
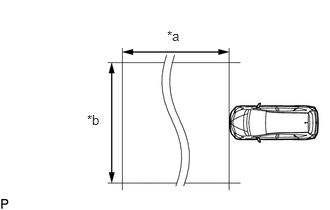
| *a | Approximately 10 m (32.8 ft.) |
| *b | Approximately 14 m (45.9 ft.) |
- NOTICE:
- ·
Perform measurements on a level surface.
·Make sure that no large pieces of metal are within a 10 m (32.8 ft.) x 14 m (45.9 ft.) area in front of the vehicle. If possible, the surrounding area should also be free of large metal objects.
Before adjusting the radar beam axis, prepare the vehicle as follows.
Check the tire pressure and adjust it if necessary.
Remove all excess weight from the vehicle (luggage, heavy objects, etc.).
Remove the radiator support opening cover (See page Vehicle Exterior>EXTERIOR PANELS / TRIM>FRONT BUMPER>REMOVAL).
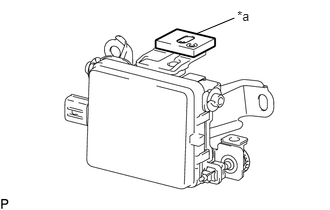
Check and adjust the vertical direction of the radar sensor.
| *a | Level |
Remove dust, oil and foreign matter from the radar sensor's level rack.
Set a level on the radar sensor's level rack.
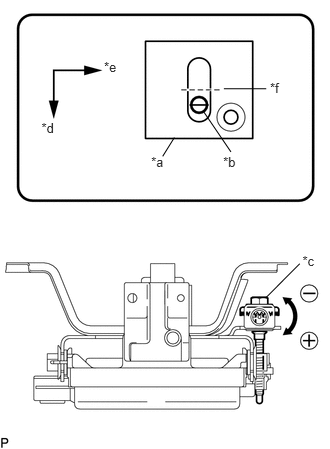
Check that the level's air bubble is within the red frame.
| *a | Level |
| *b | Air Bubble |
| *c | Bolt |
| *d | Vehicle Front |
| *e | Vehicle Left |
| *f | 0° |
- OK:
Level's air bubble is within red frame.
If the bubble is not within the red frame, use a screwdriver to adjust bolt until the air bubble is within the red frame.
- HINT:
- ·
The adjustable range within the level's red frame is +/- 0.2°.
·The target angle is +0.2° (upward angle of 0.2°).
- Adjustment:
Adjustment Direction Adjustment Procedure Adjustment Angle Upward Turn screwdriver to positive (+) side When screwdriver is turned once, adjustment changes by about Downward 0.12° Downward Turn screwdriver to negative (-) side
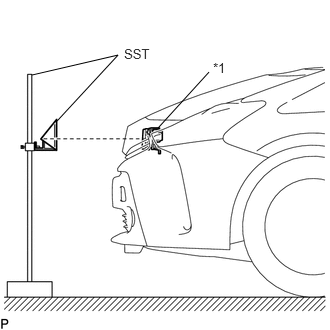
Adjust the reflector height.
| *1 | Millimeter Wave Radar Sensor |
Adjust the reflector so that the center of SST (reflector) is the same height as the millimeter wave radar sensor.
- SST
- 09870-60000 (09870-60010)
09870-60040
- HINT:
-
Prepare a 10 m (32.8 ft.) string, a string with a sharp-pointed weight (plumb bob) and a 5 m (16.4 ft.) tape measure.
Place the reflector.
Hang the string (with weight) from the center of the vehicle rear emblem. Mark the vehicle rear center point on the ground.
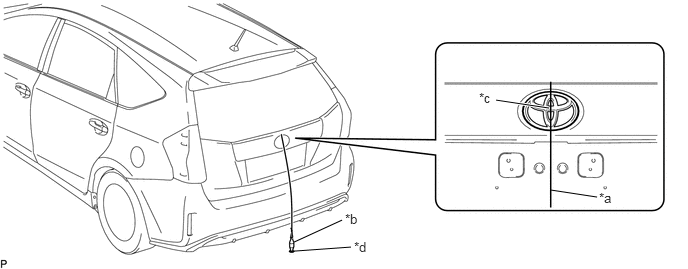
| *a | String | *b | Weight |
| *c | Center point | *d | Mark |
Repeat for the front of the vehicle.
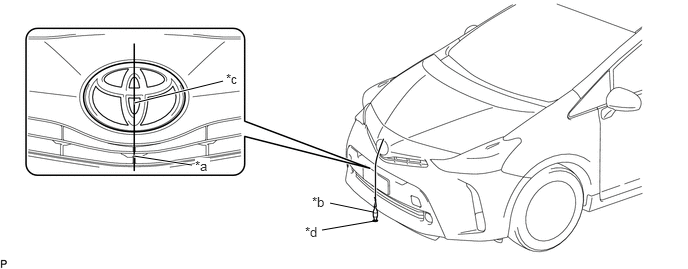
| *a | String | *b | Weight |
| *c | Center point | *d | Mark |
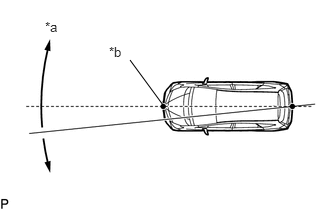
Set one end of the 10 m (32.8 ft.) string on the vehicle rear center point. Run the string over the vehicle front center point to a position 5 m (16.4 ft.) beyond the vehicle front center point, as shown in the illustration. Mark the 5 m (16.4 ft.) position.
| *a | Adjust center by moving string to right and left |
| *b | Extend string through front center point |
Place the reflector (SST) at the marked position.
- NOTICE:
-
Perform the operation as precisely as possible.
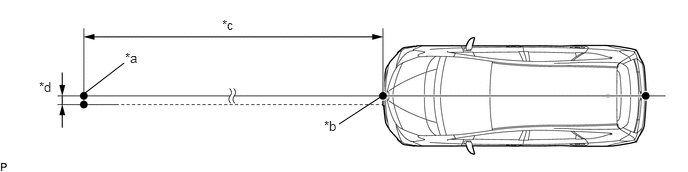
| *a | Reflector Placement Point | *b | Millimeter Wave Radar Sensor Position |
| *c | 5000 mm (16.4 ft.) | *d | 7.5 mm (0.295 in.) |
Check the radar beam axis.
When using the GTS:
Connect the GTS to the DLC3.
Turn the power switch on (IG).
Turn the GTS on and turn the cruise control main switch on.
Select "Connect to Vehicle".
Select each item on the display screen and proceed to the next screen.
Under "System Selection Menu", select "Radar Cruise".
Select "Utility" from the display screen.
Select "Beam Axis Adjustment" and proceed to the next screen.
Follow the GTS display and continue with the adjustment.
- CAUTION:
-
Do not come within 20 cm (7.87 in.) of the radar sensor.
- NOTICE:
- ·
Turn the cruise control main switch on before pressing "Next".
·Make sure there is at least 20 cm (7.87 in.) between the millimeter wave radar sensor and any nearby individuals.
·If "Error beam axis" is displayed on the screen, press the "Yes" button, and repeat again.
·Check that there are no metal objects in the specified area in front of the vehicle (refer to the NOTICE at the beginning of this adjustment procedure).
Press the "Exit" button to finish beam axis adjustment.
Disconnect the GTS from the DLC3.
After adjusting the radar beam axis, return the vehicle to its original condition.
Install the radiator support opening cover (See page Vehicle Exterior>EXTERIOR PANELS / TRIM>FRONT BUMPER>INSTALLATION).
If any heavy items were removed from the vehicle, return them (luggage, heavy objects, etc.).