CRUISE CONTROL DYNAMIC RADAR CRUISE CONTROL SYSTEM Cruise Control Switch Circuit
DESCRIPTION
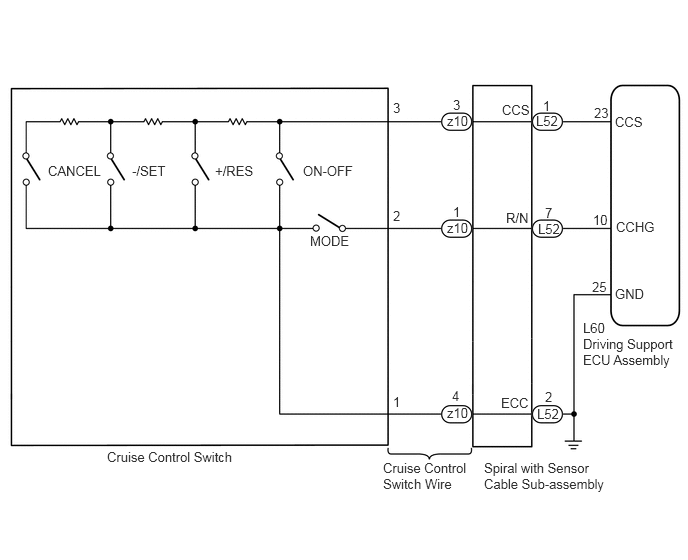
The cruise control switch is used to turn the cruise control system on and off, as well as operate 8 functions: SET, -(COAST), TAP-DOWN, RES (RESUME), + (ACCEL), TAP-UP, CANCEL, and MODE. The SET, TAP-DOWN, and - (COAST) functions, and the RES (RESUME), TAP-UP, and + (ACCEL) functions are operated with the same switch. The cruise control switch is an automatic return type switch which turns on only while it is being operated it in the direction of each arrow and turns off after being released. The internal contact points of the cruise control switch turn on with switch operation. The driving support ECU then reads the voltage value that has been changed by the switch operation to MODE, SET, -, RES, +, or CANCEL. The dynamic radar cruise control system has two cruise control modes: constant speed control mode and vehicle-to-vehicle distance control mode.
Vehicle-to-vehicle distance control mode is selected by default when the dynamic radar cruise control system is turned on using the cruise control switch (ON-OFF button).
The operation of constant speed control mode is the same as that for a conventional cruise control system.
WIRING DIAGRAM
PROCEDURE
Remove the cruise control switch (See page Engine / Hybrid System>CRUISE CONTROL>CRUISE CONTROL MAIN SWITCH>REMOVAL).
Measure the resistance according to the value(s) in the table below.
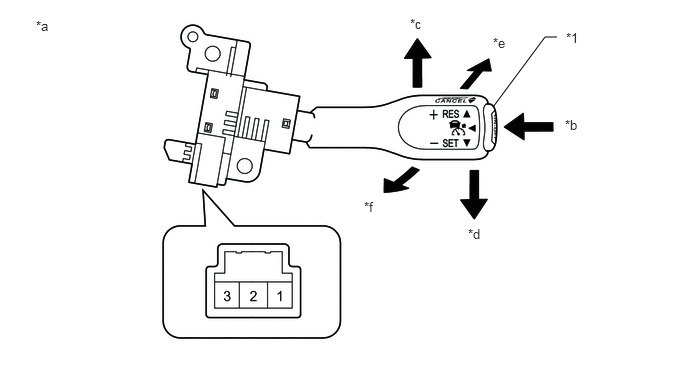
| *1 | Cruise control switch (ON-OFF button) | - | - |
| *a | Component without harness connected
(Cruise Control Switch) |
*b | ON-OFF |
| *c | +/RES | *d | -/SET |
| *e | MODE | *f | CANCEL |
- Standard Resistance:
Tester Connection Switch Condition Specified Condition 1 - 2
1 - 3Cruise control switch ON-OFF button not pressed 1 MΩ or higher 1 - 3 Cruise control switch ON-OFF button pressed Below 2.5 Ω 1 - 2 MODE Below 2.5 Ω 1 - 3 +/RES 235 to 245 Ω 1 - 3 -/SET 617 to 643 Ω 1 - 3 CANCEL 1509 to 1571 Ω
Reinstall the cruise control switch (See page Engine / Hybrid System>CRUISE CONTROL>CRUISE CONTROL MAIN SWITCH>INSTALLATION).
OK
NG
Disconnect the connector from the spiral with sensor cable sub-assembly.
Disconnect the connector from the cruise control switch.
Measure the resistance according to the value(s) in the table below.
- Standard Resistance (Check for Open):
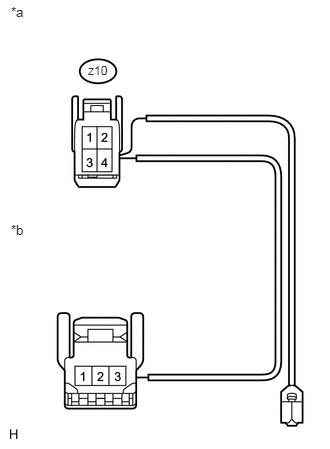
Tester Connection Condition Specified Condition Cruise control switch side connector terminal 1 - z10-4 Always Below 2.5 Ω Cruise control switch side connector terminal 2 - z10-1 Always Below 2.5 Ω Cruise control switch side connector terminal 3 - z10-3 Always Below 2.5 Ω
- Standard Resistance (Check for Short):
Tester Connection Condition Specified Condition Cruise control switch side connector terminal 1 - z10-4 Always 1 MΩ or higher Cruise control switch side connector terminal 2 - z10-1 Always 1 MΩ or higher Cruise control switch side connector terminal 3 - z10-3 Always 1 MΩ or higher
| *a | Front view of wire harness connector
(to Spiral with Sensor Cable Sub-assembly) |
| *b | Front view of wire harness connector
(to Cruise Control Switch) |
Reconnect the connector to the spiral with sensor cable sub-assembly.
Reconnect the connector to the cruise control switch.
OK
NG
- NOTICE:
-
The spiral with sensor cable sub-assembly is an important part of the SRS airbag system. Incorrect removal or installation of the spiral with sensor cable sub-assembly may cause airbag deployment. Be sure to read the page shown in the link/brackets.
Remove the spiral with sensor cable sub-assembly (See page Vehicle Interior>SUPPLEMENTAL RESTRAINT SYSTEMS>SPIRAL CABLE>REMOVAL).
Measure the resistance according to the value(s) in the table below.
- Standard Resistance (Check for Open):
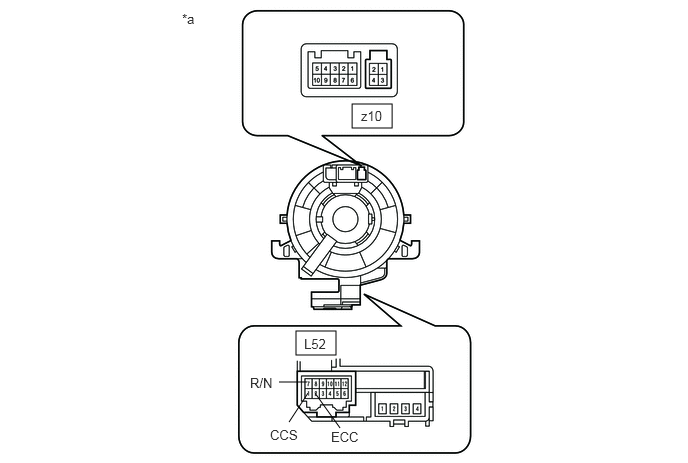
Tester Connection Condition Specified Condition z10-1 - L52-7 (R/N) Always Below 1 Ω z10-3 - L52-1 (CCS) Always Below 1 Ω z10-4 - L52-2 (ECC) Always Below 1 Ω
| *a | Component without harness connected
(Spiral with Sensor Cable Sub-assembly) |
- HINT:
-
The spiral with sensor cable sub-assembly makes a maximum of approximately 5 rotations.
Install the spiral with sensor cable sub-assembly (See page Vehicle Interior>SUPPLEMENTAL RESTRAINT SYSTEMS>SPIRAL CABLE>INSTALLATION).
OK
NG
Disconnect the driving support ECU assembly connector.
Disconnect the spiral with sensor cable sub-assembly connector.
Measure the resistance according to the value(s) in the table below.
- Standard Resistance (Check for Open):
Tester Connection Condition Specified Condition L60-23 (CCS) - L52-1 (CCS) Always Below 1 Ω L60-10 (CCHG) - L52-7 (R/N) Always Below 1 Ω
- Standard Resistance (Check for Short):
Tester Connection Condition Specified Condition L60-23 (CCS) or L52-1 (CCS) - Body ground Always 10 kΩ or higher L60-10 (CCHG) or L52-7 (R/N) - Body ground Always 10 kΩ or higher
Reconnect the driving support ECU assembly connector.
Reconnect the spiral with sensor cable sub-assembly connector.
OK
NG
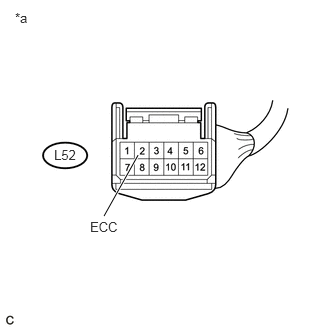
Disconnect the spiral with sensor cable sub-assembly connector.
Measure the resistance according to the value(s) in the table below.
- Standard Resistance (Check for Open):
Tester Connection Condition Specified Condition L52-2 (ECC) - Body ground Always Below 1 Ω
| *a | Front view of wire harness connector
(to Spiral with Sensor Cable Sub-assembly) |
Reconnect the spiral with sensor cable sub-assembly connector.
OK
(See pageEngine / Hybrid System>CRUISE CONTROL>DYNAMIC RADAR CRUISE CONTROL SYSTEM>PROBLEM SYMPTOMS TABLE)
NG