NAVIGATION / MULTI INFO DISPLAY NAVIGATION SYSTEM Illumination Circuit
DESCRIPTION
Power is supplied to the navigation ECU sub-assembly and steering pad switch assembly illumination when the light control switch is in the tail or head position.
WIRING DIAGRAM
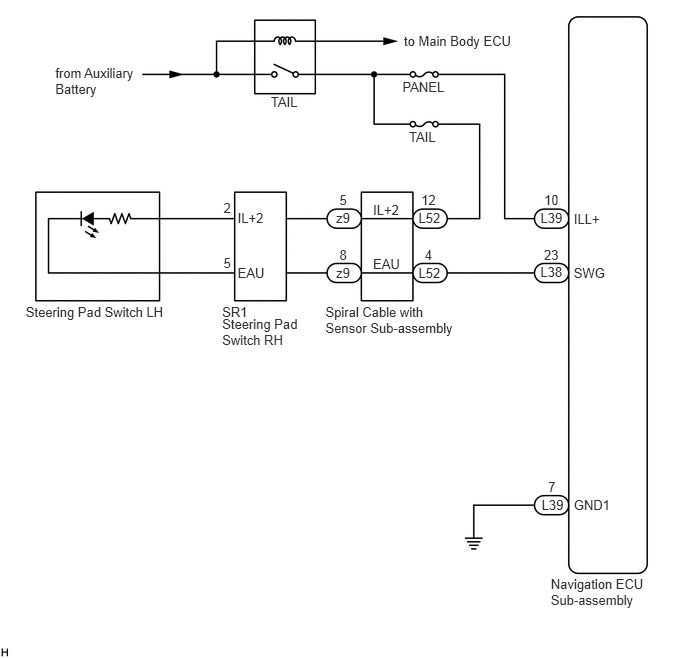
CAUTION / NOTICE / HINT
- NOTICE:
- ·
The vehicle is equipped with a Supplemental Restraint System (SRS) which includes components such as airbags. Before servicing (including removal or installation of parts), be sure to read the precaution for Supplemental Restraint System (See page Vehicle Interior>SUPPLEMENTAL RESTRAINT SYSTEMS>AIRBAG SYSTEM>PRECAUTION).
·Inspect the fuses for circuits related to this system before performing the following inspection procedure.
PROCEDURE
Check if the illumination for the navigation ECU sub-assembly, steering pad switch assembly, heater control switch or others (hazard switch, transmission control switch, etc.) comes on when the light control switch is turned to the head or tail position.
- Result:
Result Proceed to Illumination comes on for all components except steering pad switch assembly. A Illumination comes on for all components except navigation ECU sub-assembly. B No illumination comes on (navigation ECU sub-assembly, hazard switch, heater control switch, etc.). C
A
B
C
Disconnect the L52 spiral cable with sensor sub-assembly connector.
Measure the voltage according to the value(s) in the table below.
- Standard Voltage:
Tester Connection Condition Specified Condition L52-12 (IL+2) - Body ground Power switch off
Light control switch in the tail or head position11 to 14 V
OK
NG
Disconnect the z9 steering pad switch assembly connector.
Connect an auxiliary battery positive (+) lead to terminal IL+2 and a negative (-) lead to terminal EAU of the steering pad switch assembly connector.
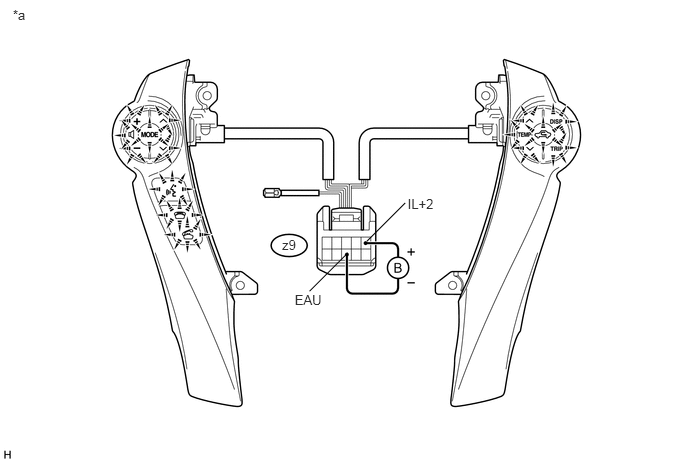
Check if the illumination for the steering pad switch assembly comes on.
- OK:
Illumination for the steering pad switch assembly comes on.
| *a | Component without harness connected
(Steering Pad Switch Assembly) |
- | - |
Proceed to the next step based on the inspection result.
- Result:
Result Proceed to NG A OK B
A
B
Disconnect the z9 steering pad switch RH connector.
Disconnect the SR1 steering pad switch RH connector.
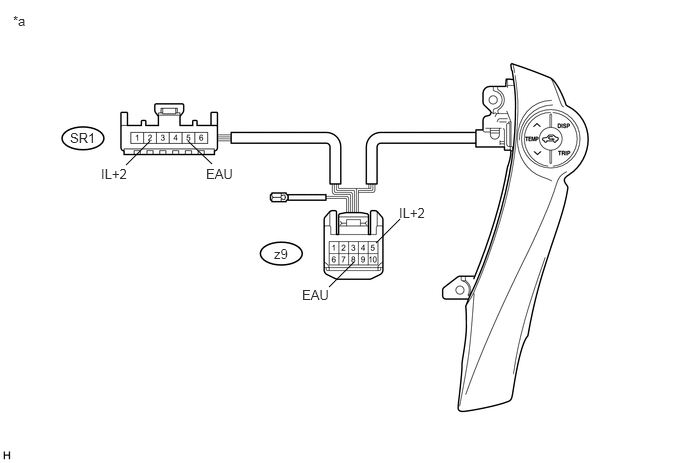
Measure the resistance according to the value(s) in the table below.
- Standard Resistance:
Tester Connection Condition Specified Condition SR1-2 (IL+2) - z9-5 (IL+2) Always Below 1 Ω SR1-5 (EAU) - z9-8 (EAU) Always Below 1 Ω
| *a | Component without harness connected
(Steering Pad Switch RH) |
- | - |
OK
NG
Disconnect the z9 steering pad switch assembly connector.
Disconnect the L52 spiral cable with sensor sub-assembly connector.
Measure the resistance according to the value(s) in the table below.
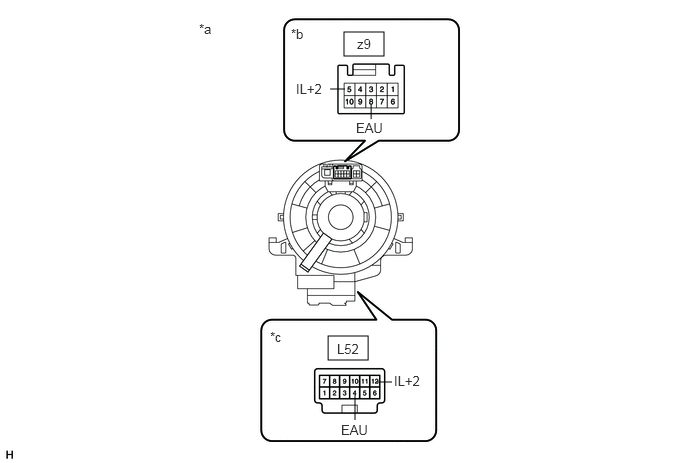
- Standard Resistance:
Tester Connection Condition Specified Condition z9-5 (IL+2) - L52-12 (IL+2) Center Below 3 Ω 2.5 rotations to the left 2.5 rotations to the right z9-8 (EAU) - L52-4 (EAU) Center Below 3 Ω 2.5 rotations to the left 2.5 rotations to the right
After setting the spiral cable with sensor sub-assembly to the center position, rotate the spiral cable with sensor sub-assembly 2.5 times clockwise. Then while rotating the spiral cable with sensor sub-assembly 5 times counterclockwise, measure the resistance as shown in the table below.
- Standard Resistance:
Tester Connection Condition Specified Condition z9-5 (IL+2) - L52-12 (IL+2) Always Below 3 Ω z9-8 (EAU) - L52-4 (EAU) Always Below 3 Ω
- NOTICE:
- ·
The spiral cable with sensor sub-assembly is an important part of the SRS airbag system. Incorrect removal or installation of the spiral cable with sensor sub-assembly may prevent the airbag from deploying. Refer to the pages shown in the brackets.
·As the spiral cable with sensor sub-assembly may break, do not rotate the spiral cable with sensor sub-assembly more than the specified amount.
- HINT:
- ·
Removal (See page Vehicle Interior>SUPPLEMENTAL RESTRAINT SYSTEMS>SPIRAL CABLE>REMOVAL)
·Installation (See page Vehicle Interior>SUPPLEMENTAL RESTRAINT SYSTEMS>SPIRAL CABLE>INSTALLATION)
| *a | Component without harness connected
(Spiral Cable with Sensor Sub-assembly) |
| *b | Steering Pad Switch Assembly Side |
| *c | Vehicle Side |
OK
NG
Disconnect the L52 spiral cable with sensor sub-assembly connector.
Disconnect the L38 navigation ECU sub-assembly connector.
Measure the resistance according to the value(s) in the table below.
- Standard Resistance:
Tester Connection Condition Specified Condition L52-4 (EAU) - L38-23 (SWG) Always Below 1 Ω
OK
(See pageAudio / Visual / Telematics>NAVIGATION / MULTI INFO DISPLAY>NAVIGATION SYSTEM>PROBLEM SYMPTOMS TABLE)
NG
Disconnect the L39 navigation ECU sub-assembly connector.
Measure the voltage according to the value(s) in the table below.
- Standard Voltage:
Tester Connection Condition Specified Condition L39-10 (ILL+) - Body ground Power switch off
Light control switch in the tail or head position11 to 14 V
OK
NG
Disconnect the L39 navigation ECU sub-assembly connector.
Measure the resistance according to the value(s) in the table below.
- Standard Resistance:
Tester Connection Condition Specified Condition L39-7 (GND1) - Body ground Always Below 1 Ω
OK
(See pageAudio / Visual / Telematics>NAVIGATION / MULTI INFO DISPLAY>NAVIGATION SYSTEM>PROBLEM SYMPTOMS TABLE)
NG