NETWORKING LIN COMMUNICATION SYSTEM B1206 P/W Master Switch Communication Stop
DESCRIPTION
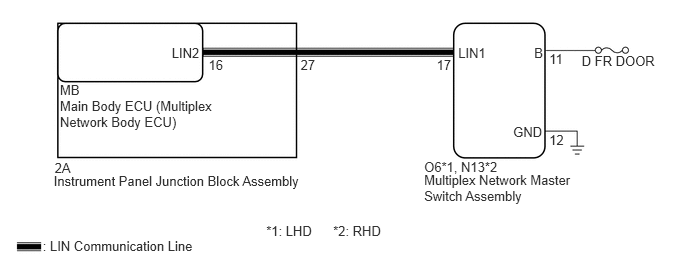
This DTC is stored when LIN communication between the multiplex network master switch assembly and main body ECU (multiplex network body ECU) stops for 10 seconds or more.
| DTC No. | DTC Detection Condition | Trouble Area |
|---|---|---|
| B1206 | No communication between multiplex network master switch assembly and main body ECU (multiplex network body ECU) for 10 seconds or more. | ·
Multiplex network master switch assembly ·
Main body ECU (multiplex network body ECU) ·
Instrument panel junction block assembly ·
Wire harness or connector ·
D FR DOOR fuse |
WIRING DIAGRAM
CAUTION / NOTICE / HINT
- NOTICE:
- ·
Inspect the fuses for circuits related to this system before performing the following inspection procedure.
·When using the GTS to troubleshoot with the power switch off:
Connect the GTS to the DLC3, and turn the courtesy switch on and off at 1.5-second intervals until communication between the GTS and vehicle begins.
PROCEDURE
Remove the instrument panel junction block assembly (See page Power Source / Network>POWER DISTRIBUTION>MAIN BODY ECU>REMOVAL).
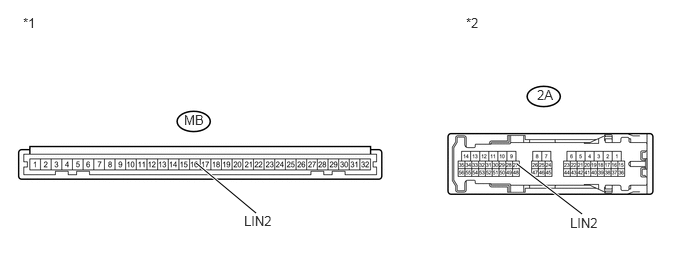
Remove the main body ECU (multiplex network body ECU) from the instrument panel junction block assembly.
Measure the resistance according to the value(s) in the table below.
- HINT:
-
This inspection is to check the LIN line in the instrument panel junction block assembly that connects the wire harness to the built-in main body ECU (multiplex network body ECU).
- Standard Resistance:
Tester Connection Condition Specified Condition 2A-27 (LIN2) - MB-16 (LIN2) Always Below 1 Ω 2A-27 (LIN2) - Body ground Always 10 kΩ or higher
| *1 | Component without harness connected
(Instrument Panel Junction Block Assembly) |
*2 | Component without harness connected
(Instrument Panel Junction Block Assembly) |
OK
NG
Disconnect the O6*1 or N13*2 multiplex network master switch assembly connector.
*1: for LHD
*2: for RHD
Measure the resistance according to the value(s) in the table below.
- Standard Resistance:
Tester Connection Condition Specified Condition 2A-27 (LIN2) - O6-17 (LIN1)*1
2A-27 (LIN2) - N13-17 (LIN1)*2Always Below 1 Ω 2A-27 (LIN2) - Body ground Always 10 kΩ or higher
*1: for LHD
*2: for RHD
OK
NG
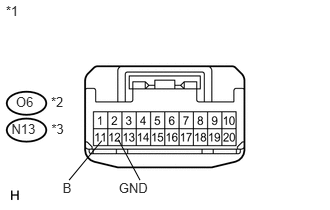
Measure the voltage according to the value(s) in the table below.
- Standard Voltage:
Tester Connection Condition Specified Condition O6-11 (B) - O6-12 (GND)*1
N13-11 (B) - N13-12 (GND)*2Power switch off 11 to 14 V
Measure the resistance according to the value(s) in the table below.
- Standard Resistance:
Tester Connection Condition Specified Condition O6-12 (GND) - Body ground*1
N13-12 (GND) - Body ground*2Always Below 1 Ω
*1: for LHD
*2: for RHD
| *1 | Front view of wire harness connector
(to Multiplex Network Master Switch Assembly) |
| *2 | for LHD |
| *3 | for RHD |
OK
NG
Replace the multiplex network master switch assembly (See page Vehicle Exterior>WINDOW / GLASS>POWER WINDOW MASTER SWITCH>REMOVAL).
NEXT
Clear the DTC (See page Power Source / Network>NETWORKING>LIN COMMUNICATION SYSTEM>DTC CHECK / CLEAR).
Recheck for DTCs.
- OK:
DTC B1206 is not output.
OK
NG