THEFT DETERRENT / KEYLESS ENTRY ENTRY AND START SYSTEM(for Start Function) B2271 Ignition Hold Monitor Malfunction
DESCRIPTION
This DTC is stored when a malfunction in the IG1 drive circuit, IG2 drive circuit or IG hold circuit in the power management control ECU is detected.
- HINT:
- ·
When the power management control ECU is replaced with a new one and the cable is connected to the negative (-) auxiliary battery terminal, the power source mode changes to on (IG).
·When the auxiliary battery cable is disconnected and reconnected, the power source returns to the mode it was in before the auxiliary battery cable was disconnected.
| DTC Code | DTC Detection Condition | Trouble Area | DTC Output Confirmation Operation |
|---|---|---|---|
| B2271 | Either condition is met (1-trip detection logic*):
·
The IG1 or IG2 drive circuit in the power management control ECU is malfunctioning. ·
The IG hold circuit in the power management control ECU is malfunctioning. |
·
AM2 fuse ·
IG1 relays (Instrument panel junction block assembly) ·
IG2 relay (No. 2 integration relay) ·
Power management control ECU ·
Wire harness or connector |
Turn the power switch on (IG).
|
*: Only output while a malfunction is present and the power switch is on (IG)
- HINT:
- ·
The IG1 and IG2 drive circuits activate the IG1 and IG2 relays.
·After the IG1 and IG2 drive circuits turn on, even if the power management control ECU operates incorrectly, the IG hold circuit maintains the power switch on (IG) state.
| Vehicle Condition when Malfunction Detected | Fail-safe Function when Malfunction Detected |
|---|---|
| The power source mode is not allowed to change to on (IG) (the hybrid control system cannot be started). | The power source mode cannot be changed to on (IG). |
WIRING DIAGRAM
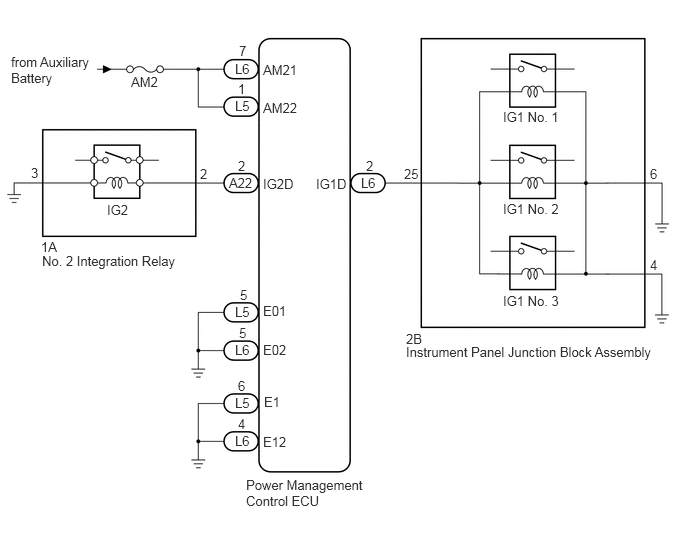
CAUTION / NOTICE / HINT
- NOTICE:
- ·
When using the GTS with the power switch off, perform either of the following: 1) Turn a courtesy light switch on and off at intervals of 1.5 seconds or less until communication between the GTS and vehicle begins, or 2) connect the GTS to the vehicle, select the vehicle type under manual mode, and then enter the following menus:
for Power Source Control: Body Electrical / Power Source Control / Trouble Codes.
for Entry&Start: Body Electrical / Entry&Start / Trouble Codes.
·The entry and start system uses multiplex communication. First perform the inspections in "How to Proceed with Troubleshooting" to confirm that there are no communication malfunctions before proceeding with troubleshooting (See page Vehicle Interior>THEFT DETERRENT / KEYLESS ENTRY>ENTRY AND START SYSTEM (for Start Function)>HOW TO PROCEED WITH TROUBLESHOOTING).
·Inspect the fuses for circuits related to this system before performing the following inspection procedure.
·After performing repairs, perform the operation that fulfills the DTC output confirmation operation, and then confirm that no DTCs are output again.
- HINT:
Related Data List and Active Test Items DTC Data List Item Active Test Item B2271 Power Source Control·IG1 Relay Monitor (Inside)
·IG2 Relay Monitor (Inside)
·Latch Circuit
-
PROCEDURE
Disconnect the L5 and L6 connectors from the power management control ECU.
Measure the voltage according to the value(s) in the table below.
- Standard Voltage:
Tester Connection Condition Specified Condition L5-1 (AM22) - Body ground Always 9.5 to 16 V L6-7 (AM21) - Body ground Always 9.5 to 16 V
OK
NG
Measure the resistance according to the value(s) in the table below.
- Standard Resistance:
Tester Connection Condition Specified Condition L5-5 (E01) - Body ground Always Below 1 Ω L5-6 (E1) - Body ground Always Below 1 Ω L6-4 (E12) - Body ground Always Below 1 Ω L6-5 (E02) - Body ground Always Below 1 Ω
OK
NG
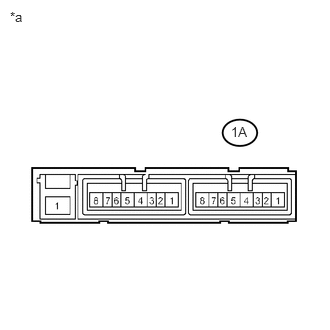
Remove the No. 2 integration relay (See page Engine / Hybrid System>2ZR-FXE (ENGINE CONTROL)>INTEGRATION RELAY>REMOVAL).
Measure the resistance according to the value(s) in the table below.
- Standard Resistance:
Tester Connection Condition Specified Condition 1A-2 - 1A-3 20°C (68°F) 130 to 230 Ω
| *a | Component without harness connected
(No.2 Integration Relay) |
OK
NG
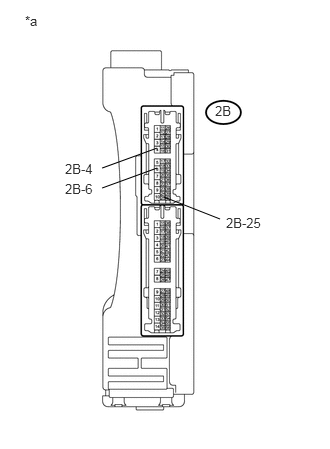
Remove the instrument panel junction block assembly (See page Power Source / Network>POWER DISTRIBUTION>MAIN BODY ECU>REMOVAL).
Measure the resistance according to the value(s) in the table below.
- Standard Resistance:
Tester Connection Condition Specified Condition 2B-25 - 2B-4 20°C (68°F) 54.32 to 79.32 Ω 2B-25 - 2B-6 20°C (68°F) 54.32 to 79.32 Ω 2B-4 - 2B-6 Always Below 1 Ω
| *a | Component without harness connected
(Instrument Panel Junction Block Assembly) |
OK
NG
Measure the resistance according to the value(s) in the table below.
- Standard Resistance:
Tester Connection Condition Specified Condition L6-2 (IG1D) - 2B-25 Always Below 1 Ω L6-2 (IG1D) - Body ground Always 10 kΩ or higher
OK
NG
Measure the resistance according to the value(s) in the table below.
- Standard Resistance:
Tester Connection Condition Specified Condition 2B-4 - Body ground Always Below 1 Ω 2B-6 - Body ground Always Below 1 Ω
OK
NG
Measure the resistance according to the value(s) in the table below.
- Standard Resistance:
Tester Connection Condition Specified Condition A22-2 (IG2D) - 1A-2 Always Below 1 Ω A22-2 (IG2D) - Body ground Always 10 kΩ or higher
OK
NG
Measure the resistance according to the value(s) in the table below.
- Standard Resistance:
Tester Connection Condition Specified Condition 1A-3 - Body ground Always Below 1 Ω
OK
NG
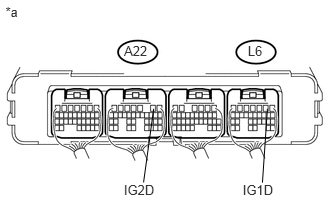
Install the instrument panel junction block assembly.
Install the No. 2 integration relay.
Reconnect the A22 and L6 connectors.
Measure the voltage according to the value(s) in the table below.
- Standard Voltage:
Tester Connection Condition Specified Condition A22-2 (IG2D) - Body ground Power switch on (IG) 9 V or higher L6-2 (IG1D) - Body ground Power switch on (IG) 9 V or higher
| *a | Component with harness connected
(Power Management Control ECU) |
OK
(See pageGeneral>INTRODUCTION>HOW TO TROUBLESHOOT ECU CONTROLLED SYSTEMS>HOW TO PROCEED WITH TROUBLESHOOTING)
NG