DOOR / HATCH REAR DOOR DISASSEMBLY
CAUTION / NOTICE / HINT
- HINT:
- ·
Use the same procedure for the RH side and LH side.
·The following procedure is for the LH side.
PROCEDURE

 1. PRECAUTION
- NOTICE:
-
After turning the power switch off, waiting time may be required before disconnecting the cable from the negative (-) auxiliary battery terminal. Therefore, make sure to read the disconnecting the cable from the negative (-) auxiliary battery terminal notice before proceeding with work (See page General>INTRODUCTION>REPAIR INSTRUCTION>PRECAUTION).
58410B
2.REMOVE DECK BOARD ASSEMBLY
58411A
3.REMOVE NO. 1 DECK BOARD
58412A
4.REMOVE NO. 2 DECK BOARD
64993
5.REMOVE REAR DECK FLOOR BOX
64995
6.REMOVE DECK FLOOR BOX RH
7.DISCONNECT CABLE FROM NEGATIVE AUXILIARY BATTERY TERMINAL
- NOTICE:
-
When disconnecting the cable, some systems need to be initialized after the cable is reconnected (See page General>INTRODUCTION>REPAIR INSTRUCTION>INITIALIZATION).
69284D
8.REMOVE REAR DOOR INSIDE HANDLE BEZEL PLUG
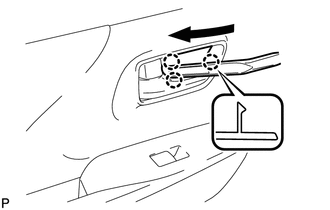
Using a moulding remover, disengage the 3 claws and remove the rear door inside handle bezel plug.
9.REMOVE REAR POWER WINDOW REGULATOR SWITCH ASSEMBLY WITH REAR DOOR ARMREST BASE PANEL
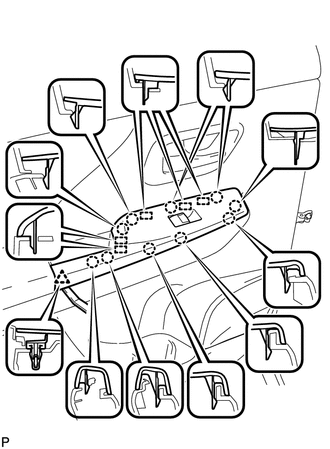
Using a moulding remover, disengage the clip, 10 claws and 5 guides.
Disconnect the connector and remove the rear power window regulator switch assembly with rear door armrest base panel.
74262
10.REMOVE REAR DOOR ARMREST COVER
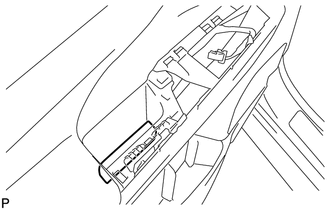
Remove the rear door armrest cover.
67604
11.REMOVE REAR DOOR TRIM BOARD SUB-ASSEMBLY
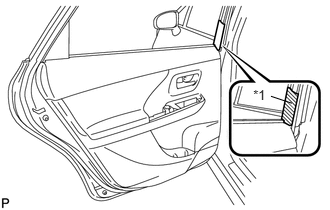
Put protective tape around the rear door panel.
| *1 | Protective Tape |
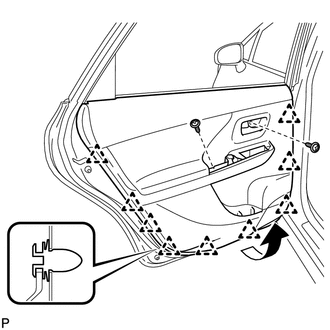
Remove the 2 screws.
Using a clip remover, disengage the 9 clips.
Pull out the rear door trim board sub-assembly in the direction indicated by the arrow in the illustration.
Raise the rear door trim board sub-assembly and disconnect the rear door trim board sub-assembly with the rear door inner glass weatherstrip.
for 8 Speakers:
Disconnect the connector.
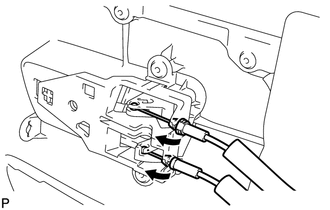
Disconnect the rear door lock remote control cable assembly and rear door inside locking cable assembly, and remove the rear door trim board sub-assembly.
68174A
12.REMOVE REAR DOOR INNER GLASS WEATHERSTRIP
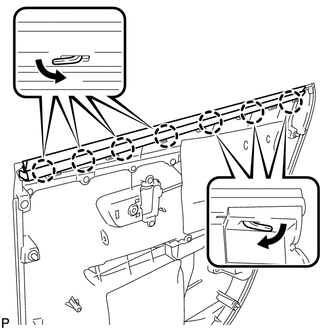
Disengage the 7 claws and remove the rear door inner glass weatherstrip from the rear door trim board sub-assembly as shown in the illustration.
65908D
13.REMOVE REAR CURTAIN SUB-ASSEMBLY (w/ Rear Door Sunshade)
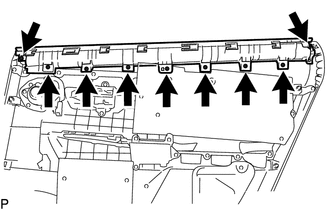
Remove the 9 screws and rear curtain sub-assembly.
69206C
14.REMOVE REAR DOOR INSIDE HANDLE SUB-ASSEMBLY
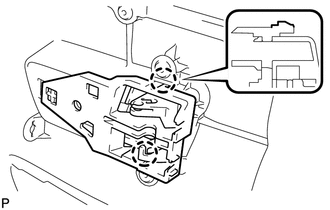
Using a screwdriver, disengage the 2 claws to remove the rear door inside handle sub-assembly.
86160Y
15.REMOVE REAR NO. 2 SPEAKER ASSEMBLY (for 8 Speakers)
86160B
16.REMOVE REAR SPEAKER ASSEMBLY
67628
17.REMOVE REAR DOOR TRIM BRACKET
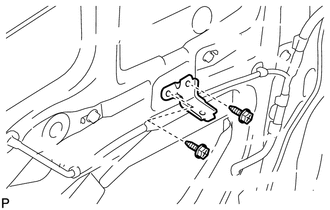
Remove the 2 screws and rear door trim bracket.
67842E
18.REMOVE REAR DOOR SERVICE HOLE COVER
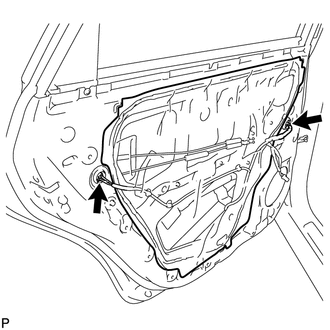
Disconnect the 2 connectors.
Remove the rear door service hole cover.
- HINT:
-
Remove any remaining butyl tape from the rear door panel.
68640A
19.REMOVE REAR DOOR CHECK ASSEMBLY
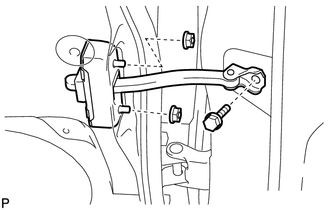
Remove the bolt, 2 nuts and rear door check assembly.
67872
20.REMOVE REAR DOOR WEATHERSTRIP
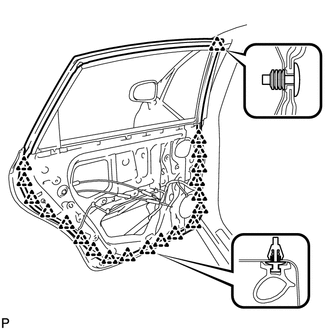
Using a clip remover, disengage the 20 clips and remove the rear door weatherstrip.
68152C
21.REMOVE REAR DOOR GLASS RUN
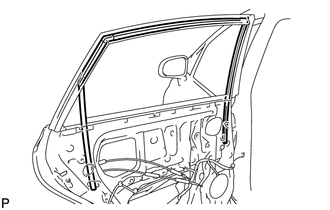
Remove the rear door glass run.
67408D
22.REMOVE REAR DOOR WINDOW GUIDE SUB-ASSEMBLY
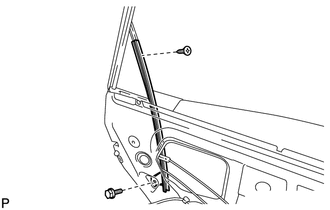
Remove the screw.
Remove the bolt and rear door window guide sub-assembly.
67488C
23.REMOVE REAR DOOR REAR GUIDE SEAL
Remove the 3 screws.
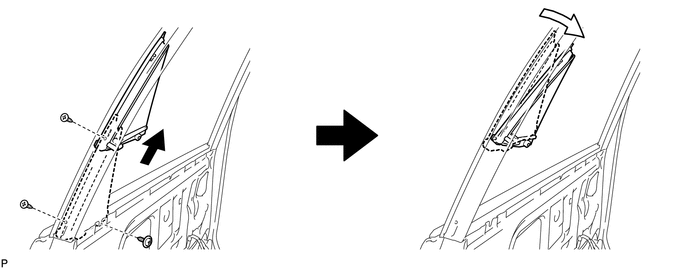
Remove the rear door rear guide seal as shown in the illustration.
68104
24.REMOVE REAR DOOR GLASS SUB-ASSEMBLY
Connect the cable to the negative (-) auxiliary battery terminal.
Connect the rear power window regulator motor connector.
Connect the rear power window regulator switch assembly and move the rear door glass sub-assembly so that the door glass bolts can be seen.
Disconnect the rear power window regulator switch assembly and rear power window regulator motor connector.
Disconnect the cable from the negative (-) auxiliary battery terminal.
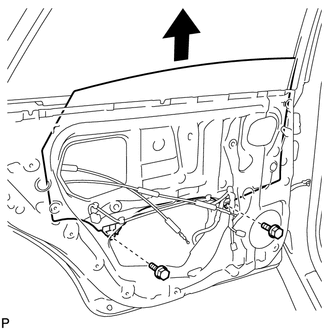
Remove the 2 bolts and rear door glass sub-assembly as shown in the illustration.
- NOTICE:
- ·
After the bolts are removed, do not allow the door glass to fall.
·Do not damage the door glass.
25.REMOVE REAR DOOR POWER WINDOW REGULATOR ASSEMBLY
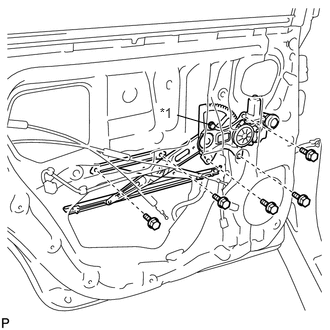
Loosen the temporary bolt.
| *1 | Temporary Bolt |
- NOTICE:
-
Do not remove the temporary bolt. If the temporary bolt is removed, the rear door power window regulator assembly may fall and cause damage.
Remove the 5 bolts.
Remove the rear door power window regulator assembly.
Remove the temporary bolt from the rear door power window regulator assembly.
85720E
26.REMOVE POWER WINDOW REGULATOR MOTOR ASSEMBLY
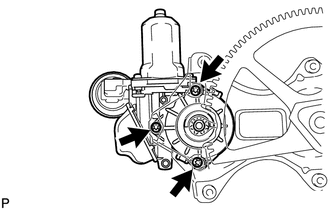
Using a T25 "TORX" socket wrench, remove the 3 screws and power window regulator motor assembly.
69060A
27.REMOVE REAR DOOR LOCK WITH MOTOR ASSEMBLY
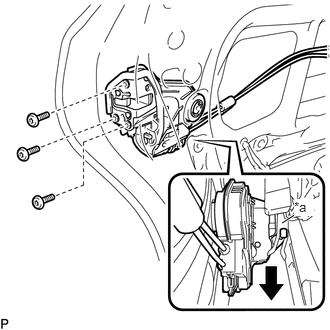
Using a T30 "TORX" socket wrench, remove the 3 screws.
| *a | Release Plate |
Move the rear door lock with motor assembly downward to disconnect in from the release plate of the rear door outside handle frame sub-assembly and remove the rear door lock with motor assembly and cables as a unit.
When reusing the rear door lock with motor assembly:
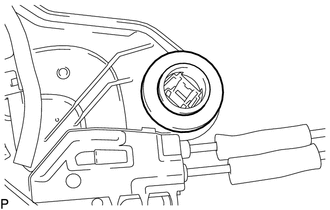
Remove the door lock wiring harness seal from the rear door lock with motor assembly.
69038A
28.REMOVE REAR DOOR LOCK COVER SUB-ASSEMBLY (w/o Double Locking System)
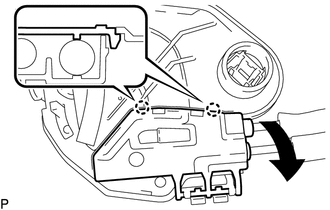
Using a screwdriver, disengage the 2 claws as shown in the illustration.
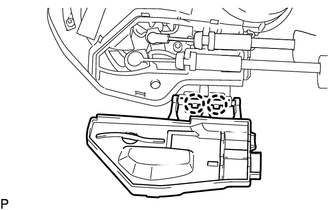
Disengage the 2 claws to remove the rear door lock cover sub-assembly.
69740D
29.REMOVE REAR DOOR LOCK REMOTE CONTROL CABLE ASSEMBLY (w/o Double Locking System)
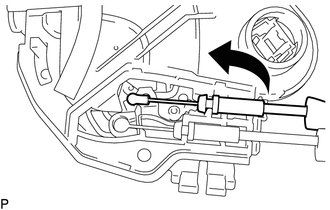
Remove the rear door lock remote control cable assembly as shown in the illustration.
69740D
30.REMOVE REAR DOOR LOCK REMOTE CONTROL CABLE ASSEMBLY (w/ Double Locking System)
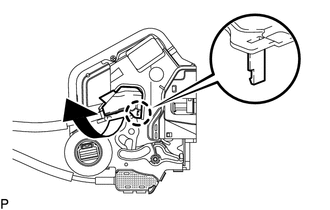
Using a screwdriver, disengage the claw as shown in the illustration.
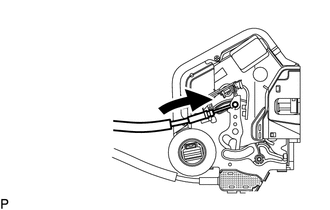
Remove the rear door lock remote control cable assembly as shown in the illustration.
69780B
31.REMOVE REAR DOOR INSIDE LOCKING CABLE ASSEMBLY (w/o Double Locking System)
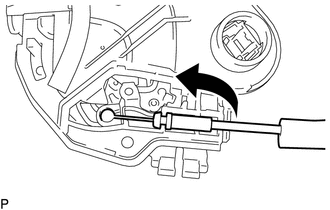
Remove the rear door inside locking cable assembly as shown in the illustration.
69780B
32.REMOVE REAR DOOR INSIDE LOCKING CABLE ASSEMBLY (w/ Double Locking System)
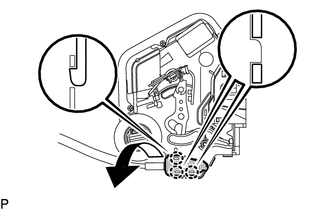
Using a screwdriver, disengage the 3 claws as shown in the illustration.
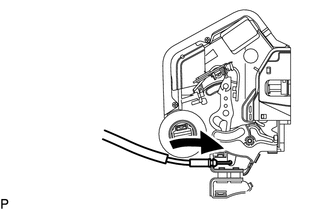
Remove the rear door inside locking cable assembly as shown in the illustration.
69227L
33.REMOVE REAR DOOR OUTSIDE HANDLE COVER
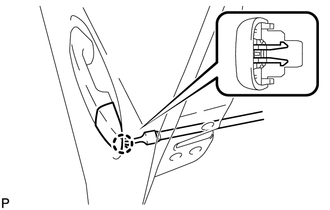
Using a T30 "TORX" socket wrench, loosen the screw.
- HINT:
-
The screw cannot be removed because it is integrated into the rear door outside handle frame sub-assembly.
Disengage the claw to remove the rear door outside handle cover.
69240
34.REMOVE REAR DOOR OUTSIDE HANDLE ASSEMBLY
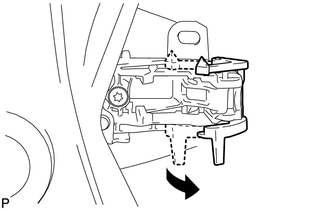
Move the lever in the direction indicated by the arrow in the illustration.
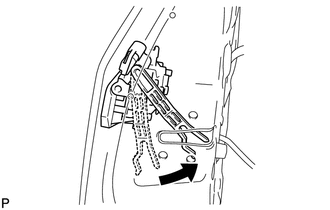
Pull and hold the release plate of the rear door outside handle frame sub-assembly as shown in the illustration.
- NOTICE:
-
The release plate may interfere with the rear door outside handle assembly and may be damaged when removing the rear door outside handle assembly, unless the release plate of the rear door outside handle frame sub-assembly is pulled and held.
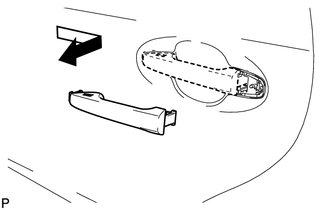
Remove the rear door outside handle assembly as shown in the illustration.
69241G
35.REMOVE REAR DOOR FRONT OUTSIDE HANDLE PAD
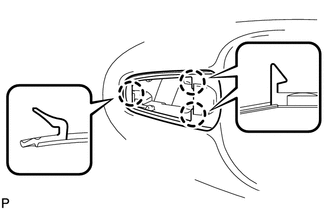
Disengage the 3 claws to remove the rear door front outside handle pad.
69242G
36.REMOVE REAR DOOR REAR OUTSIDE HANDLE PAD
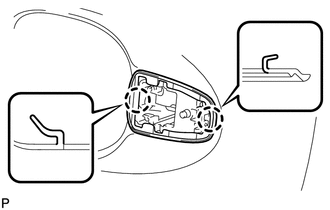
Disengage the 2 claws to remove the rear door rear outside handle pad.
69204A
37.REMOVE REAR DOOR OUTSIDE HANDLE FRAME SUB-ASSEMBLY
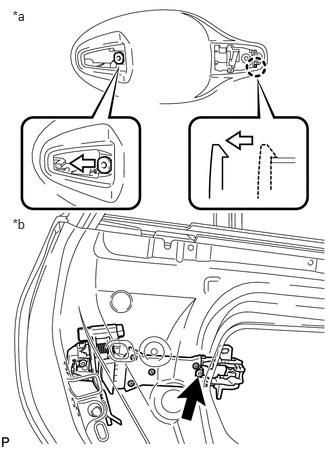
Using a T30 "TORX" socket wrench, loosen the screw.
| *a | Outside |
| *b | Inside |
Slide the rear door outside handle frame sub-assembly to disengage the door handle nut and claw of the rear door outside handle frame sub-assembly, and then remove the rear door outside handle frame sub-assembly.
67003C
38.REMOVE REAR DOOR PANEL CUSHION
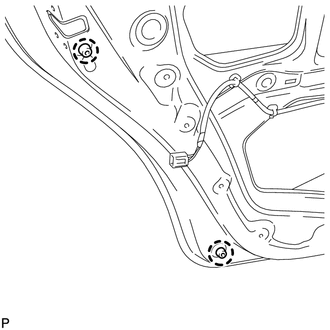
Disengage the 2 claws to remove the 2 rear door panel cushions.
67837C
39.REMOVE REAR DOOR DUST PROOF SEAL
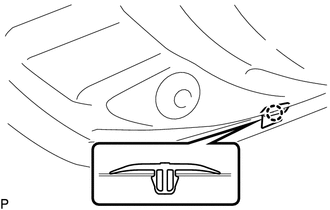
Disengage the claw to remove the rear door dust proof seal.
- HINT:
-
Use the same procedure for the other rear door dust proof seal.
67674A
40.REMOVE REAR DOOR FRAME GARNISH (w/o Rear Door Sunshade)
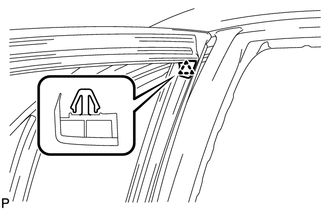
Disengage the clip to remove the rear door frame garnish.
- HINT:
-
This garnish needs to be replaced with a new one because the clip will break when removing the rear door frame garnish.
67676C
41.REMOVE REAR DOOR NO. 2 FRAME GARNISH (w/o Rear Door Sunshade)
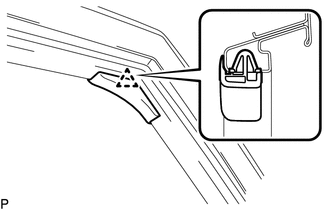
Disengage the clip to remove the rear door No. 2 frame garnish.
- HINT:
-
This garnish needs to be replaced with a new one because the clip will break when removing the rear door No. 2 frame garnish.
67674A
42.REMOVE REAR DOOR FRAME GARNISH (w/ Rear Door Sunshade)
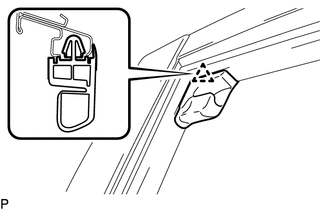
Disengage the clip to remove the rear door frame garnish.
- HINT:
-
This garnish needs to be replaced with a new one because the clip will break when removing the rear door frame garnish.
67676C
43.REMOVE REAR DOOR NO. 2 FRAME GARNISH (w/ Rear Door Sunshade)
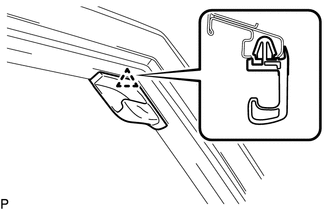
Disengage the clip to remove the rear door No. 2 frame garnish.
- HINT:
-
This garnish needs to be replaced with a new one because the clip will break when removing the rear door No. 2 frame garnish.
75740
44.REMOVE REAR DOOR BELT MOULDING ASSEMBLY
75762A
45.REMOVE REAR DOOR FRONT WINDOW FRAME MOULDING
75924
46.REMOVE NO. 2 BLACK OUT TAPE
75988C
47.REMOVE REAR DOOR OUTSIDE STRIPE
75989C
48.REMOVE REAR DOOR UPPER OUTSIDE STRIPE
75978H
49.REMOVE REAR DOOR LOWER OUTSIDE STRIPE