EXTERIOR PANELS / TRIM FRONT DOOR BELT MOULDING INSTALLATION
PROCEDURE

 1. PRECAUTION
- NOTICE:
-
After turning the power switch off, waiting time may be required before disconnecting the cable from the negative (-) auxiliary battery terminal. Therefore, make sure to read the disconnecting the cable from the negative (-) auxiliary battery terminal notices before proceeding with work (See page General>INTRODUCTION>REPAIR INSTRUCTION>PRECAUTION).
75720
2.INSTALL FRONT DOOR BELT MOULDING ASSEMBLY
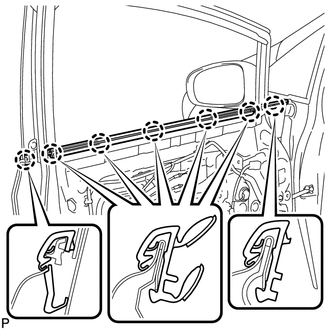
Engage the 7 claws to install the front door belt moulding assembly.
68151D
3.INSTALL FRONT DOOR GLASS RUN
68102
4.INSTALL FRONT DOOR GLASS SUB-ASSEMBLY
67832
5.INSTALL FRONT DOOR SERVICE HOLE COVER
67626
6.INSTALL FRONT DOOR TRIM BRACKET
67602
7.INSTALL FRONT DOOR TRIM BOARD SUB-ASSEMBLY
74222
8.INSTALL DOOR ARMREST COVER
9.INSTALL MULTIPLEX NETWORK MASTER SWITCH ASSEMBLY WITH FRONT DOOR ARMREST BASE PANEL (for Driver Side)
10.INSTALL POWER WINDOW REGULATOR SWITCH ASSEMBLY WITH FRONT DOOR ARMREST BASE PANEL (for Front Passenger Side)
69284C
11.INSTALL FRONT DOOR INSIDE HANDLE BEZEL PLUG
12.CONNECT CABLE TO NEGATIVE AUXILIARY BATTERY TERMINAL
- NOTICE:
-
When disconnecting the cable, some systems need to be initialized after the cable is reconnected (See page General>INTRODUCTION>REPAIR INSTRUCTION>INITIALIZATION).
64995
13.INSTALL DECK FLOOR BOX RH
64993
14.INSTALL REAR DECK FLOOR BOX
58411A
15.INSTALL NO. 1 DECK BOARD
58412A
16.INSTALL NO. 2 DECK BOARD
58410B
17.INSTALL DECK BOARD ASSEMBLY
18.INITIALIZE POWER WINDOW CONTROL SYSTEM
19.INSPECT POWER WINDOW OPERATION