INTERIOR PANELS / TRIM ROOF HEADLINING INSTALLATION
PROCEDURE

 1.SET ROOF HEADLINING ASSEMBLY
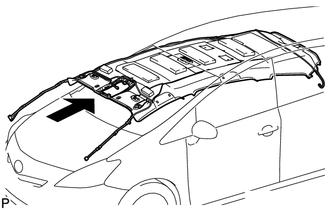
Put the roof headlining assembly into the vehicle through the front of the vehicle.
- NOTICE:
-
Do not damage the roof headlining assembly or body interior.
- HINT:
-
Temporarily install the roof headlining assembly so that the windshield glass can be installed.
56111
2.INSTALL WINDSHIELD GLASS
3.INSTALL ROOF HEADLINING ASSEMBLY (except Glass Roof)
Install the 5 clips.
Remove the protective cover.
w/o Satellite Radio:
Engage the 3 clamps and connect the connector to the front pillar RH.
Engage the claw and connect the connector to the rear pillar RH.
w/ Satellite Radio:
Engage the 3 clamps and connect the 2 connectors to the front pillar RH.
Engage the claw and clamp, and connect the 2 connectors to the rear pillar RH.
Engage the 3 clamps and connect the connector to the front pillar LH.
w/ EC Mirror:
Connect the inner rear view mirror connector.
w/ Rain Sensor:
Connect the rain sensor connector.
Install the protective cover.
4.INSTALL ROOF HEADLINING ASSEMBLY (for Glass Roof)
Engage the 15 fasteners.
Install the 3 clips.
Remove the protective cover.
w/o Satellite Radio:
Engage the 3 clamps and connect the connector to the front pillar RH.
Engage the claw and connect the connector to the rear pillar RH.
w/ Satellite Radio:
Engage the 3 clamps and connect the 2 connectors to the front pillar RH.
Engage the claw and clamp, and connect the 2 connectors to the rear pillar RH.
Engage the 3 clamps and connect the connector to the front pillar LH.
w/ EC Mirror:
Connect the inner rear view mirror connector.
w/ Rain Sensor:
Connect the rain sensor connector.
Install the protective cover.
74348
5.INSTALL VISOR HOLDER
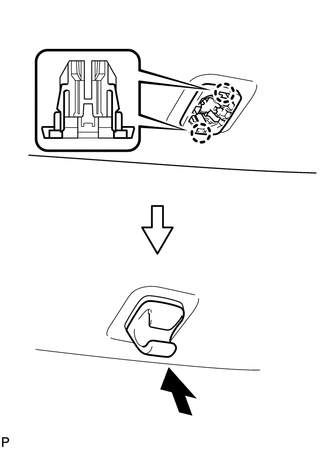
Engage the 2 claws.
Push in the visor holder as shown in the illustration.
- HINT:
-
Use the same procedure for the other visor holder.
74320
6.INSTALL VISOR ASSEMBLY LH
Install the visor assembly LH with the 2 screws.
74310
7.INSTALL VISOR ASSEMBLY RH
- HINT:
-
Use the same procedure as for the LH side.
74610S
8.INSTALL FRONT ASSIST GRIP ASSEMBLY
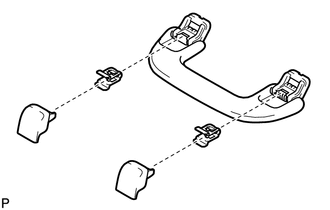
Assemble the front assist grip assembly as shown in the illustration.
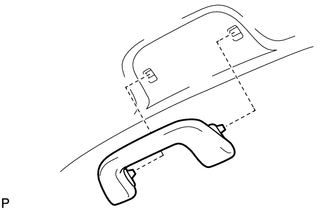
Install the front assist grip assembly.
- HINT:
-
Use the same procedure for the other front assist grip assembly.
74620B
9.INSTALL REAR ASSIST GRIP ASSEMBLY
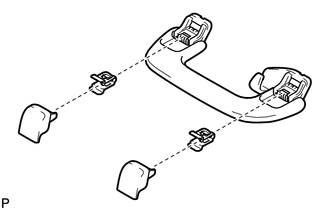
Assemble the rear assist grip assembly as shown in the illustration.
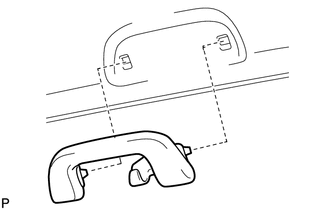
Install the rear assist grip assembly.
- HINT:
-
Use the same procedure for the other rear assist grip assembly.
73139A
10.INSTALL SEAT BELT ANCHOR COVER
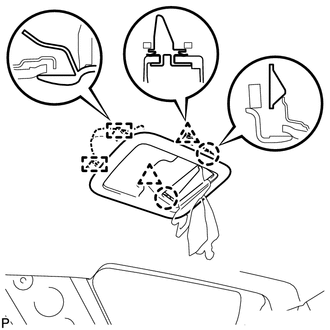
Engage the 2 guides and 2 claws, 2 clips to install the seat belt anchor cover.
81240
11.INSTALL NO. 1 ROOM LIGHT ASSEMBLY
81260A
12.INSTALL MAP LIGHT ASSEMBLY (except Glass Roof)
81260A
13.INSTALL MAP LIGHT ASSEMBLY (for Glass Roof)
89943
14.INSTALL RAIN SENSOR COVER (w/ Rain Sensor)
87818
15.INSTALL INNER REAR VIEW MIRROR COVER (w/ EC Mirror)
62452C
16.INSTALL REAR ROOF SIDE RAIL GARNISH LH
Engage the guide and 4 claws to install the rear roof side rail garnish LH.
62480A
17.INSTALL ROOF SIDE INNER GARNISH ASSEMBLY LH
Pass the floor anchor of the rear seat outer seat belt assembly LH through the roof side inner garnish assembly LH.
Insert the roof side inner garnish assembly LH in the direction indicated by the arrow (1) shown in the illustration and engage the 3 clips (B).
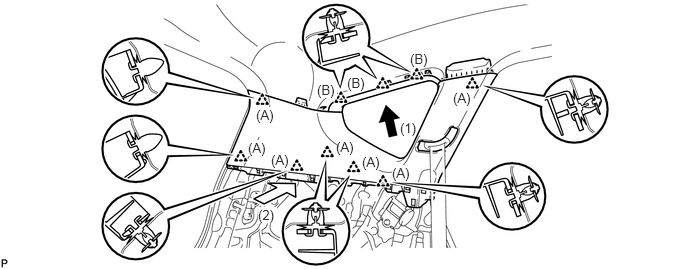
Insert the roof side inner garnish assembly LH in the direction indicated by the arrow (2) shown in the illustration and engage the 7 clips (A) to install the roof side inner garnish assembly LH and rear roof side rail garnish LH as a unit.
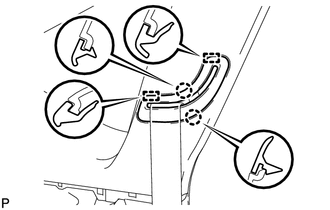
Engage the 2 guides.
Engage the 2 claws to install the belt guide LH.
73570
18.CONNECT REAR NO. 2 SEAT OUTER BELT ASSEMBLY LH (for Upper Side)
64740C
19.INSTALL DECK TRIM SIDE PANEL ASSEMBLY LH
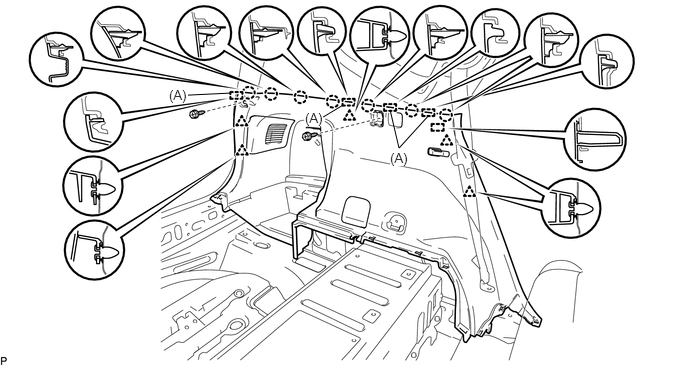
Engage the 5 guides, 5 clips and 7 claws.
- HINT:
-
Make sure that the 4 guides (A) of the deck trim side panel assembly LH are inserted securely to prevent any excessive gaps.
Install the deck trim side panel assembly LH with the 2 bolts.
81250
20.INSTALL NO. 2 ROOM LIGHT ASSEMBLY
73570
21.CONNECT REAR NO. 2 SEAT OUTER BELT ASSEMBLY LH (for Lower Side)
73370C
22.CONNECT REAR NO. 1 SEAT OUTER BELT ASSEMBLY LH
55548C
23.INSTALL NO. 2 CUP HOLDER
Engage the 12 claws to install the No. 2 cup holder.
64713F
24.INSTALL FRONT DECK SIDE TRIM COVER LH
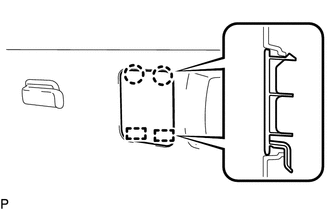
Engage the 2 guides.
Engage the 2 claws to install the front deck side trim cover LH.
58460D
25.INSTALL LUGGAGE HOLD BELT STRIKER ASSEMBLY (for LH Side)
Engage the 2 guides.
Install the 2 luggage hold belt striker assemblies with the 2 bolts.
64721G
26.INSTALL NO. 1 DECK TRIM COVER (for LH Side)
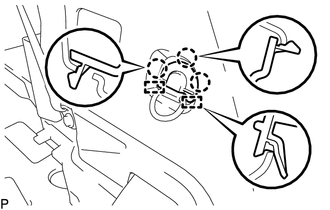
Engage the 2 guides and 3 claws to install the No. 1 deck trim cover.
62451C
27.INSTALL REAR ROOF SIDE RAIL GARNISH RH
- HINT:
-
Use the same procedure as for the LH side.
62471A
28.INSTALL ROOF SIDE INNER GARNISH ASSEMBLY RH
- HINT:
-
Use the same procedure as for the LH side.
73560
29.INSTALL REAR NO. 2 SEAT OUTER BELT ASSEMBLY RH (for Upper Side)
- HINT:
-
Use the same procedure as for the LH side.
64730B
30.INSTALL DECK TRIM SIDE PANEL ASSEMBLY RH
- HINT:
-
Use the same procedure as for the LH side.
73560
31.CONNECT REAR NO. 2 SEAT OUTER BELT ASSEMBLY RH (for Lower Side)
- HINT:
-
Use the same procedure as for the LH side.
73360C
32.CONNECT REAR NO. 1 SEAT OUTER BELT ASSEMBLY RH
- HINT:
-
Use the same procedure as for the LH side.
55548C
33.INSTALL NO. 1 CUP HOLDER
Connect the connector.
Engage the 12 claws to install the No. 1 cup holder.
64712F
34.INSTALL FRONT DECK SIDE TRIM COVER RH
- HINT:
-
Use the same procedure as for the LH side.
58460D
35.INSTALL LUGGAGE HOLD BELT STRIKER ASSEMBLY (for RH Side)
- HINT:
-
Use the same procedure as for the LH side.
64721G
36.INSTALL NO. 1 DECK TRIM COVER (for RH Side)
- HINT:
-
Use the same procedure as for the LH side.
62412
37.INSTALL CENTER PILLAR GARNISH LH
Pass the floor anchor of the front seat outer seat belt assembly LH through the center pillar garnish LH.
Engage the 2 clips to install the center pillar garnish LH.
Install the center pillar garnish LH with the bolt.
62414A
38.INSTALL CENTER PILLAR LOWER GARNISH LH
Engage the 4 claws and 2 clips to install the center pillar lower garnish LH.
73220
39.CONNECT FRONT SEAT OUTER BELT ASSEMBLY LH
73233
40.INSTALL LAP BELT OUTER ANCHOR COVER (for LH Side)
62332A
41.INSTALL REAR DOOR OPENING TRIM WEATHERSTRIP LH
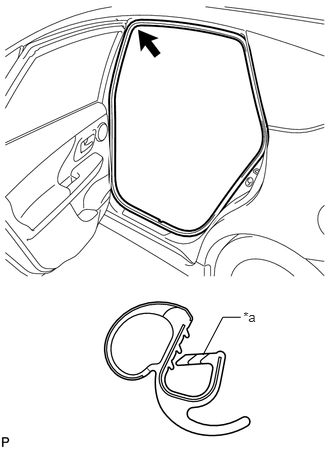
Align the alignment mark (Red) on the weatherstrip with the protruding portion on the body indicated by the arrow in the illustration, and install the rear door opening trim weatherstrip LH.
| *a | Alignment Mark (Red) |
- NOTICE:
-
After installation, check that the corners fit correctly.
67918A
42.INSTALL REAR DOOR SCUFF PLATE LH
Move the rear seat assembly LH to the foremost position.
Engage the 9 claws and 3 clips to install the rear door scuff plate LH.
62212
43.INSTALL FRONT PILLAR GARNISH LH
Remove the protective cover.
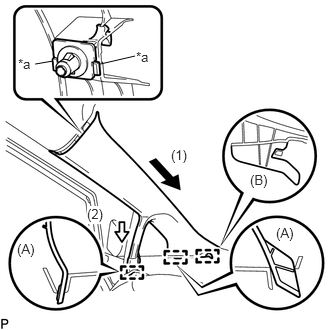
Install a new front pillar garnish clip to the front pillar garnish LH.
| *a | Protruding Part |
- NOTICE:
-
Do not allow the front pillar garnish clip to overlap the protruding parts of the front pillar garnish LH.
Engage the guide (B).
Engage the 2 guides (A).
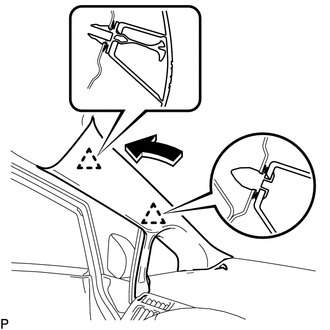
Engage the 2 clips to install the front pillar garnish LH.
62312B
44.INSTALL FRONT DOOR OPENING TRIM WEATHERSTRIP LH
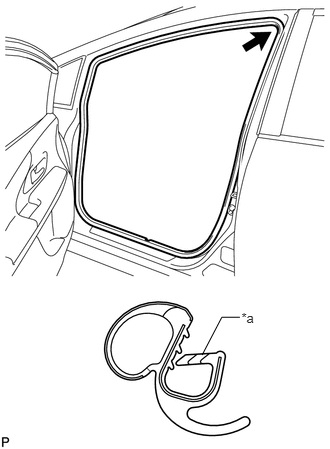
Align the alignment mark (Yellow) on the weatherstrip with the protruding portion on the body indicated by the arrow in the illustration, and install the front door opening trim weatherstrip LH.
| *a | Alignment Mark (Yellow) |
- NOTICE:
-
After installation, check that the corners fit correctly.
62112A
45.INSTALL COWL SIDE TRIM SUB-ASSEMBLY LH
Engage the 2 clips.
Install the cowl side trim sub-assembly LH with the clip.
67914
46.INSTALL FRONT DOOR SCUFF PLATE LH
Engage the 10 claws to install the front door scuff plate LH.
62411
47.INSTALL CENTER PILLAR GARNISH RH
- HINT:
-
Use the same procedure as for the LH side.
62413A
48.INSTALL CENTER PILLAR LOWER GARNISH RH
- HINT:
-
Use the same procedure as for the LH side.
73210
49.CONNECT FRONT SEAT OUTER BELT ASSEMBLY RH
- HINT:
-
Use the same procedure as for the LH side.
73233
50.INSTALL LAP BELT OUTER ANCHOR COVER (for RH Side)
- HINT:
-
Use the same procedure as for the LH side.
62331A
51.INSTALL REAR DOOR OPENING TRIM WEATHERSTRIP RH
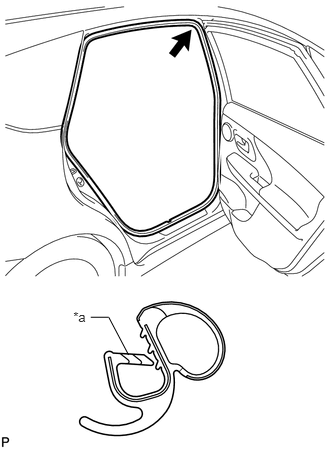
Align the alignment mark (Blue) on the weatherstrip with the protruding portion on the body indicated by the arrow in the illustration, and install the rear door opening trim weatherstrip RH.
| *a | Alignment Mark (Blue) |
- NOTICE:
-
After installation, check that the corners fit correctly.
67917A
52.INSTALL REAR DOOR SCUFF PLATE RH
- HINT:
-
Use the same procedure as for the LH side.
62211
53.INSTALL FRONT PILLAR GARNISH RH
- HINT:
-
Use the same procedure as for the LH side.
62311B
54.INSTALL FRONT DOOR OPENING TRIM WEATHERSTRIP RH
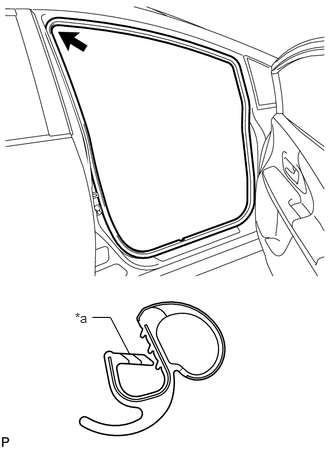
Align the alignment mark (White) on the weatherstrip with the protruding portion on the body indicated by the arrow in the illustration, and install the front door opening trim weatherstrip RH.
| *a | Alignment Mark (White) |
- NOTICE:
-
After installation, check that the corners fit correctly.
62111C
55.INSTALL COWL SIDE TRIM SUB-ASSEMBLY RH
- HINT:
-
Use the same procedure as for the LH side.
67913
56.INSTALL FRONT DOOR SCUFF PLATE RH
- HINT:
-
Use the same procedure as for the LH side.
57.INSTALL REAR NO. 2 SEAT ASSEMBLY
72128C
58.INSTALL SEAT TRACK BRACKET COVER LH
72159H
59.INSTALL REAR SEAT TRACK BRACKET COVER
72127D
60.INSTALL SEAT TRACK BRACKET COVER RH
67935A
61.INSTALL BACK DOOR SCUFF PLATE
Engage the 2 guides and 2 claws, 4 clips to install the back door scuff plate.
64910J
62.INSTALL TONNEAU COVER ASSEMBLY (w/ Tonneau Cover)
Install the tonneau cover assembly.
64995
63.INSTALL DECK FLOOR BOX RH
Engage the 3 claws to install the deck floor box RH.
64993
64.INSTALL REAR DECK FLOOR BOX
Install the rear deck floor box.
58411A
65.INSTALL NO. 1 DECK BOARD
Install the No. 1 deck board.
58412A
66.INSTALL NO. 2 DECK BOARD
Install the No. 2 deck board.
58410B
67.INSTALL DECK BOARD ASSEMBLY
Install the deck board assembly.