BRAKE CONTROL / DYNAMIC CONTROL SYSTEMS ELECTRONICALLY CONTROLLED BRAKE SYSTEM C1252 Brake Booster Pump Motor on Time Abnormally Long C1253 Pump Motor Relay
DESCRIPTION
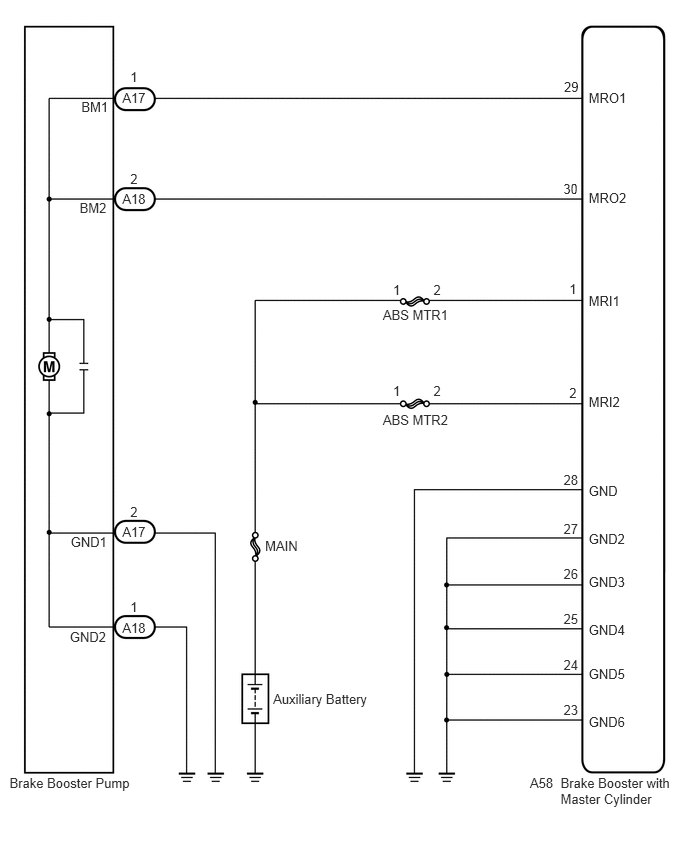
The skid control ECU detects decreases in the accumulator pressure according to the data from the accumulator pressure sensor, and then starts and stops the pump motor by operating the motor relay.
| DTC Code | INF Code | DTC Detection Condition | Trouble Area |
|---|---|---|---|
| C1252 | 311 | The pump motor is operating continuously for 178 seconds or more. (When relay malfunction is 98 seconds or more.) | ·
Short in motor circuit or motor monitor circuit ·
Motor relay stuck ·
Accumulator pressure sensor malfunction in brake actuator ·
Brake booster with master cylinder (Skid control ECU) |
| C1253 | 321 | With the IG1 terminal voltage 9.5 V or more, the motor drive monitor remains off for 0.2 seconds or more after a motor drive on request. | ·
Open in motor circuit or motor monitor circuit ·
Brake booster with master cylinder (Skid control ECU) |
| ↑ | 322 | The motor drive monitor remains on for 2 seconds or more after a motor drive off request. | ·
Short in motor circuit or motor monitor circuit ·
Brake booster with master cylinder (Skid control ECU) |
| ↑ | 323 | The skid control ECU internal motor drive logical inconsistency continues for 2 seconds or more. | Brake booster with master cylinder (Skid control ECU) |
| ↑ | 324 | An open circuit in both skid control ECU internal motor relays 1 and 2. | ·
Open in motor circuit or motor monitor circuit ·
Brake booster with master cylinder (Skid control ECU) |
| ↑ | 325 | An open circuit in both skid control ECU internal motor relays 1 and 3. | ↑ |
| ↑ | 326 | An open circuit in both skid control ECU internal motor relays 2 and 3. | ↑ |
| ↑ | 327 | An open circuit in skid control ECU internal motor relay 1. | ↑ |
| ↑ | 328 | An open circuit in skid control ECU internal motor relay 2. | ↑ |
| ↑ | 329 | An open circuit in skid control ECU internal motor relay 3. | ↑ |
WIRING DIAGRAM
CAUTION / NOTICE / HINT
- NOTICE:
-
When replacing the brake booster with master cylinder (skid control ECU or brake actuator), perform initialization and calibration of the linear solenoid valve (See page Brake>BRAKE CONTROL / DYNAMIC CONTROL SYSTEMS>ELECTRONICALLY CONTROLLED BRAKE SYSTEM>INITIALIZATION).
PROCEDURE
Connect the GTS to the DLC3.
Turn the power switch on (IG).
Select the Active Test on the GTS (See page Brake>BRAKE CONTROL / DYNAMIC CONTROL SYSTEMS>ELECTRONICALLY CONTROLLED BRAKE SYSTEM>DATA LIST / ACTIVE TEST).
| Tester Display | Test Part | Control Range | Diagnostic Note |
|---|---|---|---|
| ECB* Motor Relay | ABS motor relay | Relay ON/OFF | - |
*: Electronically Controlled Brake System
Select the Data List on the GTS (See page Brake>BRAKE CONTROL / DYNAMIC CONTROL SYSTEMS>ELECTRONICALLY CONTROLLED BRAKE SYSTEM>DATA LIST / ACTIVE TEST).
| Tester Display | Measurement Item/Range | Normal Condition | Diagnostic Note |
|---|---|---|---|
| ECB* Motor Relay | ABS motor relay / ON or OFF | ON: Relay on
OFF: Relay off |
- |
*: Electronically Controlled Brake System
Check the operating condition of the ABS motor relay when operating it using the GTS.
- Result:
Result Proceed to ABS motor relay in the Data List turns ON/OFF using the Active Test A ABS motor relay in the Data List does not change using the Active Test B
A
B
Turn the power switch off (lock).
Make sure that there is no looseness at the locking part and the connecting part of the connectors.
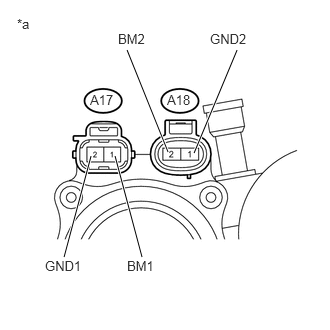
Disconnect the brake booster pump connectors.
Measure the resistance according to the value(s) in the table below.
- Standard Resistance:
Tester Connection Condition Specified Condition A17-1 (BM1) - A17-2 (GND1) Always Below 10 Ω A18-2 (BM2) - A18-1 (GND2) Always Below 10 Ω A17-1 (BM1) - A18-2 (BM2) Always Below 1 Ω A17-2 (GND1) - A18-1 (GND2) Always Below 1 Ω
| *a | Component without harness connected
(Brake Booster Pump) |
OK
NG
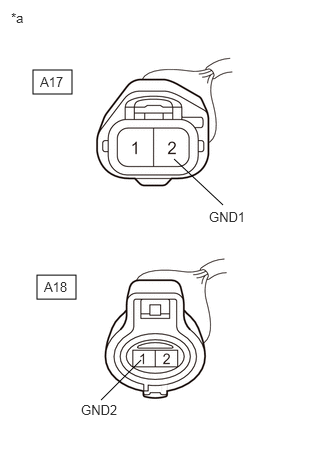
Measure the resistance according to the value(s) in the table below.
- Standard Resistance:
Tester Connection Condition Specified Condition A17-2 (GND1) - Body ground Always Below 1 Ω A18-1 (GND2) - Body ground Always Below 1 Ω
| *a | Front view of wire harness connector
(to Brake Booster Pump) |
OK
NG
Reconnect the brake booster pump connectors.
Connect the GTS to the DLC3.
Turn the power switch on (IG).
Select the Data List on the GTS (See page Brake>BRAKE CONTROL / DYNAMIC CONTROL SYSTEMS>ELECTRONICALLY CONTROLLED BRAKE SYSTEM>DATA LIST / ACTIVE TEST).
| Tester Display | Measurement Item/Range | Normal Condition | Diagnostic Note |
|---|---|---|---|
| Accumulator Sensor | Accumulator pressure sensor /
Min.: 0.00 V, Max.: 5.00 V |
Specified value: 2.90 to 4.20 V | When brake fluid is stored in the accumulator: Accumulator pressure changes in accordance with volume of fluid stored in the accumulator |
Wait for 30 seconds without depressing the brake pedal.
Check that the accumulator pressure sensor output values change is within the specified range.
- OK:
Accumulator pressure sensor output values change is within 0.55 V.
OK
NG
Turn the power switch off (lock).
Clear the DTCs (See page Brake>BRAKE CONTROL / DYNAMIC CONTROL SYSTEMS>ELECTRONICALLY CONTROLLED BRAKE SYSTEM>DTC CHECK / CLEAR).
Turn the power switch on (IG).
Check if the same DTC is recorded (See page Brake>BRAKE CONTROL / DYNAMIC CONTROL SYSTEMS>ELECTRONICALLY CONTROLLED BRAKE SYSTEM>DTC CHECK / CLEAR).
- Result:
Result Proceed to DTCs (C1252 and C1253) are not output A DTCs (C1252 and/or C1253) are output (for LHD) B DTCs (C1252 and/or C1253) are output (for RHD) C
A
(See pageGeneral>INTRODUCTION>HOW TO TROUBLESHOOT ECU CONTROLLED SYSTEMS>HOW TO PROCEED WITH TROUBLESHOOTING)
B
C
Turn the power switch off (lock).
Check that the ABS MTR1 (30 A) and ABS MTR2 (30 A) fuses are normal.
Make sure that there is no looseness at the locking part and the connecting part of the connector.
Disconnect the skid control ECU connector.
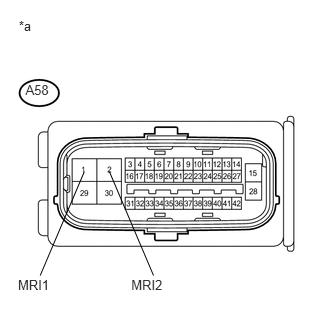
Measure the voltage according to the value(s) in the table below.
- Standard Voltage:
Tester Connection Condition Specified Condition A58-1 (MRI1) - Body ground Always 11 to 14 V A58-2 (MRI2) - Body ground Always 11 to 14 V
| *a | Front view of wire harness connector
(to Skid Control ECU) |
OK
NG
Make sure that there is no looseness at the locking part and the connecting part of the connectors.
Disconnect the brake booster pump connectors.
Measure the resistance according to the value(s) in the table below.
- Standard Resistance:
Tester Connection Condition Specified Condition A58-29 (MRO1) - A17-1 (BM1) Always Below 1 Ω A58-29 (MRO1) - Body ground Always 10 kΩ or higher A58-30 (MRO2) - A18-2 (BM2) Always Below 1 Ω A58-30 (MRO2) - Body ground Always 10 kΩ or higher
- Result:
Result Proceed to OK (for LHD) A OK (for RHD) B NG C
A
B
C
Select the Active Test on the GTS (See page Brake>BRAKE CONTROL / DYNAMIC CONTROL SYSTEMS>ELECTRONICALLY CONTROLLED BRAKE SYSTEM>DATA LIST / ACTIVE TEST).
- HINT:
-
The Active Test can be performed when the following conditions are met.
- ·
ABS main relay is on.
·Park (P) is selected.
·Parking brake is applied.
·Vehicle speed is 0 km/h (0 mph).
| Tester Display | Test Part | Control Range | Diagnostic Note |
|---|---|---|---|
| ECB* Solenoid (SMC/SRC/SCC) | Switching solenoid valve (SMC/SRC/SCC) | Solenoid ON/OFF | Operation sound of solenoid (clicking sound) can be heard |
*: Electronically Controlled Brake System
Perform the Active Test of the solenoid using the GTS.
Select the Data List on the GTS (See page Brake>BRAKE CONTROL / DYNAMIC CONTROL SYSTEMS>ELECTRONICALLY CONTROLLED BRAKE SYSTEM>DATA LIST / ACTIVE TEST).
| Tester Display | Measurement Item/Range | Normal Condition | Diagnostic Note |
|---|---|---|---|
| Wheel Cylinder Pressure Sensor | Wheel cylinder pressure sensor / Min.: 0.00 V, Max.: 5.00 V | When brake pedal released: 0.10 to 0.90 V | Reading increases when brake pedal is depressed |
Check that the output value of the wheel cylinder does not increase.
- OK:
The output value of the wheel cylinder does not increase.
- HINT:
-
If any output value increases, there may be brake fluid leaks in the brake actuator.
- Result:
Result Proceed to OK A NG (for LHD) B NG (for RHD) C
A
B
C