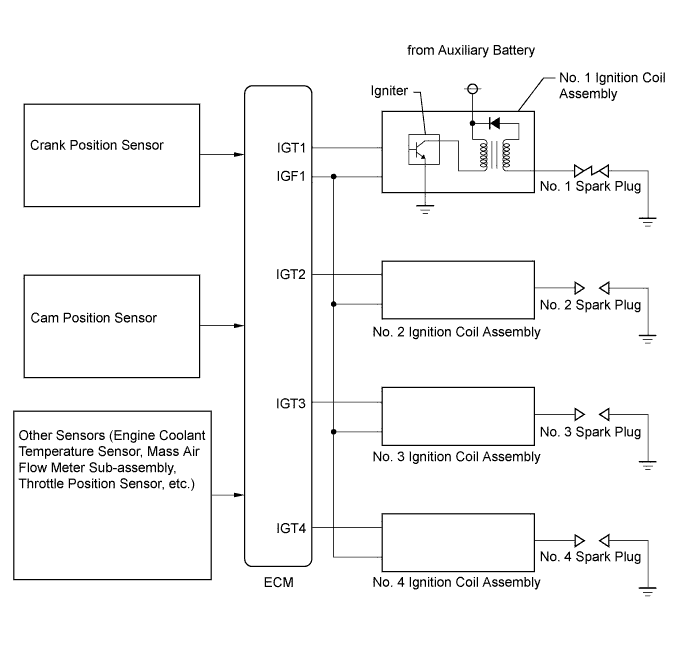
DTC P0351 Ignition Coil "A" Primary / Secondary Circuit |
DTC P0352 Ignition Coil "B" Primary / Secondary Circuit |
DTC P0353 Ignition Coil "C" Primary / Secondary Circuit |
DTC P0354 Ignition Coil "D" Primary / Secondary Circuit |
| DTC No. | DTC Detection Condition | Trouble Area |
| P0351 P0352 P0353 P0354 | No IGF signal to the ECM while the engine is running (1 trip detection logic). |
|
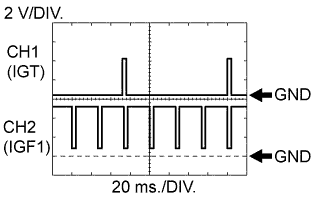 |
| ECM Terminal Name | CH1: Between IGT (1 to 4) and E1 CH2: Between IGF1 and E1 |
| Tester Range | 2 V/DIV., 20 ms./DIV. |
| Condition | Idling |
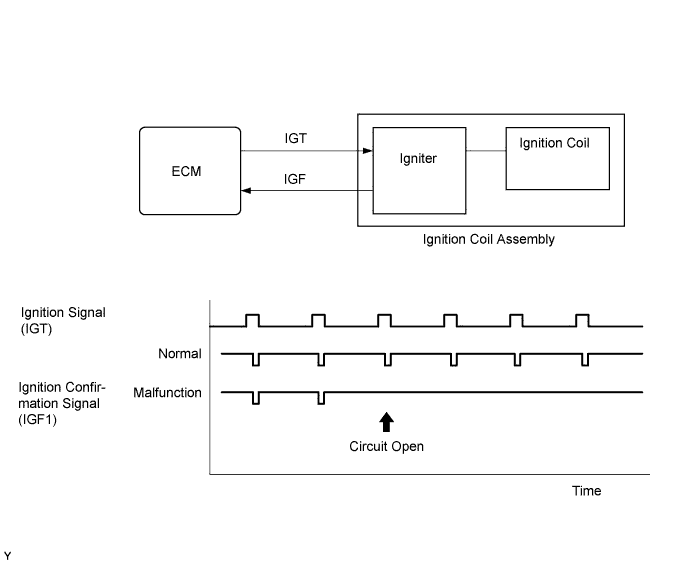
| Related DTCs | P0351: Igniter (cylinder 1) range check/function check P0352: Igniter (cylinder 2) range check/function check P0353: Igniter (cylinder 3) range check/function check P0354: Igniter (cylinder 4) range check/function check |
| Required Sensors/Components (Main) | Igniter |
| Required Sensors/Components (Related) | Crank position sensor |
| Frequency of Operation | Continuous |
| Duration | - |
| MIL Operation | Immediate |
| Sequence of Operation | None |
| Monitor runs whenever the following DTCs are not stored | None |
| All of the following conditions are met | - |
| Spark cut | Not operating |
| Either of the following conditions is met | A or B |
| A. Engine speed | 1500 rpm or less |
| B. Starter | Off |
| Either of the following conditions is met | C or D |
| C. Both of the following conditions are met | - |
| Engine speed | 500 rpm or less |
| Auxiliary battery voltage | 6 V or higher |
| D. All of the following conditions are met | - |
| Engine speed | Higher than 500 rpm |
| Auxiliary battery voltage | 10 V or higher |
| Number of sparks after CPU reset | 5 sparks or more |
| Lost communication with power management control ECU (U0293) | Not detected |
| All of the following conditions are met | A, B, C and D |
| A. Ignition signal fail counter | More than 2 times |
| B. Time after condition A is met | 0.256 seconds or more |
| C. Ignition signal fail counter after condition B is met | More than 2 times |
| D. Ignition switch | ON (IG) |
| Confirmed ignition signal input when ignition signal is on to off | 2 times |
| Techstream Display | Description |
| NORMAL |
|
| ABNORMAL |
|
| INCOMPLETE |
|
| N/A |
|
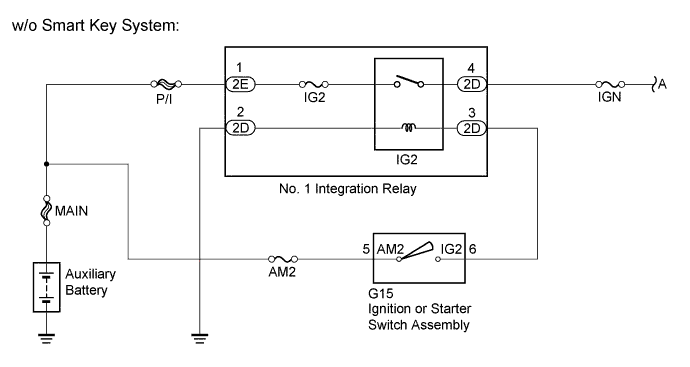
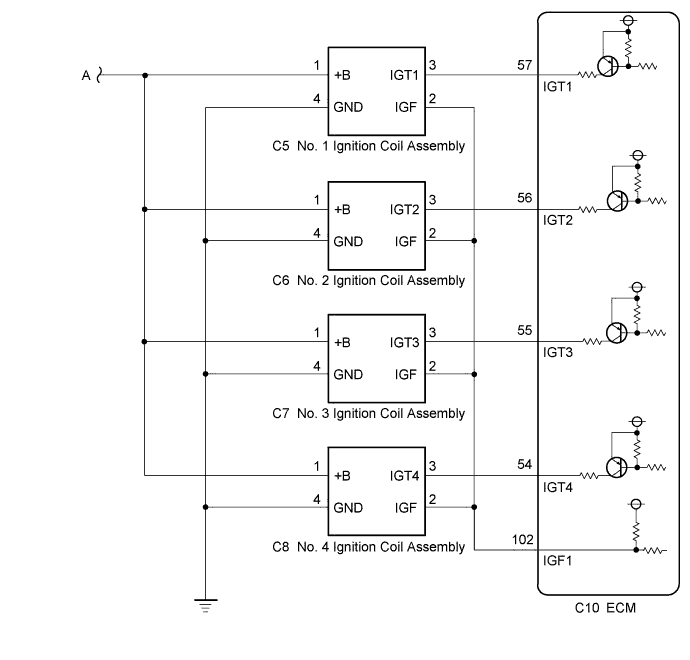
| 1.CHECK HARNESS AND CONNECTOR (IGNITION COIL ASSEMBLY - BODY GROUND) |
Disconnect the ignition coil assembly connectors.
Measure the resistance according to the value(s) in the table below.
| Tester Connection | Condition | Specified Condition |
| C5-4 (GND) - Body ground | Always | Below 1 Ω |
| C6-4 (GND) - Body ground | Always | Below 1 Ω |
| C7-4 (GND) - Body ground | Always | Below 1 Ω |
| C8-4 (GND) - Body ground | Always | Below 1 Ω |
|
| ||||
| OK | |
 |
| 2.CHECK TERMINAL VOLTAGE (POWER SOURCE OF IGNITION COIL ASSEMBLY) |
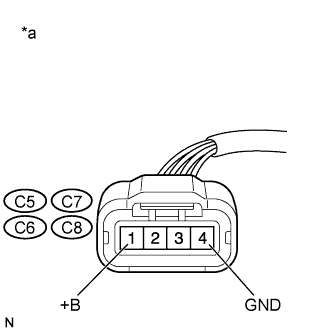 |
Disconnect the ignition coil assembly connectors.
Turn the ignition switch to ON (IG).
Measure the voltage according to the value(s) in the table below.
| Tester Connection | Condition | Specified Condition |
| C5-1 (+B) - C5-4 (GND) | Ignition switch ON (IG) | 11 to 14 V |
| C6-1 (+B) - C6-4 (GND) | Ignition switch ON (IG) | 11 to 14 V |
| C7-1 (+B) - C7-4 (GND) | Ignition switch ON (IG) | 11 to 14 V |
| C8-1 (+B) - C8-4 (GND) | Ignition switch ON (IG) | 11 to 14 V |
| *a | Front view of wire harness connector (to Ignition Coil Assembly) |
|
| ||||
| OK | |
|
| 3.CHECK HARNESS AND CONNECTOR (IGNITION COIL ASSEMBLY - ECM) |
Disconnect the ignition coil assembly connectors.
Disconnect the ECM connector.
Measure the resistance according to the value(s) in the table below.
| Tester Connection | Condition | Specified Condition |
| C5-2 (IGF) - C10-102 (IGF1) | Always | Below 1 Ω |
| C6-2 (IGF) - C10-102 (IGF1) | Always | Below 1 Ω |
| C7-2 (IGF) - C10-102 (IGF1) | Always | Below 1 Ω |
| C8-2 (IGF) - C10-102 (IGF1) | Always | Below 1 Ω |
| C5-3 (IGT1) - C10-57 (IGT1) | Always | Below 1 Ω |
| C6-3 (IGT2) - C10-56 (IGT2) | Always | Below 1 Ω |
| C7-3 (IGT3) - C10-55 (IGT3) | Always | Below 1 Ω |
| C8-3 (IGT4) - C10-54 (IGT4) | Always | Below 1 Ω |
| C5-3 (IGT1) or C10-57 (IGT1) - Body ground | Always | 10 kΩ or higher |
| C6-3 (IGT2) or C10-56 (IGT2) - Body ground | Always | 10 kΩ or higher |
| C7-3 (IGT3) or C10-55 (IGT3) - Body ground | Always | 10 kΩ or higher |
| C8-3 (IGT4) or C10-54 (IGT4) - Body ground | Always | 10 kΩ or higher |
| C5-2 (IGF), C6-2 (IGF), C7-2 (IGF), C8-2 (IGF) or C10-102 (IGF1) - Body ground | Always | 10 kΩ or higher |
|
| ||||
| OK | |
|
| 4.CHECK WHETHER DTC OUTPUT RECURS (DTC P0351, P0352, P0353 OR P0354) |
Connect the Techstream to the DLC3.
Turn the ignition switch to ON (IG).
Turn the Techstream on.
Clear the DTCs (Click here).
Shuffle the arrangement of the ignition coil assemblies (among No. 1 to No. 4 cylinders).
Perform a simulation test.
Enter the following menus: Powertrain / Engine and ECT / Trouble Codes.
Read the DTCs.
| Result | Proceed to |
| Same DTC output | A |
| Different ignition coil DTC output | B |
|
| ||||
| A | ||
 | ||
| ||
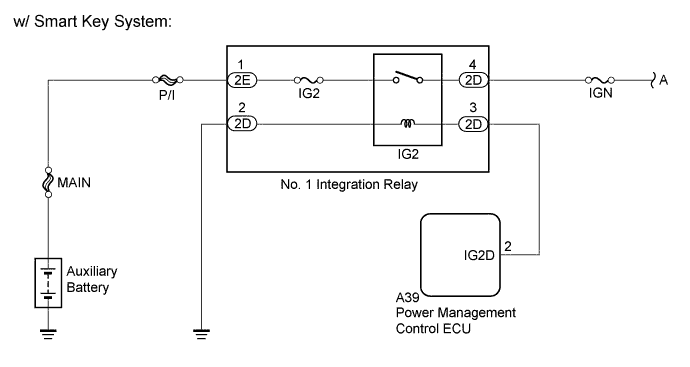
| 5.CHECK HARNESS AND CONNECTOR (IGNITION COIL ASSEMBLY - NO. 1 INTEGRATION RELAY) |
Disconnect the ignition coil assembly connectors.
Remove the No. 1 integration relay from the engine room relay block and junction block assembly.
Measure the resistance according to the value(s) in the table below.
| Tester Connection | Condition | Specified Condition |
| C5-1 (+B) - 2D-4 | Always | Below 1 Ω |
| C6-1 (+B) - 2D-4 | Always | Below 1 Ω |
| C7-1 (+B) - 2D-4 | Always | Below 1 Ω |
| C8-1 (+B) - 2D-4 | Always | Below 1 Ω |
| C5-1 (+B), C6-1 (+B), C7-1 (+B), C8-1 (+B) or 2D-4 - Body ground | Always | 10 kΩ or higher |
|
| ||||
| OK | ||
| ||
| ||

