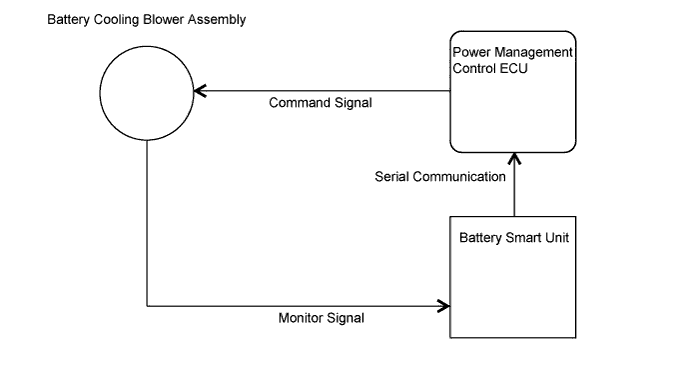
DTC P0A84-123 Hybrid Battery Pack Cooling Fan 1 Control Circuit Low |
| DTC No. | INF Code | DTC Detection Condition | Trouble Area |
| P0A84 | 123 | Both of the following conditions are met due to the battery cooling blower system malfunction: (1 trip detection logic)
|
|
| DTC No. | Data List |
| P0A84-123 |
|
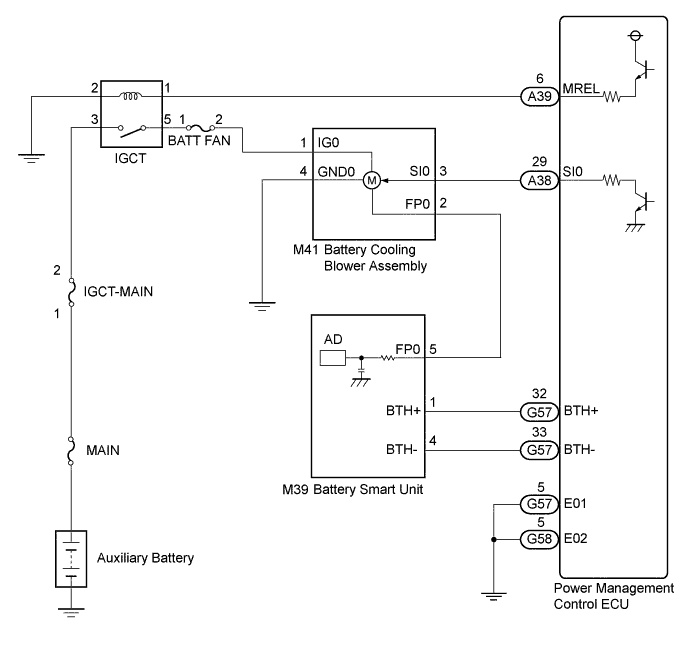
| 1.CHECK FOR DTCS (HV) |
Connect the Techstream to the DLC3.
Turn the ignition switch to ON (IG).
Enter the following menus: Powertrain / Hybrid Control / Trouble Codes.
Check and record any HV system DTCs, INF codes and freeze frame data.
Read output DTCs (Click here).
| Result | Proceed to |
| P0AFC-123 is not output. | A |
| P0AFC-123 is also output. | B |
Turn the ignition switch off.
Disconnect the Techstream from the DLC3.
|
| ||||
| A | |
 |
| 2.PERFORM ACTIVE TEST USING TECHSTREAM |
Connect the Techstream to the DLC3.
Turn the ignition switch to ON (IG).
Enter the following menus: Powertrain / Hybrid Control / Active Test / Driving the Battery Cooling Fan.
Select air volume mode 6 in the "Driving the Battery Cooling Fan" Active Test to operate the battery cooling blower assembly.
Check that the fan operates and air is sucked into the inlet duct.
Turn the ignition switch off.
|
| ||||
| OK | |
|
| 3.CHECK HARNESS AND CONNECTOR (BATTERY COOLING BLOWER - BATTERY SMART UNIT) |
Check that the service plug grip is not installed.
Remove the No. 1 hybrid battery exhaust duct .
Disconnect connector M41 from the battery cooling blower assembly.
Disconnect connector M39 from the battery smart unit.
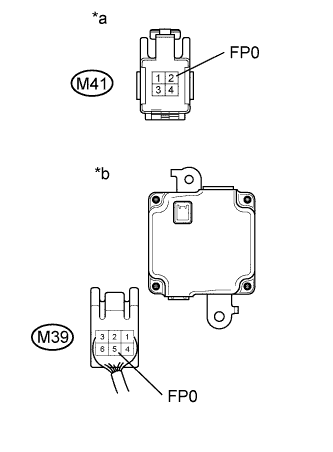 |
Measure the resistance according to the value(s) in the table below.
| Tester Connection | Switch Condition | Specified Condition |
| M41-2 (FP0) - M39-5 (FP0) | Ignition switch off | Below 1 Ω |
| M41-2 (FP0) or M39-5 (FP0) - Body ground | Ignition switch off | 10 kΩ or higher |
| *a | Front view of wire harness connector (to Battery Cooling Blower Assembly) |
| *b | Rear view of wire harness connector (to Battery Smart Unit) |
Connect the battery cooling blower assembly connector.
Connect the battery smart unit connector.
Install the No. 1 hybrid battery exhaust duct.
|
| ||||
| OK | |
|
| 4.CHECK BATTERY SMART UNIT (FREQUENCY) |
Check that the service plug grip is not installed.
Remove the rear seat cushion leg sub-assembly .
Connect the cable to the negative (-) auxiliary battery terminal.
Connect the Techstream to the DLC3.
Turn the ignition switch to ON (IG).
Enter the following menus: Powertrain / Hybrid Control / Trouble Codes.
Clear DTCs and freeze frame data.
Enter the following menus: Powertrain / Hybrid Control / Active Test / Driving the Battery Cooling Fan.
Enter the following menus: Powertrain / Hybrid Control / Data List / All Data / Cooling Fan Frequency 1.
Select each air volume mode (1 to 6) in the "Driving the Battery Cooling Fan" Active Test to operate the battery cooling blower assembly.
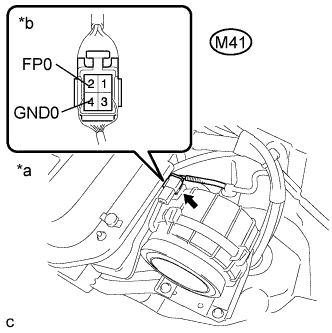 |
While the cooling fan is operating, compare the value in the data list (Cooling Fan Frequency 1) with the Frequency value that was actually measured at the battery cooling blower assembly connector.
| Tester Connection | Condition |
| M41-2 (FP0) - M41-4 (GND0) | Battery cooling blower is operating |
| *a | Component with harness connected (Battery Cooling Blower Assembly) |
| *b | Rear view of wire harness connector (to Battery Cooling Blower Assembly) |
| Result | Proceed to |
| The value in the Data List (Cooling Fan Frequency 1) and the actual measurement value at the battery cooling blower assembly connector are 0 Hz. | A |
| The value in the Data List (Cooling Fan Frequency 1) and the actual measurement value at the battery cooling blower assembly connector are not 0 Hz. | B |
Turn the ignition switch off.
Disconnect the cable from the negative (-) auxiliary battery terminal.
Install the rear seat cushion leg sub-assembly.
|
| ||||
| A | |
|
| 5.CHECK BATTERY SMART UNIT |
Check that the service plug grip is not installed.
Remove the rear seat cushion leg sub-assembly .
Disconnect connector M39 from the battery smart unit.
Connect the cable to the negative (-) auxiliary battery terminal.
Connect the Techstream to the DLC3.
Turn the ignition switch to ON (IG).
Enter the following menus: Powertrain / Hybrid Control / Trouble Codes.
Clear DTCs and freeze frame data.
Enter the following menus: Powertrain / Hybrid Control / Active Test / Driving the Battery Cooling Fan.
Enter the following menus: Powertrain / Hybrid Control / Data List / All Data / Cooling Fan Frequency 1.
Select each air volume mode (1 to 6) in the "Driving the Battery Cooling Fan" Active Test to operate the battery cooling blower assembly.
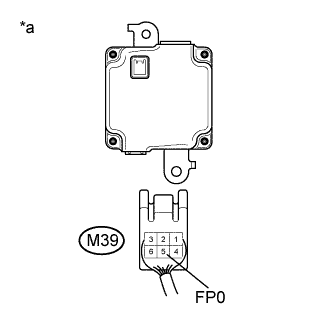 |
While the cooling fan is operating, measure the frequency on the wire harness side of the battery cooling blower assembly connector.
| Tester Connection | Condition |
| M39-5 (FP0) - Body ground | Battery cooling blower is operating |
| *a | Front view of wire harness connector (to Battery Smart Unit) |
| Result | Proceed to |
| The actual measured value at the battery cooling blower assembly connector remains 0 Hz. | A |
| The actual measured value at the battery cooling blower assembly connector is not 0 Hz. | B |
Turn the ignition switch off.
Disconnect the cable from the negative (-) auxiliary battery terminal.
Connect the battery cooling blower assembly connector.
Install the rear seat cushion leg sub-assembly.
|
| ||||
| A | ||
 | ||
| ||
| 6.CHECK BATTERY SMART UNIT |
Check that the service plug grip is not installed.
Remove the rear seat cushion leg sub-assembly .
Connect the cable to the negative (-) auxiliary battery terminal.
Connect the Techstream to the DLC3.
Turn the ignition switch to ON (IG).
Enter the following menus: Powertrain / Hybrid Control / Trouble Codes.
Clear DTCs and freeze frame data.
Enter the following menus: Powertrain / Hybrid Control / Active Test / Driving the Battery Cooling Fan.
Enter the following menus: Powertrain / Hybrid Control / Data List / All Data / Cooling Fan Frequency 1.
Select each air volume mode (1 to 6) in the "Driving the Battery Cooling Fan" Active Test to operate the battery cooling blower assembly.
|
While the cooling fan is operating, compare the value in the data list (Cooling Fan Frequency 1) with the Frequency value that was actually measured at the battery cooling blower assembly connector.
| Tester Connection | Condition |
| M41-2 (FP0) - M41-4 (GND0) | Battery cooling blower is operating |
| *a | Component with harness connected (Battery Cooling Blower Assembly) |
| *b | Rear view of wire harness connector (to Battery Cooling Blower Assembly) |
| Result | Proceed to |
| Difference between the value in the Data List (Cooling Fan Frequency 1) and the actual measurement value at the battery cooling blower assembly connector is 10% or less. | A |
| Difference between the value in the Data List (Cooling Fan Frequency 1) and the actual measurement value at the battery cooling blower assembly connector is more than 10%. | B |
Turn the ignition switch off.
Disconnect the cable from the negative (-) auxiliary battery terminal.
Install the rear seat cushion leg sub-assembly.
|
| ||||
| A | ||
| ||
| ||
| 7.CHECK FUSE (BATT FAN) |
Remove the BATT FAN fuse from the No. 2 engine room relay block and No. 2 junction block assembly.
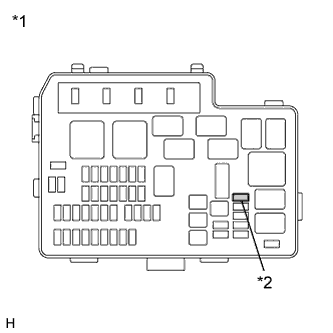 |
Measure the resistance of the BATT FAN fuse.
| Tester Connection | Condition | Specified Condition |
| BATT FAN fuse | Always | Below 1 Ω |
| *1 | No. 2 Engine Room Relay Block and No. 2 Junction Block Assembly |
| *2 | BATT FAN Fuse |
|
| ||||
| OK | |
|
| 8.CHECK HARNESS AND CONNECTOR (VOLTAGE) |
Check that the service plug grip is not installed.
Remove the rear seat cushion leg sub-assembly .
Connect the cable to the negative (-) auxiliary battery terminal.
Connect the Techstream to the DLC3.
Turn the ignition switch to ON (IG).
Enter the following menus: Powertrain / Hybrid Control / Trouble Codes.
Clear DTCs and freeze frame data.
Enter the following menus: Powertrain / Hybrid Control / Active Test / Driving the Battery Cooling Fan.
Enter the following menus: All Data / VMF Fan Motor Voltage 1.
Select each air volume mode (1 to 6) in the "Driving the Battery Cooling Fan" Active Test to operate the battery cooling blower assembly.
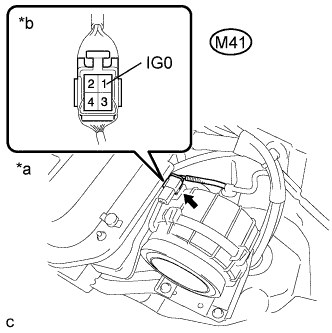 |
Measure the voltage according to the value(s) in the table below.
| Tester Connection | Condition | Specified Condition |
| M41-1 (IG0) - Body ground | Battery cooling blower is operating | 11 to 14 V |
| *a | Component with harness connected (Battery Cooling Blower Assembly) |
| *b | Rear view of wire harness connector (to Battery Cooling Blower Assembly) |
Turn the ignition switch off.
Disconnect the cable from the negative (-) auxiliary battery terminal.
Install the rear seat cushion leg sub-assembly.
|
| ||||
| OK | |
|
| 9.CHECK BATTERY COOLING BLOWER ASSEMBLY |
Check that the service plug grip is not installed.
Connect the cable to the negative (-) auxiliary battery terminal.
Disconnect connector A38 from the power management control ECU (Click here).
Turn the ignition switch to ON (IG).
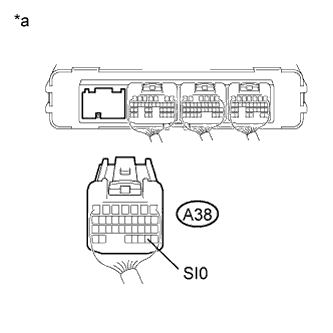 |
Measure the voltage according to the value(s) in the table below.
| Tester Connection | Switch Condition | Specified Condition |
| A38-29 (SI0) - Body ground | Ignition switch ON (IG) | 4.5 to 5.5 V |
| *a | Rear view of wire harness connector (to Power Management Control ECU) |
Turn the ignition switch off.
Disconnect the cable from the negative (-) auxiliary battery terminal.
|
| ||||
| OK | ||
| ||
| ||
| 10.CHECK HARNESS AND CONNECTOR (BATTERY COOLING BLOWER - POWER MANAGEMENT CONTROL ECU) |
Check that the service plug grip is not installed.
Remove the rear seat cushion leg sub-assembly .
Disconnect connector M41 from the battery cooling blower assembly.
Disconnect connector A38 from the power management control ECU (Click here).
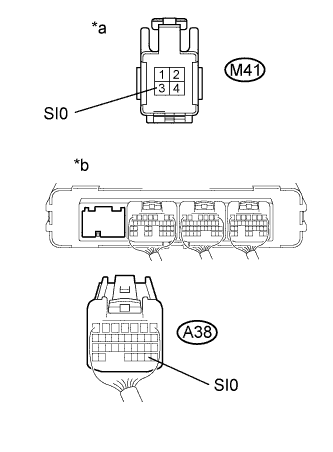 |
Measure the resistance according to the value(s) in the table below.
| Tester Connection | Switch Condition | Specified Condition |
| M41-3 (SI0) - A38-29 (SI0) | Ignition switch off | Below 1 Ω |
| M41-3 (SI0) or A38-29 (SI0) - Body ground | Ignition switch off | 10 kΩ or higher |
| *a | Front view of wire harness connector (to Battery Cooling Blower Assembly) |
| *b | Rear view of wire harness connector (to Power Management Control ECU) |
Connect the cable to the negative (-) auxiliary battery terminal.
Turn the ignition switch to ON (IG).
Measure the voltage according to the value(s) in the table below.
| Tester Connection | Switch Condition | Specified Condition |
| M41-3 (SI0) - Body ground | Ignition switch ON (IG) | Below 1 V |
Turn the ignition switch off.
Disconnect the cable from the negative (-) auxiliary battery terminal.
Connect the battery cooling blower assembly connector.
Install the rear seat cushion leg sub-assembly.
Connect the power management control ECU connector.
|
| ||||
| OK | ||
| ||
| ||
| 11.CHECK HARNESS AND CONNECTOR (POWER MANAGEMENT CONTROL ECU - BODY GROUND) |
Disconnect connector G57 from the power management control ECU (Click here).
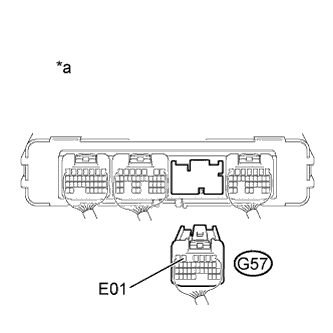 |
Measure the resistance according to the value(s) in the table below.
| Tester Connection | Switch Condition | Specified Condition |
| G57-5 (E01) - Body ground | Ignition switch off | Below 1 Ω |
| *a | Rear view of wire harness connector (to Power Management Control ECU) |
Connect the power management control ECU connector.
|
| ||||
| OK | |
|
| 12.CHECK HARNESS AND CONNECTOR (POWER MANAGEMENT CONTROL ECU - BODY GROUND) |
Disconnect connector G58 from the power management control ECU (Click here).
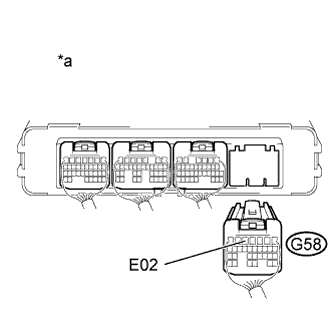 |
Measure the resistance according to the value(s) in the table below.
| Tester Connection | Switch Condition | Specified Condition |
| G58-5 (E02) - Body ground | Ignition switch off | Below 1 Ω |
| *a | Rear view of wire harness connector (to Power Management Control ECU) |
Connect the power management control ECU connector.
|
| ||||
| OK | |
|
| 13.CHECK HARNESS AND CONNECTOR (IGCT RELAY - BATTERY COOLING BLOWER ASSEMBLY) |
Remove the IGCT relay.
Remove the rear seat cushion leg sub-assembly .
Disconnect connector M41 from the battery cooling blower assembly.
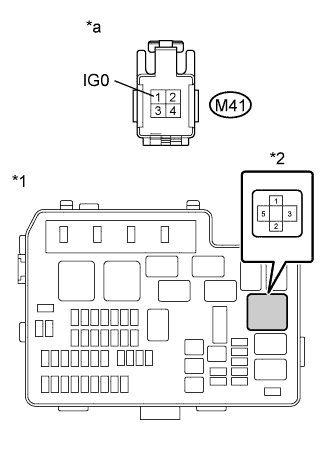 |
Measure the resistance according to the value(s) in the table below.
| Tester Connection | Switch Condition | Specified Condition |
| 5 (IGCT relay block) - M41-1 (IG0) | Ignition switch off | Below 1 Ω |
| *1 | No. 2 Engine Room Relay Block and No. 2 Junction Block Assembly |
| *2 | IGCT Relay |
| *a | Front view of wire harness connector (to Battery Cooling Blower Assembly) |
Install the IGCT relay.
Connect the battery cooling blower assembly connector.
Install the rear seat cushion leg sub-assembly.
|
| ||||
| OK | ||
| ||
| ||
| 14.CHECK HARNESS AND CONNECTOR (BATT FAN FUSE - BATTERY COOLING BLOWER ASSEMBLY) |
Remove the BATT FAN fuse.
Remove the rear seat cushion leg sub-assembly .
Disconnect connector M41 from the battery cooling blower assembly.
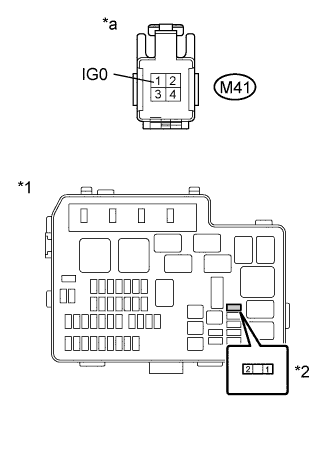 |
Measure the resistance according to the value(s) in the table below.
| Tester Connection | Switch Condition | Specified Condition |
| M41-1 (IG0) - Terminals other than 2 (BATT FAN fuse block) and body ground | Ignition switch off | 10 kΩ or higher |
| *1 | No. 2 Engine Room Relay Block and No. 2 Junction Block Assembly |
| *2 | BATT FAN fuse |
| *a | Front view of wire harness connector (to Battery Cooling Blower Assembly) |
Install the BATT FAN fuse.
Connect the battery cooling blower assembly connector.
Install the rear seat cushion leg sub-assembly.
|
| ||||
| OK | |
|
| 15.REPLACE BATTERY COOLING BLOWER ASSEMBLY |
| NEXT | ||
| ||
| ||
| 16.REPAIR OR REPLACE HARNESS OR CONNECTOR |
| NEXT | ||
| ||
| ||

