| B |  |
| GO TO DTC CHART (P0AFC-123) (Click here) |
DTC P0AAE-123 Hybrid Battery Pack Air Temperature Sensor "A" Circuit Low |
DTC P0AAF-123 Hybrid Battery Pack Air Temperature Sensor "A" Circuit High |
| DTC No. | INF Code | DTC Detection Condition | Trouble Area |
| P0AAE | 123 | The inlet air temperature sensor output voltage is lower than the specified value (short circuit) and the detected temperature is higher than the specified value. (1 trip detection logic) |
|
| P0AAF | The inlet air temperature sensor output voltage is higher than the standard value (short to +B or open) and the detected temperature is lower than the specified value. (1 trip detection logic) |
| Displayed Temperature | Malfunction |
| -45 °C (-49 °F) or less | Open or +B short circuit |
| 95 °C (203 °F) or more | GND short |
| DTC No. | Data List |
| P0AAE-123 P0AAF-123 | Inhaling Air Temp |
| 1.CHECK FOR DTCS (HV) |
Connect the Techstream to the DLC3.
Turn the ignition switch to ON (IG).
Enter the following menus: Powertrain / Hybrid Control / Trouble Codes.
Check and record any HV system DTCs, INF codes and freeze frame data.
Read output DTCs (Click here).
| Result | Proceed to |
| P0AFC-123 is not output. | A |
| P0AFC-123 is also output. | B |
Turn the ignition switch off.
Disconnect the Techstream from the DLC3.
|
| ||||
| A | |
 |
| 2.CHECK CONNECTOR CONNECTION CONDITION |
Check that the service plug grip is not installed.
Remove the No. 1 hybrid battery shield sub-assembly .
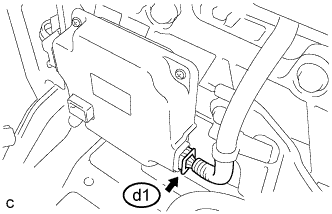 |
Check the connections of the d1 connector of the battery smart unit.
Install the No. 1 hybrid battery shield sub-assembly.
|
| ||||
| OK | |
|
| 3.CHECK INSTALLATION OF INLET AIR TEMPERATURE SENSOR |
Check that the service plug grip is not installed.
Remove the No. 2 hybrid battery shield sub-assembly .
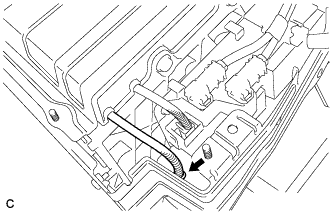 |
Visually check the installation condition of the inlet air temperature sensor.
| Result | Proceed to |
| The inlet air temperature sensor is installed in the correct location and its claws are engaged securely | A |
| Claws are damaged. | B |
| Inlet air temperature sensor is not installed correctly, but claws are not damaged. | C |
Install the No. 2 hybrid battery shield sub-assembly.
|
| ||||
|
| ||||
| A | |
|
| 4.CHECK HV BATTERY (INLET AIR TEMPERATURE SENSOR AND BATTERY TEMPERATURE SENSOR) |
Check that the service plug grip is not installed.
Remove the No. 1 hybrid battery shield sub-assembly .
Disconnect connectors M39 and d1 from the battery smart unit.
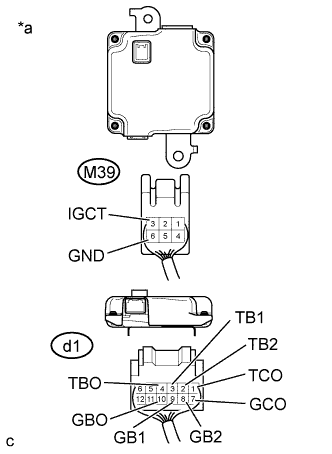 |
Measure the resistance according to the value(s) in the table below.
| Tester Connection | Condition | Specified Condition |
| d1-1 (TCO) - d1-7 (GCO) | 0°C (32°F) | 26.7 to 27.8 kΩ |
| 25°C (77°F) | 9.9 to 10.1 kΩ | |
| 40°C (104°F) | 5.73 to 5.92 kΩ |
| *a | Rear view of wire harness connector (to Battery Smart Unit) |
Measure the resistance according to the value(s) in the table below.
| Tester Connection | Switch Condition | Specified Condition |
| d1-1 (TCO) - M39-3 (IGCT) | Ignition switch off | 10 kΩ or higher |
| d1-1 (TCO) - M39-6 (GND) | Ignition switch off | 10 kΩ or higher |
| d1-7 (GCO) - M39-3 (IGCT) | Ignition switch off | 10 kΩ or higher |
| d1-7 (GCO) - M39-6 (GND) | Ignition switch off | 10 kΩ or higher |
| d1-4 (TBO) - M39-3 (IGCT) | Ignition switch off | 10 kΩ or higher |
| d1-4 (TBO) - M39-6 (GND) | Ignition switch off | 10 kΩ or higher |
| d1-10 (GBO) - M39-3 (IGCT) | Ignition switch off | 10 kΩ or higher |
| d1-10 (GBO) - M39-6 (GND) | Ignition switch off | 10 kΩ or higher |
| d1-3 (TB1) - M39-3 (IGCT) | Ignition switch off | 10 kΩ or higher |
| d1-3 (TB1) - M39-6 (GND) | Ignition switch off | 10 kΩ or higher |
| d1-9 (GB1) - M39-3 (IGCT) | Ignition switch off | 10 kΩ or higher |
| d1-9 (GB1) - M39-6 (GND) | Ignition switch off | 10 kΩ or higher |
| d1-2 (TB2) - M39-3 (IGCT) | Ignition switch off | 10 kΩ or higher |
| d1-2 (TB2) - M39-6 (GND) | Ignition switch off | 10 kΩ or higher |
| d1-8 (GB2) - M39-3 (IGCT) | Ignition switch off | 10 kΩ or higher |
| d1-8 (GB2) - M39-6 (GND) | Ignition switch off | 10 kΩ or higher |
Connect the battery smart unit connectors.
Install the No. 1 hybrid battery shield sub-assembly.
|
| ||||
| OK | ||
 | ||
| ||
| 5.CHECK HARNESS AND CONNECTOR (INLET AIR TEMPERATURE SENSOR AND BATTERY TEMPERATURE SENSOR) |
Check that the service plug grip is not installed.
Remove the upper hybrid battery cover sub-assembly .
Check the wire harness and connectors of the battery temperature sensor and inlet air temperature sensor for abnormalities by sight and touch.
Install the upper hybrid battery cover sub-assembly.
|
| ||||
| OK | ||
| ||
| ||
