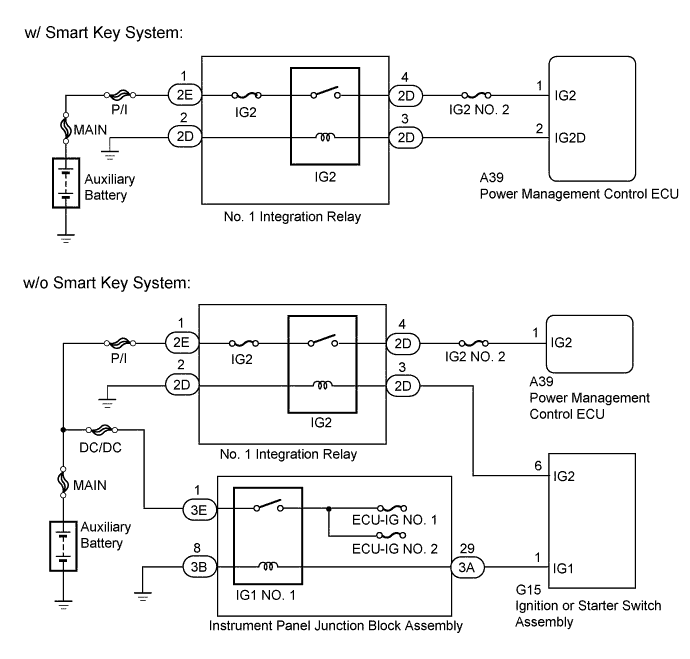
DTC P2532-772 Ignition Switch Run Position Circuit High |
| DTC No. | INF Code | DTC Detection Condition | Trouble Area |
| P2532 | 772 | Although the power management control ECU is sending a signal to open the IG2 relay, voltage is applied to the IG2 terminal. Although the power switch is turned off, the HV control system is not turned off. (1 trip detection logic) |
|
| DTC No. | INF Code | DTC Detection Condition | Trouble Area |
| P2532 | 772 | When communication from ECUs with an IG1 power source is interrupted and power source voltage is still applied to terminal IG2. |
|
| 1.CHECK VEHICLE CONDITION |
Check the vehicle condition.
| Result | Proceed to |
| w/ Smart Key System | A |
| w/o Smart Key System | B |
|
| ||||
| A | |
 |
| 2.CHECK HARNESS AND CONNECTOR (+B SHORT) |
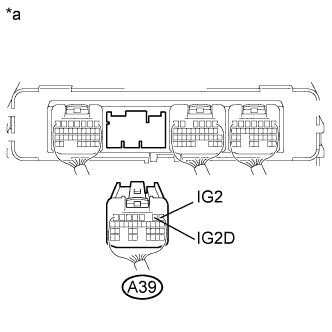 |
Disconnect connector A39 from the power management control ECU.
Measure the voltage according to the value(s) in the table below.
| Tester Connection | Switch Condition | Specified Condition |
| A39-1 (IG2) - Body ground | Ignition switch off | 1 V or less |
| A39-2 (IG2D) - Body ground | Ignition switch off | 1 V or less |
| *a | Rear view of wire harness connector (to Power Management Control ECU) |
| Result | Proceed to |
| NG | A |
| OK | B |
Connect the power management control ECU connector.
|
| ||||
| A | |
|
| 3.CHECK HARNESS AND CONNECTOR (POWER MANAGEMENT CONTROL ECU - IG2 RELAY) |
Disconnect connector A39 from the power management control ECU.
Remove the No. 1 integration relay from the No. 2 engine room relay block and No. 2 junction block assembly.
|
Measure the voltage according to the value(s) in the table below.
| Tester Connection | Switch Condition | Specified Condition |
| A39-1 (IG2) - Body ground | Ignition switch off | 1 V or less |
| A39-2 (IG2D) - Body ground | Ignition switch off | 1 V or less |
| *a | Rear view of wire harness connector (to Power Management Control ECU) |
Install the No. 1 integration relay.
Connect the power management control ECU connector.
|
| ||||
| OK | ||
 | ||
| ||
| 4.CLEAR DTC |
Connect the Techstream to the DLC3.
Turn the ignition switch to ON (IG).
Enter the following menus: Powertrain / Hybrid Control / Trouble Codes.
Read and record the DTCs and freeze frame data.
Clear the DTCs and freeze frame data.
Turn the ignition switch off.
| NEXT | |
|
| 5.CHECK DTC OUTPUT (HYBRID CONTROL) |
Connect the Techstream to the DLC3.
Turn the ignition switch to ON (IG).
Enter the following menus: Powertrain / Hybrid Control / Trouble Codes.
Check if DTCs are output.
| Result | Proceed to |
| Only P2532-772 is output or P2532-772 and DTCs other than U0140-146 are also output. | A |
| U0140-146 is output. | B |
| DTCs other than P2532-772 or U0140-146 are output. | C |
| No DTCs are output. | D |
Turn the ignition switch off.
|
| ||||
|
| ||||
|
| ||||
| A | |
|
| 6.CHECK FUSE (ECU-IG NO. 1, ECU-IG NO. 2) |
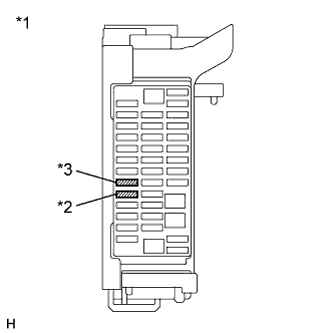 |
Remove the ECU-IG NO. 1 fuse and ECU-IG NO. 2 fuse from the instrument panel junction block assembly.
Measure the resistance according to the value(s) in the table below.
| Tester Connection | Condition | Specified Condition |
| ECU-IG NO. 1 fuse terminal | Always | Below 1 Ω |
| ECU-IG NO. 2 fuse terminal | Always | Below 1 Ω |
| *1 | Instrument panel junction block assembly |
| *2 | ECU-IG NO. 1 fuse |
| *3 | ECU-IG NO. 2 fuse |
Install the ECU-IG NO. 1 fuse and ECU-IG NO. 2 fuse.
|
| ||||
| OK | |
|
| 7.CHECK HARNESS AND CONNECTOR (IG1 NO. 1 RELAY POWER SOURCE CIRCUIT) |
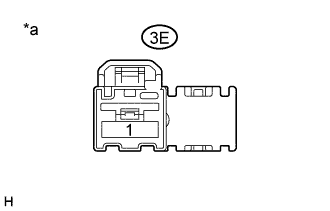
Disconnect connector 3E from the instrument panel junction block assembly.
 |
Measure the voltage according to the value(s) in the table below.
| Tester Connection | Switch Condition | Specified Condition |
| 3E-1 - Body ground | Ignition switch off | 11 to 14 V |
| *a | Front view of wire harness connector (to Instrument Panel Junction Block Assembly) |
Connect the instrument panel junction block assembly connector.
|
| ||||
| OK | |
|
| 8.CHECK HARNESS AND CONNECTOR (IG1 NO. 1 RELAY BODY GROUND) |
Disconnect connector 3B from the instrument panel junction block assembly.
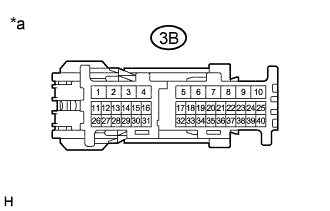 |
Measure the resistance according to the value(s) in the table below.
| Tester Connection | Switch Condition | Specified Condition |
| 3B-8 - Body ground | Ignition switch off | Below 1 Ω |
| *a | Front view of wire harness connector (to Instrument Panel Junction Block Assembly) |
Connect the instrument panel junction block assembly connector.
|
| ||||
| OK | ||
| ||
| ||
| 9.CHECK DTC OUTPUT (HYBRID CONTROL) |
Turn the ignition switch off and leave the vehicle as it is for 10 seconds or more.
Connect the Techstream to the DLC3.
Turn the ignition switch to ON (IG).
Enter the following menus: Powertrain / Hybrid Control / Trouble Codes.
Check if DTCs are output.
| Result | Proceed to |
| DTC P2532-772 is output. | A |
| No DTC is output. | B |
Turn the ignition switch off.
|
| ||||
| A | |
|
| 10.CHECK HARNESS AND CONNECTOR (+B SHORT) |
Disconnect connector A39 from the power management control ECU.
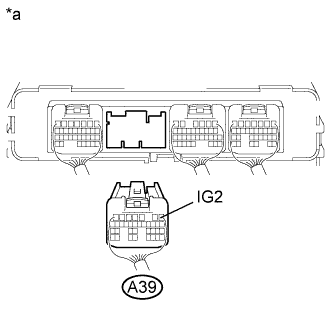 |
Measure the voltage according to the value(s) in the table below.
| Tester Connection | Switch Condition | Specified Condition |
| A39-1 (IG2) - Body ground | Ignition switch off | Below 1 V |
| *a | Rear view of wire harness connector (to Power Management Control ECU) |
| Result | Proceed to |
| NG | A |
| OK | B |
Connect the power management control ECU connector.
|
| ||||
| A | |
|
| 11.CHECK HARNESS AND CONNECTOR (POWER MANAGEMENT CONTROL ECU - IG2 RELAY) |
Disconnect connector A39 from the power management control ECU.
Remove the No. 1 integration relay from the No. 2 engine room relay block and No. 2 junction block assembly.
|
Measure the voltage according to the value(s) in the table below.
| Tester Connection | Switch Condition | Specified Condition |
| A39-1 (IG2) - Body ground | Ignition switch off | Below 1 V |
| *a | Rear view of wire harness connector (to Power Management Control ECU) |
Install the No. 1 integration relay.
Connect the power management control ECU connector.
|
| ||||
| OK | |
|
| 12.INSPECT NO. 1 INTEGRATION RELAY (IG2 RELAY) |
|
| ||||
| OK | |
|
| 13.CHECK HARNESS AND CONNECTOR (IGNITION OR STARTER SWITCH ASSEMBLY - IG2 RELAY) |
Disconnect the connector G15 from the ignition or starter switch assembly.
Remove the No. 1 integration relay from the No. 2 engine room relay block and No. 2 junction block assembly.
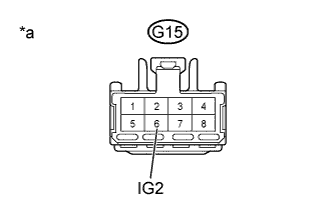 |
Measure the voltage according to the value(s) in the table below.
| Tester Connection | Switch Condition | Specified Condition |
| G15-6 (IG2) - Body ground | Ignition switch off | Below 1 V |
| *a | Front view of wire harness connector (to Ignition or Starter Switch Assembly) |
Install the No. 1 integration relay.
Connect the ignition or starter switch assembly connector.
|
| ||||
| OK | ||
| ||
| ||

