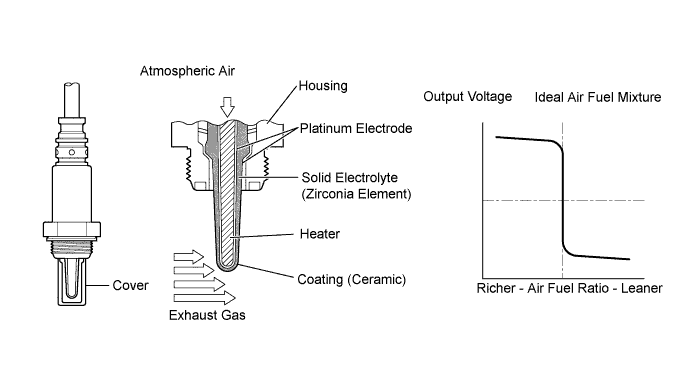
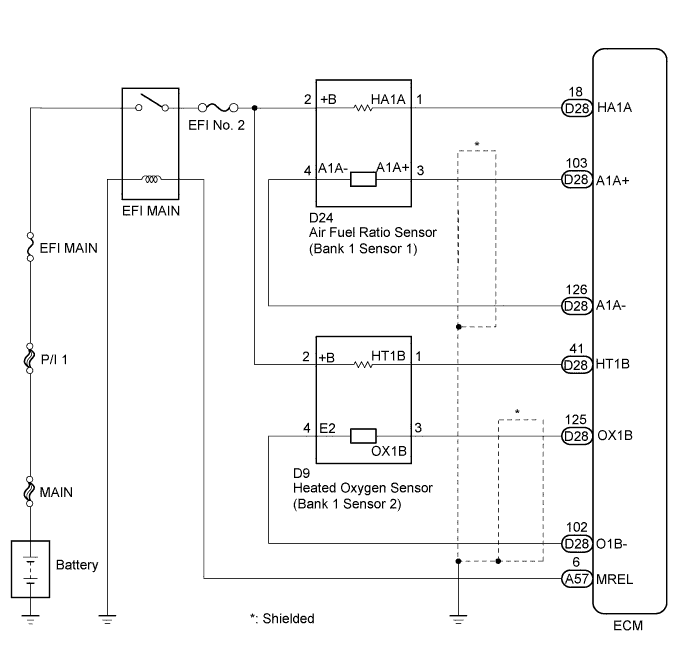
DTC P0136 Oxygen Sensor Circuit Malfunction (Bank 1 Sensor 2) |
DTC P0137 Oxygen Sensor Circuit Low Voltage (Bank 1 Sensor 2) |
DTC P0138 Oxygen Sensor Circuit High Voltage (Bank 1 Sensor 2) |
| DTC No. | DTC Detection Condition | Trouble Area |
| P0136 | Abnormal voltage output:
|
|
| P0137 | Low voltage (open):
|
|
| P0138 | High voltage (short):
|
|
| Tester Display | Description |
| NORMAL |
|
| ABNORMAL |
|
| INCOMPLETE |
|
| UNKNOWN |
|
| Tester Display (Sensor) | Injection Volume | Status | Voltage |
| AFS Voltage B1S1 (Air fuel ratio) | +25% | Rich | Less than 3.1 V |
| AFS Voltage B1S1 (Air fuel ratio) | -12.5% | Lean | More than 3.4 V |
| O2S B1S2 (Heated oxygen) | +25% | Rich | More than 0.55 V |
| O2S B1S2 (Heated oxygen) | -12.5% | Lean | Less than 0.4 V |
| Case | Air Fuel Ratio Sensor (Sensor 1) Output Voltage | Heated Oxygen Sensor (Sensor 2) Output Voltage | Main Suspected Trouble Area |
| 1 | 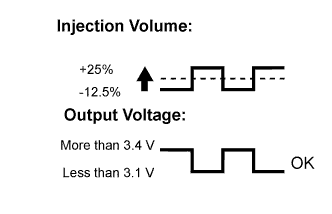 | 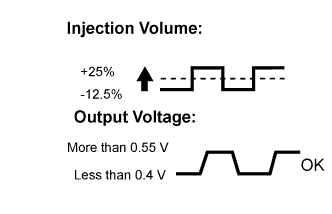 | - |
| 2 | 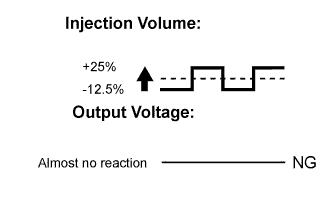 | |
|
| 3 | | 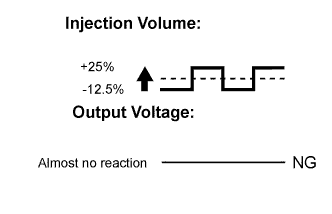 |
|
| 4 | | |
|
| 1.READ DTC OUTPUT (DTC P0136, P0137 OR P0138) |
Connect the intelligent tester to the DLC3.
Turn the power switch on (IG).
Turn the tester on.
Enter the following menus: Powertrain / Engine and ECT / DTC.
Read the DTCs.
| Result | Proceed to |
| DTC P0138 is output | A |
| DTC P0137 is output | B |
| DTC P0136 is output | C |
|
| ||||
|
| ||||
| A | |
 |
| 2.READ VALUE USING INTELLIGENT TESTER (OUTPUT VOLTAGE OF HEATED OXYGEN SENSOR) |
Connect the intelligent tester to the DLC3.
Turn the power switch on (IG).
Turn the tester on.
Enter the following menus: Powertrain / Engine and ECT / Data List / A/F Control System / O2S B1S2.
Allow the engine to idle.
Read the heated oxygen sensor output voltage while idling.
| Result | Proceed to |
| 1.0 V or more | A |
| Less than 1.0 V | B |
|
| ||||
| A | |
|
| 3.INSPECT HEATED OXYGEN SENSOR (CHECK FOR SHORT) |
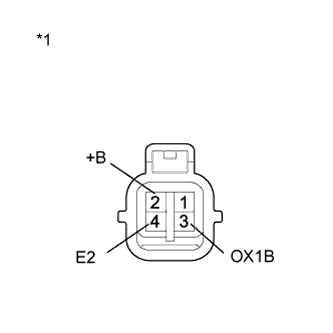 |
Disconnect the heated oxygen sensor connector.
Measure the resistance according to the value(s) in the table below.
| Tester Connection | Condition | Specified Condition |
| 2 (+B) - 4 (E2) | Always | 10 kΩ or higher |
| 2 (+B) - 3 (OX1B) |
| *1 | Component without harness connected (Heated Oxygen Sensor) |
Reconnect the heated oxygen sensor connector.
|
| ||||
| OK | |
|
| 4.CHECK HARNESS AND CONNECTOR |
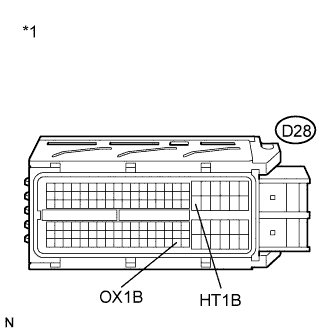 |
Turn the power switch off and wait for 5 minutes or more.
Disconnect the ECM connector.
Measure the resistance according to the value(s) in the table below.
| Tester Connection | Condition | Specified Condition |
| D28-41 (HT1B) - D28-125 (OX1B) | Always | 10 kΩ or higher |
| *1 | Front view of wire harness connector (to ECM) |
Reconnect the ECM connector.
|
| ||||
| OK | |
|
| 5.PERFORM ACTIVE TEST USING INTELLIGENT TESTER (CONTROL THE EGR STEP POSITION) |
Connect the intelligent tester to the DLC3.
Turn the power switch on (IG).
Turn the tester on.
Put the engine in inspection mode (Click here).
Start the engine and warm it up until the engine coolant temperature reaches 75°C (167°F) or more.
Enter the following menus: Powertrain / Engine and ECT / Active Test / Control the EGR Step Position.
Confirm the Throttle Idle Position is ON and check the engine idling condition and MAP values in the Data List while performing the Active Test.
| - | EGR Step Position (Active Test) | |
| 0 Steps | 0 to 30 Steps | |
| Idling condition | Steady idling | Idling changes from steady to rough idling |
| MAP (Data List) | MAP value is 20 to 40 kPa (150 to 300 mmHg) (EGR valve is fully closed) | MAP value is at least +10 kPa (75 mmHg) higher than when EGR valve is fully closed |
|
| ||||
|
| ||||
| 6.INSPECT EGR VALVE ASSEMBLY |
Remove the EGR valve assembly (Click here).
Check if the EGR valve is stuck open.
Reinstall the EGR valve assembly (Click here).
|
| ||||
| OK | ||
 | ||
| ||
| 7.PERFORM ACTIVE TEST USING INTELLIGENT TESTER (INJECTION VOLUME) |
Connect the intelligent tester to the DLC3.
Turn the power switch on (IG).
Turn the tester on.
Put the engine in inspection mode (Click here).
Start the engine and warm it up.
Enter the following menus: Powertrain / Engine and ECT / Active Test / Control the Injection Volume.
Change the fuel injection volume using the intelligent tester and monitor the voltage output of air fuel ratio and heated oxygen sensors displayed on the intelligent tester.
| Tester Display (Sensor) | Voltage Variation | Proceed to |
| AFS Voltage B1S1 (Air fuel ratio) | Alternates between more and less than 3.3 V | OK |
| Remains at more than 3.3 V | NG | |
| Remains at less than 3.3 V | NG |
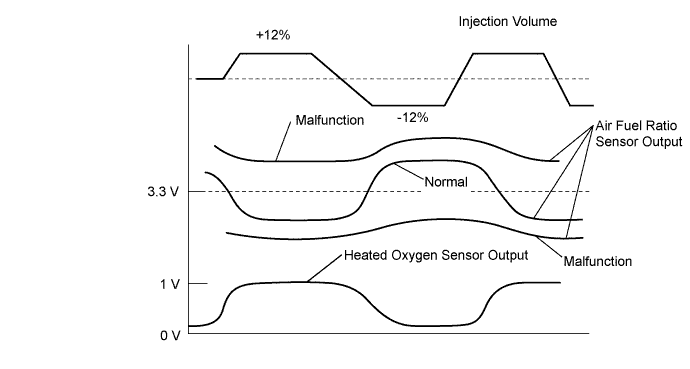
|
| ||||
| OK | |
|
| 8.INSPECT AIR FUEL RATIO SENSOR NO.2 |
Connect the intelligent tester to the DLC3.
Turn the power switch on (IG).
Turn the tester on.
Clear the DTCs (Click here).
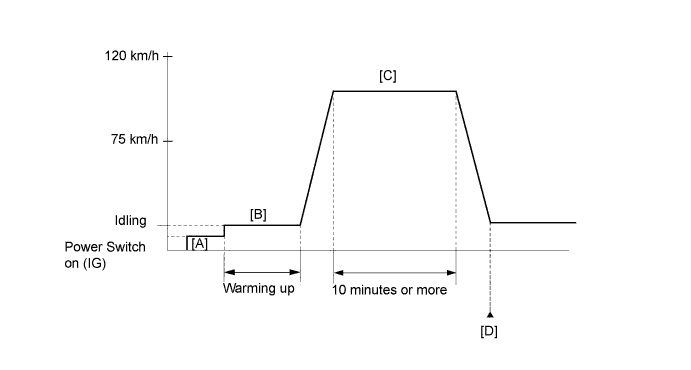
Drive the vehicle according to the drive pattern listed below:
Put the engine in inspection mode (Click here).
Warm up the engine until the engine coolant temperature reaches 75°C (167°F) or more.
Drive the vehicle at 75 km/h (47 mph) or more and decelerate the vehicle for 6 seconds or more.
Repeat the deceleration above at least 3 times.
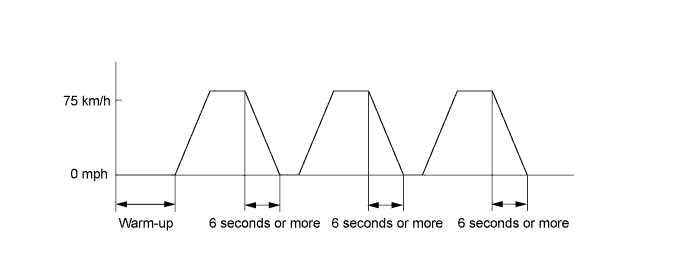
Enter the following menus: Powertrain / Engine and ECT / Data List / All Data / AFS Current B1S1.
Read the value of the air fuel ratio sensor current while the fuel-cut operation is being performed.
|
| ||||
|
| ||||
| 9.READ VALUE USING INTELLIGENT TESTER (OUTPUT VOLTAGE OF HEATED OXYGEN SENSOR) |
Connect the intelligent tester to the DLC3.
Turn the power switch on (IG).
Turn the tester on.
Put the engine in inspection mode (Click here).
Start the engine and warm it up.
Enter the following menus: Powertrain / Engine and ECT / Active Test / Control the Injection Volume.
Change the fuel injection volume using the intelligent tester and monitor the voltage output of heated oxygen sensor displayed on the intelligent tester.
|
| ||||
| OK | |
|
| 10.PERFORM ACTIVE TEST USING INTELLIGENT TESTER (INJECTION VOLUME) |
Connect the intelligent tester to the DLC3.
Turn the power switch on (IG).
Turn the tester on.
Put the engine in inspection mode (Click here).
Start the engine and warm it up.
Enter the following menus: Powertrain / Engine and ECT / Active Test / Control the Injection Volume.
Change the fuel injection volume using the intelligent tester and monitor the voltage output of air fuel ratio and heated oxygen sensors displayed on the intelligent tester.
| Tester Display (Sensor) | Voltage Variation | Proceed to |
| AFS Voltage B1S1 (Air fuel ratio) | Alternates between more and less than 3.3 V | OK |
| Remains at more than 3.3 V | NG | |
| Remains at less than 3.3 V | NG |
|
| ||||
| OK | |
|
| 11.PERFORM ACTIVE TEST USING INTELLIGENT TESTER (CONTROL THE EGR STEP POSITION) |
Connect the intelligent tester to the DLC3.
Turn the power switch on (IG).
Turn the tester on.
Put the engine in inspection mode (Click here).
Start the engine and warm it up until the engine coolant temperature reaches 75°C (167°F) or more.
Enter the following menus: Powertrain / Engine and ECT / Active Test / Control the EGR Step Position.
Confirm the Throttle Idle Position is ON and check the engine idling condition and MAP values in the Data List while performing the Active Test.
| - | EGR Step Position (Active Test) | |
| 0 Steps | 0 to 30 Steps | |
| Idling condition | Steady idling | Idling changes from steady to rough idling |
| MAP (Data List) | MAP value is 20 to 40 kPa (150 to 300 mmHg) (EGR valve is fully closed) | MAP value is at least +10 kPa (75 mmHg) higher than when EGR valve is fully closed |
|
| ||||
|
| ||||
| 12.INSPECT EGR VALVE ASSEMBLY |
Remove the EGR valve assembly (Click here).
Check if the EGR valve is stuck open.
Reinstall the EGR valve assembly (Click here).
|
| ||||
| OK | ||
| ||
| ||
| 13.CHECK EXHAUST GAS LEAK (HEATER RESISTANCE) |
Inspect for exhaust gas leaks from the exhaust manifold sub-assembly and exhaust pipes.
|
| ||||
| OK | |
|
| 14.INSPECT HEATED OXYGEN SENSOR (HEATER RESISTANCE) |
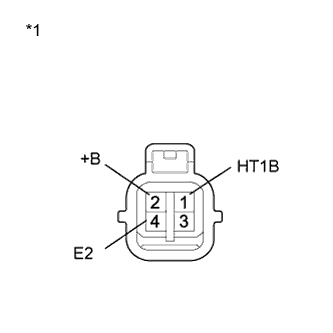 |
Disconnect the heated oxygen sensor connector.
Measure the resistance according to the value(s) in the table below.
| Tester Connection | Condition | Specified Condition |
| 1 (HT1B) - 2 (+B) | 20°C (68°F) | 11 to 16 Ω |
| 1 (HT1B) - 4 (E2) | Always | 10 kΩ or higher |
| *1 | Component without harness connected (Heated Oxygen Sensor (Sensor 2)) |
Reconnect the heated oxygen sensor connector.
|
| ||||
| OK | |
|
| 15.CHECK HARNESS AND CONNECTOR (HEATED OXYGEN SENSOR - ECM) |
Disconnect the heated oxygen sensor connector.
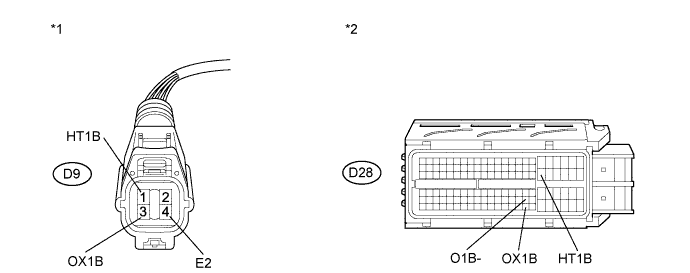
Disconnect the ECM connector.
Measure the resistance according to the value(s) in the table below.
| Tester Connection | Condition | Specified Condition |
| D9-1 (HT1B) - D28-41 (HT1B) | Always | Below 1 Ω |
| D9-3 (OX1B) - D28-125 (OX1B) | ||
| D9-4 (E2) - D28-102 (O1B-) |
| Tester Connection | Condition | Specified Condition |
| D9-1 (HT1B) or D28-41 (HT1B) - Body ground | Always | 10 kΩ or higher |
| D9-3 (OX1B) or D28-125 (OX1B) - Body ground |
| *1 | Front view of wire harness connector (to Heated Oxygen Sensor) | *2 | Front view of wire harness connector (to ECM) |
Reconnect the heated oxygen sensor connector.
Reconnect the ECM connector.
|
| ||||
| OK | |
|
| 16.REPLACE HEATED OXYGEN SENSOR |
Replace the heated oxygen sensor (Click here).
| NEXT | |
|
| 17.PERFORM CONFIRMATION DRIVING PATTERN |
Connect the intelligent tester to the DLC3.
Turn the power switch on (IG).
Turn the tester on.
Clear the DTC (Click here).
Turn the tester off.
Turn the power switch off and wait for 30 seconds.
Turn the power switch on (IG) and turn the tester on.
Put the engine in inspection mode (Click here).
Start the engine and warm it up.
Drive the vehicle in accordance with the driving pattern described in the Confirmation Driving Pattern.
| NEXT | |
|
| 18.CHECK WHETHER DTC OUTPUT RECURS (P0136, P0137 OR P0138) |
Connect the intelligent tester to the DLC3.
Turn the power switch on (IG).
Turn the tester on.
Enter the following menus: Powertrain / Engine and ECT / Utility / All Readiness.
Input the DTCs: P0136, P0137 and P0138. Check the DTC judgement result is NORMAL. If it is INCOMPLETE, perform the drive pattern adding the vehicle speed.
| Result | Proceed to |
| ABNORMAL (DTC P0136, P0137 or P0138 is output) | A |
| NORMAL (DTC is not output) | B |
|
| ||||
| A | |
|
| 19.PERFORM ACTIVE TEST USING INTELLIGENT TESTER (CONTROL THE EGR STEP POSITION) |
Connect the intelligent tester to the DLC3.
Turn the power switch on (IG).
Turn the tester on.
Put the engine in inspection mode (Click here).
Start the engine and warm it up until the engine coolant temperature reaches 75°C (167°F) or more.
Enter the following menus: Powertrain / Engine and ECT / Active Test / Control the EGR Step Position.
Confirm the Throttle Idle Position is ON and check the engine idling condition and MAP values in the Data List while performing the Active Test.
| - | EGR Step Position (Active Test) | |
| 0 Steps | 0 to 30 Steps | |
| Idling condition | Steady idling | Idling changes from steady to rough idling |
| MAP (Data List) | MAP value is 20 to 40 kPa (150 to 300 mmHg) (EGR valve is fully closed) | MAP value is at least +10 kPa (75 mmHg) higher than when EGR valve is fully closed |
|
| ||||
|
| ||||
| 20.INSPECT EGR VALVE ASSEMBLY |
Remove the EGR valve assembly (Click here).
Check if the EGR valve is stuck open.
Reinstall the EGR valve assembly (Click here).
|
| ||||
| OK | ||
| ||
| ||
| 21.REPLACE AIR FUEL RATIO SENSOR NO.2 |
Replace the air fuel ratio sensor (Click here).
| NEXT | |
|
| 22.PERFORM CONFIRMATION DRIVING PATTERN |
Connect the intelligent tester to the DLC3.
Turn the power switch on (IG).
Turn the tester on.
Clear the DTC (Click here).
Turn the tester off.
Turn the power switch off and wait for 30 seconds.
Turn the power switch on (IG) and turn the tester on.
Put the engine in inspection mode (Click here).
Start the engine and warm it up.
Drive the vehicle in accordance with the driving pattern described in the Confirmation Driving Pattern.
| NEXT | |
|
| 23.CHECK WHETHER DTC OUTPUT RECURS (DTC P0136 OR P0138) |
Connect the intelligent tester to the DLC3.
Turn the power switch on (IG).
Turn the tester on.
Enter the following menus: Powertrain / Engine and ECT / Utility / All Readiness.
Input the DTCs: P0136 or P0138. Check the DTC judgement result is NORMAL. If it is INCOMPLETE, perform the drive pattern adding the vehicle speed.
| Result | Proceed to |
| ABNORMAL (DTC P0136 or P0138 is output) | A |
| NORMAL (DTC is not output) | B |
|
| ||||
| A | |
|
| 24.PERFORM ACTIVE TEST USING INTELLIGENT TESTER (CONTROL THE EGR STEP POSITION) |
Connect the intelligent tester to the DLC3.
Turn the power switch on (IG).
Turn the tester on.
Put the engine in inspection mode (Click here).
Start the engine and warm it up until the engine coolant temperature reaches 75°C (167°F) or more.
Enter the following menus: Powertrain / Engine and ECT / Active Test / Control the EGR Step Position.
Confirm the Throttle Idle Position is ON and check the engine idling condition and MAP values in the Data List while performing the Active Test.
| - | EGR Step Position (Active Test) | |
| 0 Steps | 0 to 30 Steps | |
| Idling condition | Steady idling | Idling changes from steady to rough idling |
| MAP (Data List) | MAP value is 20 to 40 kPa (150 to 300 mmHg) (EGR valve is fully closed) | MAP value is at least +10 kPa (75 mmHg) higher than when EGR valve is fully closed |
|
| ||||
|
| ||||
| 25.INSPECT EGR VALVE ASSEMBLY |
Remove the EGR valve assembly (Click here).
Check if the EGR valve is stuck open.
Reinstall the EGR valve assembly (Click here).
|
| ||||
| OK | ||
| ||
| ||

