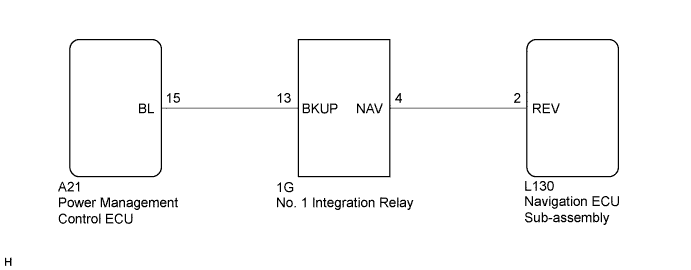
AUDIO AND VISUAL SYSTEM (w/o Daytime Running Light) > Reverse Signal Circuit |
| 1.CHECK HARNESS AND CONNECTOR (REVERSE SIGNAL) |
Disconnect the navigation ECU sub-assembly connector.
Measure the voltage according to the value(s) in the table below.
| Tester Connection | Condition | Specified Condition |
| L130-2 (REV) - Body ground | Power switch on (READY) Reverse (R) selected | 11 to 15.5 V |
| L130-2 (REV) - Body ground | Power switch on (READY) Except reverse (R) selected | Below 1 V |
|
| ||||
| OK | ||
 | ||
| ||
| 2.CHECK HARNESS AND CONNECTOR (NAVIGATION ECU SUB-ASSEMBLY - NO. 1 INTEGRATION RELAY) |
Disconnect the navigation ECU sub-assembly connector.
Disconnect the No. 1 integration relay connector.
Measure the resistance according to the value(s) in the table below.
| Tester Connection | Condition | Specified Condition |
| L130-2 (REV) - 1G-4 (NAV) | Always | Below 1 Ω |
| L130-2 (REV) - Body ground | Always | 10 kΩ or higher |
|
| ||||
| OK | |
 |
| 3.CHECK HARNESS AND CONNECTOR (NO. 1 INTEGRATION RELAY - POWER MANAGEMENT CONTROL ECU) |
Disconnect the No. 1 integration relay connector.
Disconnect the power management control ECU connector.
Measure the resistance according to the value(s) in the table below.
| Tester Connection | Condition | Specified Condition |
| 1G-13 (BKUP) - A21-15 (BL) | Always | Below 1 Ω |
| 1G-13 (BKUP) - Body ground | Always | 10 kΩ or higher |
|
| ||||
| OK | |
|
| 4.REPLACE NO. 1 INTEGRATION RELAY |
Replace the No. 1 integration relay with a new one or known good one (Click here).
Check that the malfunction disappears.
|
| ||||
| OK | ||
| ||
| ||

