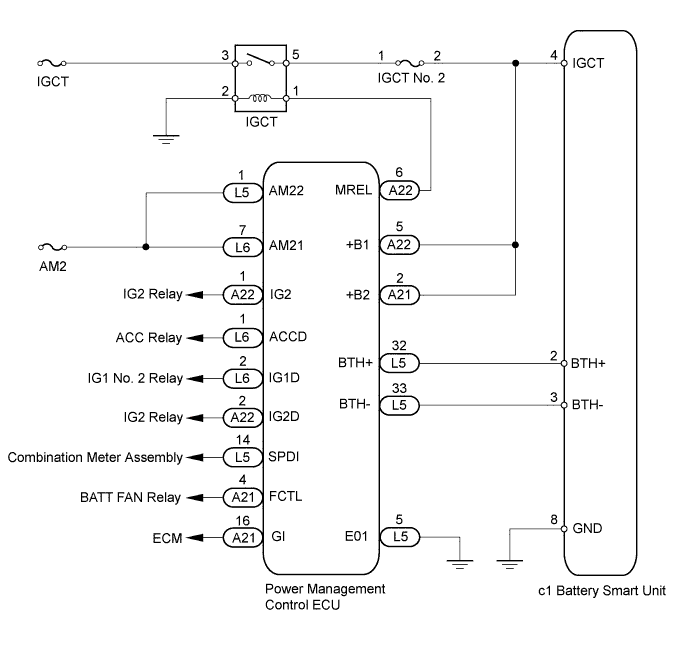
DTC U029A-123 Lost Communication with Hybrid Battery Pack Sensor Module |
| DTC No. | DTC Detection Condition | Trouble Area |
| U029A-123 | Serial communication error between the power management control ECU and battery smart unit: The power management control ECU cannot receive signals from the battery smart unit correctly. (1 trip detection logic) |
|
| 1.CHECK DTC OUTPUT (HV) |
Connect the Techstream to the DLC3.
Turn the power switch on (IG).
Enter the following menus: Powertrain / Hybrid Control / Trouble Codes.
Check and record any HV system DTCs, INF codes and freeze frame data.
Check for DTCs (Click here).
| Result | Proceed to |
| Only U029A-123 is output. | A |
| DTCs other than U029A-123 are also output. | B |
Disconnect the Techstream from the DLC3.
|
| ||||
| A | |
 |
| 2.CHECK HARNESS AND CONNECTOR (IGCT VOLTAGE) |
Disconnect the cable from the negative (-) battery terminal.
Check that the service plug grip is not installed.
Remove the No. 1 hybrid vehicle battery carrier bracket sub-assembly (Click here).
Connect the cable to the negative (-) battery terminal.
Turn the power switch on (IG).
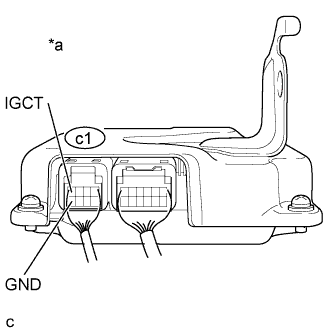 |
Measure the voltage according to the value(s) in the table below.
| Tester Connection | Switch Condition | Specified Condition |
| c1-4 (IGCT) - c1-8 (GND) | Power switch on (IG) | 11 to 14 V |
| *a | Component with harness connected (Battery Smart Unit) |
Turn the power switch off.
Install the No. 1 hybrid vehicle battery carrier bracket sub-assembly (Click here).
|
| ||||
| OK | |
|
| 3.CHECK HARNESS AND CONNECTOR (POWER MANAGEMENT CONTROL ECU - BATTERY SMART UNIT) |
Disconnect the cable from the negative (-) battery terminal.
Check that the service plug grip is not installed.
Disconnect connector L5 from the power management control ECU (Click here).
Remove the No. 1 hybrid vehicle battery carrier bracket sub-assembly (Click here).
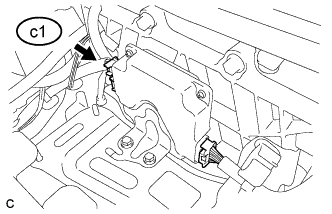 |
Disconnect connector c1 from the battery smart unit.
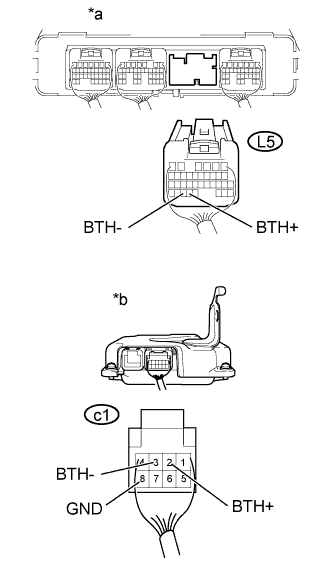 |
Measure the resistance according to the value(s) in the table below.
| Tester Connection | Switch Condition | Specified Condition |
| L5-32 (BTH+) - c1-2 (BTH+) | Power switch off | Below 1 Ω |
| L5-33 (BTH-) - c1-3 (BTH-) | Power switch off | Below 1 Ω |
| c1-2 (BTH+) - c1-8 (GND) and Body ground | Power switch off | 10 kΩ or higher |
| c1-3 (BTH-) - c1-8 (GND) and Body ground | Power switch off | 10 kΩ or higher |
| *a | Rear view of wire harness connector (to Power Management Control ECU) |
| *b | Rear view of wire harness connector (to Battery Smart Unit) |
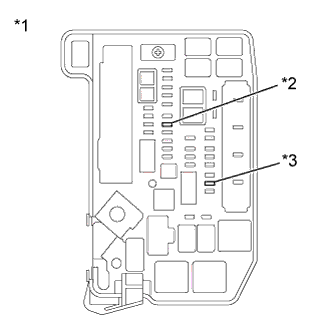 |
Remove the IGCT NO. 2 fuse and AM2 fuse from the engine room junction block assembly.
| *1 | Engine Room Junction Block Assembly |
| *2 | AM2 Fuse |
| *3 | IGCT NO. 2 Fuse |
Disconnect all connectors from the power management control ECU.
Measure the resistance according to the value(s) in the table below.
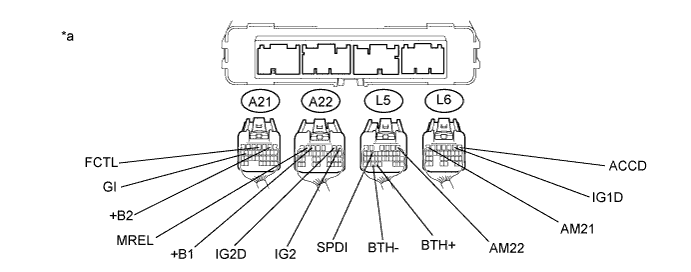
| Tester Connection | Switch Condition | Specified Condition |
| L5-32 (BTH+) - L6-7 (AM21) | Power switch off | 10 kΩ or higher |
| L5-32 (BTH+) - L5-1 (AM22) | Power switch off | 10 kΩ or higher |
| L5-32 (BTH+) - A21-2 (+B2) | Power switch off | 10 kΩ or higher |
| L5-32 (BTH+) - A22-5 (+B1) | Power switch off | 10 kΩ or higher |
| L5-32 (BTH+) - A22-6 (MREL) | Power switch off | 10 kΩ or higher |
| L5-32 (BTH+) - A22-1 (IG2) | Power switch off | 10 kΩ or higher |
| L5-32 (BTH+) - L6-1 (ACCD) | Power switch off | 10 kΩ or higher |
| L5-32 (BTH+) L6-2 (IG1D) | Power switch off | 10 kΩ or higher |
| L5-32 (BTH+) - A22-2 (IG2D) | Power switch off | 10 kΩ or higher |
| L5-32 (BTH+) - A21-4 (FCTL) | Power switch off | 10 kΩ or higher |
| L5-32 (BTH+) - L5-14 (SPDI) | Power switch off | 10 kΩ or higher |
| L5-32 (BTH+) - A21-16 (GI) | Power switch off | 10 kΩ or higher |
| L5-33 (BTH-) - L6-7 (AM21) | Power switch off | 10 kΩ or higher |
| L5-33 (BTH-) - L5-1 (AM22) | Power switch off | 10 kΩ or higher |
| L5-33 (BTH-) - A21-2 (+B2) | Power switch off | 10 kΩ or higher |
| L5-33 (BTH-) - A22-5 (+B1) | Power switch off | 10 kΩ or higher |
| L5-33 (BTH-) - A22-6 (MREL) | Power switch off | 10 kΩ or higher |
| L5-33 (BTH-) - A22-1 (IG2) | Power switch off | 10 kΩ or higher |
| L5-33 (BTH-) - L6-1 (ACCD) | Power switch off | 10 kΩ or higher |
| L5-33 (BTH-) - L6-2 (IG1D) | Power switch off | 10 kΩ or higher |
| L5-33 (BTH-) - A22-2 (IG2D) | Power switch off | 10 kΩ or higher |
| L5-33 (BTH-) - L5-14 (SPDI) | Power switch off | 10 kΩ or higher |
| L5-33 (BTH-) - A21-4 (FCTL) | Power switch off | 10 kΩ or higher |
| L5-33 (BTH-) - A21-16 (GI) | Power switch off | 10 kΩ or higher |
| *a | Rear view of wire harness connector (to Power Management Control ECU) | - | - |
Connect the cable to the negative (-) battery terminal.
Connect the battery smart unit connector.
Install the No. 1 hybrid vehicle battery carrier bracket sub-assembly (Click here).
Connect the power management control ECU connectors (Click here).
|
| ||||
| OK | |
|
| 4.CHECK POWER MANAGEMENT CONTROL ECU |
Check that the service plug grip is not installed.
Remove the No. 1 hybrid vehicle battery carrier bracket sub-assembly (Click here).
|
Disconnect connector c1 from the battery smart unit.
Turn the power switch on (IG).
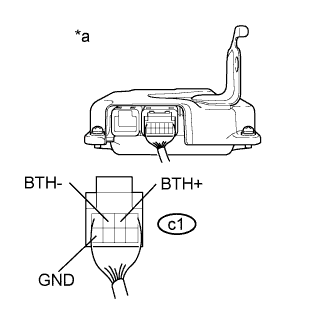 |
Measure the voltage according to the value(s) in the table below.
| Tester Connection | Switch Condition | Specified Condition |
| c1-2 (BTH+) - c1-8 (GND) | Power switch on (IG) | 2.3 to 2.7 V |
| c1-3 (BTH-) - c1-8 (GND) | Power switch on (IG) | 2.3 to 2.7 V |
| *a | Rear view of wire harness connector (to Battery Smart Unit) |
Turn the power switch off.
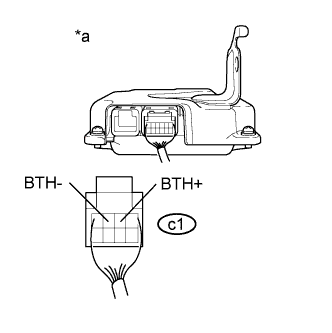 |
Measure the resistance according to the value(s) in the table below.
| Tester Connection | Switch Condition | Specified Condition |
| c1-2 (BTH+) - c1-3 (BTH-) | Power switch off | 4.4 to 5.4 kΩ |
| *a | Rear view of wire harness connector (to Battery Smart Unit) |
Connect the battery smart unit connector.
Install the No. 1 hybrid vehicle battery carrier bracket sub-assembly (Click here).
|
| ||||
| OK | ||
 | ||
| ||
