LANE RECOGNITION CAMERA SENSOR > INSTALLATION |
| 1. INSTALL LANE RECOGNITION CAMERA SENSOR ASSEMBLY |
|
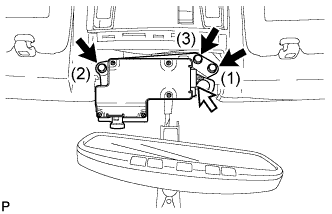
Attach the lane recognition camera sensor assembly with the clip.
Temporarily install the lane recognition camera sensor assembly with the 3 bolts.
Tighten the 3 bolts in the order shown in the illustration to install the lane recognition camera sensor assembly.
Connect the connector.
| 2. INSTALL ROOF TOP MOULDING |
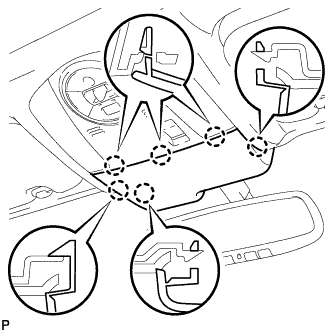 |
Engage the 6 claws to install the roof top moulding.
| 3. INSTALL INNER REAR VIEW MIRROR COVER |
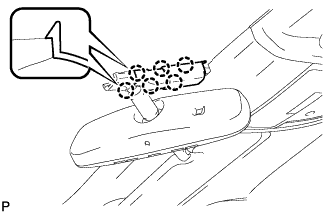 |
Engage the 6 claws and install the inner rear view mirror cover.
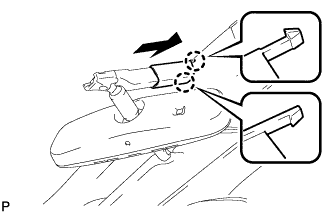 |
Engage the 2 claws and install the inner rear view mirror cover as shown in the illustration.
| 4. ADJUST LANE RECOGNITION CAMERA SENSOR ASSEMBLY |
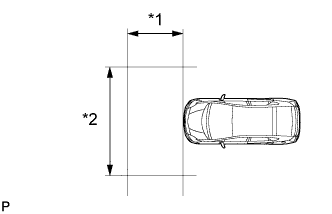 |
| *1 | 1.5 m or more |
| *2 | 3 m or more |
Prepare for beam axis learning.
Move the vehicle to a level surface.
Make sure the engine oil in the vehicle is at the specified level.
Make sure the engine coolant in the vehicle is at the specified level.
Make sure the fuel tank is full.
Make sure the spare tire is in the vehicle.
Make sure the standard tools are in the vehicle.
Make sure nobody is in the vehicle.
Make sure no extra loads are in the vehicle.
Adjust the tire pressures to the specified pressure.
Clean the windshield.
If the lens of the lane recognition camera sensor is dirty, apply a small amount of lens cleaner to a clean and soft cloth, and clean the lens.
Perform the front wheel alignment adjustment.
Perform the front wheel alignment adjustment (Click here).
Perform the rear wheel alignment adjustment.
Perform the rear wheel alignment adjustment (Click here).
Create a target sheet.
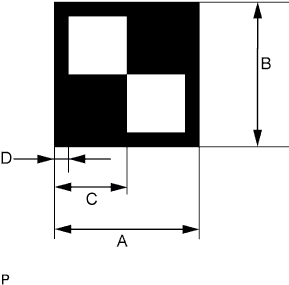  |
Print or copy the illustration . Check that the dimensions are +/- 5 mm (0.197 in.) of the ones in the table below.
| Area | Specification |
| A | 160 mm (6.30 in.) |
| B | 160 mm (6.30 in.) |
| C | 80 mm (3.15 in.) |
| D | 16 mm (0.630 in.) |
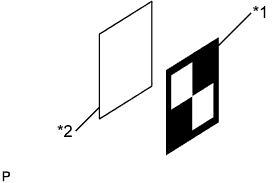 |
Attach the target sheet.
| *1 | Target Sheet |
| *2 | Cardboard, etc. |
Place the prepared target sheet on a piece of cardboard of the same size with the black area on the top right, as shown in the illustration. Then use double-sided tape to fix the target sheet in place.
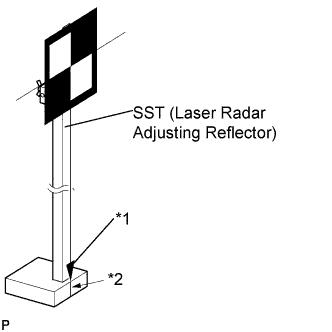 |
Hang a weight with a pointed tip from the center of the target sheet. Then, with double-sided tape, attach the target sheet to the reflector so that the weight aligns with the mark-off line of SST (laser radar adjusting reflector).
| *1 | Pointed Tip Weight |
| *2 | Mark-off Line |
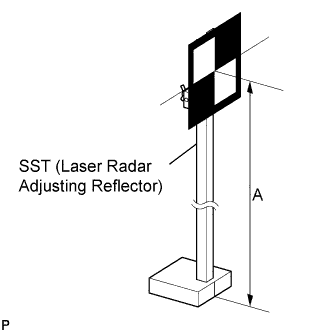 |
Move the reflector up and down to position the center of the target at the height shown in the illustration, and fix it in place.
Measure the target placement point.
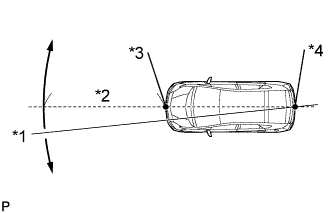 |
From the center of the front and back bumpers (center of the emblems), hang a weight with a pointed tip, and mark the front bumper center point A and the rear bumper center point B on the ground.
| *1 | Line |
| *2 | Approx. 2 m |
| *3 | Point A |
| *4 | Point B |
Draw a line that connects points A and B, and extend the line approximately 2 m (6.56 ft.) beyond the front of the vehicle.
Mark point C 1220 mm (4.00 ft.) from the front bumper center point A (placement point 1).
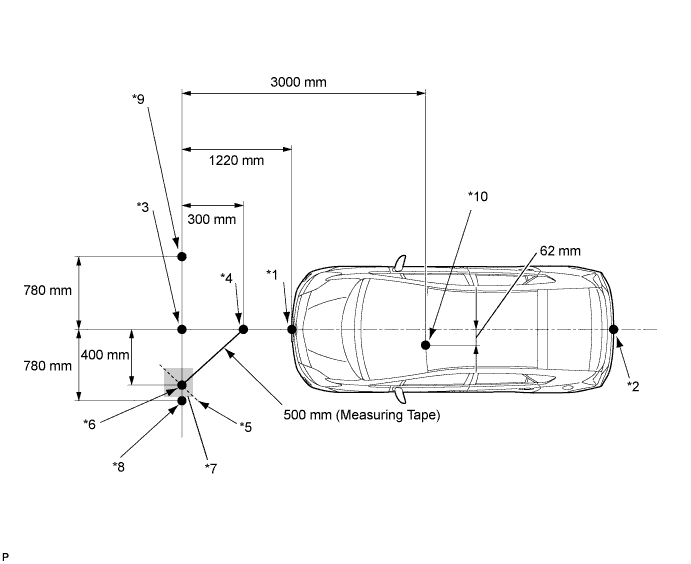
| *1 | Point A | *2 | Point B |
| *3 | Placement Point 1 Point C | *4 | Point D |
| *5 | Line E | *6 | Point F |
| *7 | Place Tape (Gray Area) Approx. 400 mm from Point C | *8 | Placement Point 2 Point G |
| *9 | Placement Point 3 Point H | *10 | Lane Recognition Camera Sensor Position |
From point C, move 300 mm (11.8 in.) towards the front bumper center point A and mark point D.
From point C, place marking tape at the point 400 mm (1.30 ft.) perpendicular to the line that connects points A and B.
Using a measuring tape of 5 m (16.41 ft.) or more, and point D as the center point, draw the part of a 500 mm (1.64 ft.) circle that overlaps the marking tape (line E).
Mark point F where the following intersect: 1) from point C, the point that is 400 mm (1.30 ft.) perpendicular from the line that connects point A and B; and 2) line E.
Set the measuring tape from point C to F. Then mark point G 780 mm (2.56 ft.) from point C (line extending from point C to F) (placement point 2).
Set the measuring tape from point F to C. Then mark point H 780 mm (2.56 ft.) beyond point C (placement point 3).
Set a string between points G and H, and draw a line on the ground (target placement line).
Measure lane recognition camera sensor height.
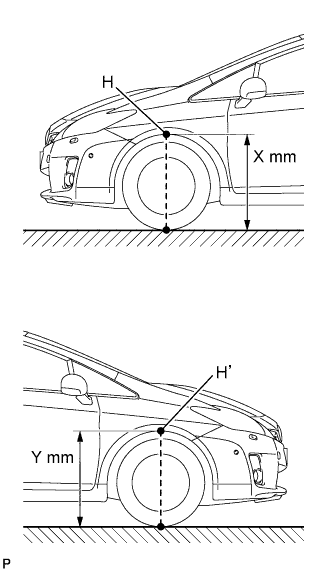 |
Measure the distance (X mm or in.) from the ground to point H for the front left wheel arch.
Measure the distance (Y mm or in.) from the ground to point H' for the front right wheel arch.
The average of the 2 distances (X mm or in, Y mm or in.) plus 617 mm (24.3 in.) is the height of the lane recognition camera sensor.
Memorize camera/target position.
When using the Techstream:
Input the measured height of the lane recognition camera sensor and the horizontal position of the camera "-62 mm (-2.44 in.)" into the input screen. Then press the "Enter" button on the display screen.
Input "3000 mm (118 in.)" for the distance from the camera to the target and "986 mm (38.8 in.)" for the height of the target into the input screen. Then press the "Enter" button on the display screen.
Press the "Exit" button to finish the camera/target position memory mode.
Perform beam axis learning.
Select "Chassis" from the display screen.
Select "Lane Keeping Assist" from the display screen.*1
Select "Utility" from the display screen.
Select "Camera Axis Adjust" from the display screen.
Follow the Techstream display, and continue with the adjustment.
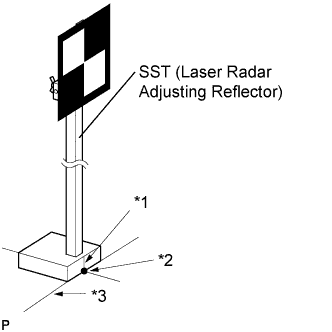 |
Align the target sheet with the target placement line, and align the mark-off line with placement point 1 (point C).
| *1 | Mark-off Line |
| *2 | Point C |
| *3 | Target Placement Line |
Check that the screen displays beam axis learning for target 1, then press the "Enter" button on the display screen.
|
Align the target sheet with the target placement line, and align the mark-off line with placement point 2 (point G).
| *1 | Mark-off Line |
| *2 | Point G |
| *3 | Target Placement Line |
Check that the screen displays beam axis learning for target 2, then press the "Enter" button on the display screen.
|
Align the target sheet with the target placement line, and align the mark-off line with placement point 3 (point H).
| *1 | Mark-off Line |
| *2 | Point H |
| *3 | Target Placement Line |
Check that the screen displays beam axis learning for target 3, then press the "Enter" button on the display screen.
Press the "Exit" button to finish the beam axis learning mode.