Home › Vehicle Interior › HEATING / AIR CONDITIONING › CONDENSER

CONDENSER > INSTALLATION

for Preparation Click here


1. INSTALL COOLER CONDENSER ASSEMBLY


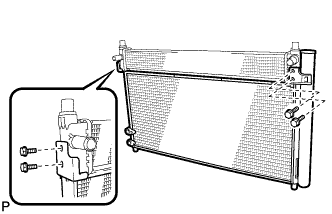
    E189078
  1. Install the cooler condenser assembly with the 4 bolts to the hybrid radiator assembly.
    Torque:
    9.0 N*m{ 92 kgf*cm , 80 in.*lbf }


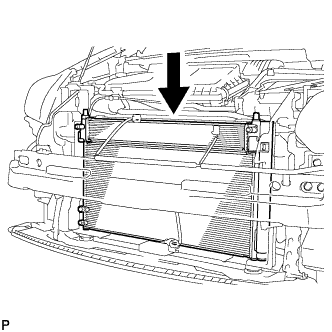
    E189077
  1. Install the cooler condenser assembly.

    HINT:
    If the condenser is replaced with a new one, add compressor oil to the new condenser.

    Capacity:
    40 cc (1.35 fl. oz.)

    Compressor oil:
    ND-11 or equivalent

    NOTICE:
    Do not use any compressor oil other than ND-OIL 11 or equivalent. If any compressor oil other than ND-OIL 11 or equivalent is used, compressor motor insulation performance may decrease, resulting in a leakage of electric power.


2. INSTALL NO. 2 FAN SHROUD


    A213432
  1. Install the No. 2 fan shroud with the 2 bolts.
    Torque:
    7.0 N*m{ 71 kgf*cm , 62 in.*lbf }


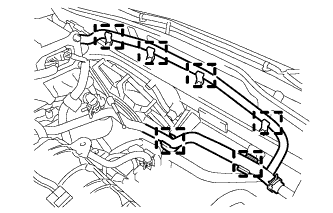
    A216555
  1. Connect the 6 water by-pass hose clamps to the No. 2 fan shroud.
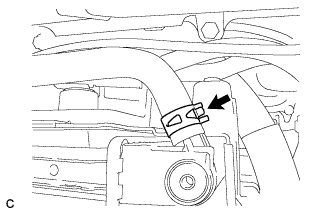


    A213435
  1. Connect the water by-pass hose to the radiator assembly.
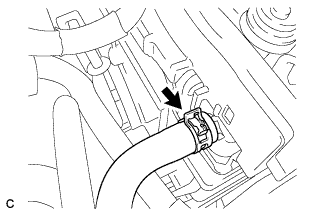


    A213434
  1. Connect the No. 1 water by-pass hose to the radiator assembly.


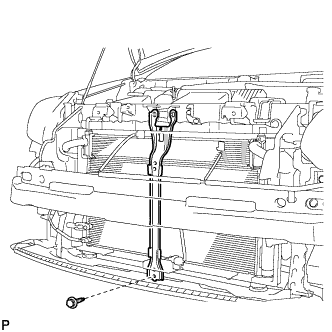
3. INSTALL HOOD LOCK SUPPORT SUB-ASSEMBLY


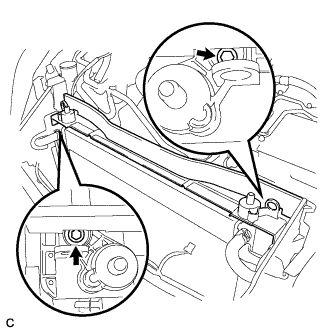
    A213431
  1. Install the upper radiator support with the 4 bolts.

    Torque:
    13 N*m{ 133 kgf*cm , 10 ft.*lbf }

  1. Install the 2 cushions to the radiator support RH and radiator support LH.
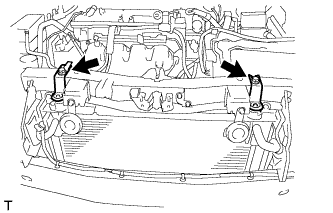


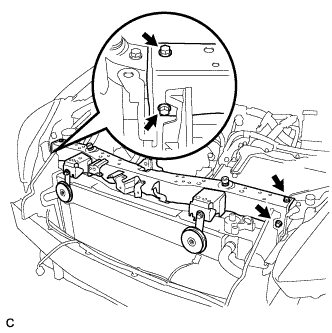
    A216554
  1. Install the radiator support RH and radiator support LH with the 2 bolts.
    Torque:
    19 N*m{ 194 kgf*cm , 14 ft.*lbf }


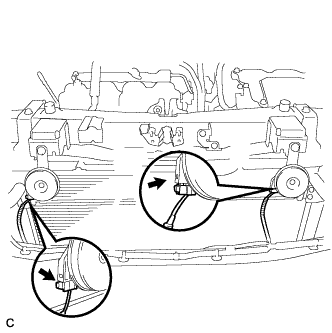
    A213427
  1. Connect the 2 horn connectors.


    A216557
  1. Connect the 2 wire harness clamps and connector to the fan shroud and cooling fan motor.
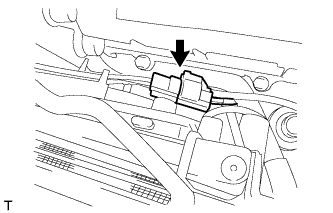


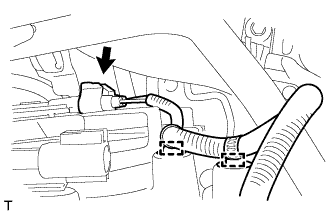
    A216556
  1. Connect the connector to the No. 2 cooling fan motor.
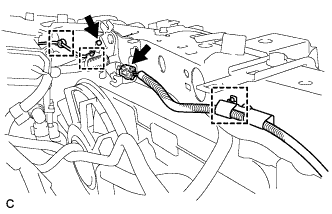


    A213437
  1. Connect the hood lock connector and hood lock control cable wire.

  1. Connect the 3 wire harness clamps.


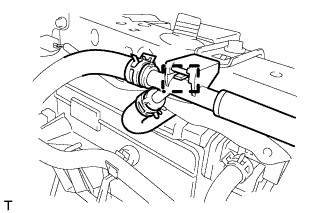
    A216553
  1. Connect the water by-pass hose clamp to the radiator support RH.


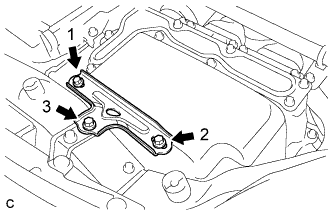
4. INSTALL NO. 1 INVERTER BRACKET


    A209685E01
  1. Temporarily install the No. 1 inverter bracket with the 3 bolts.

  1. Tighten the 3 bolts in the order shown in the illustration.

    Torque:
    14 N*m{ 140 kgf*cm , 10 ft.*lbf }


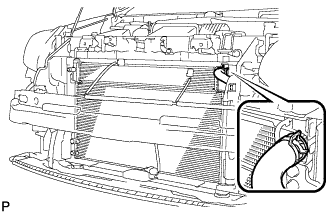
5. CONNECT NO. 7 INVERTER COOLING HOSE


    E189073
  1. Using pliers, grip the claws of the clip and slide the clip to connect the No. 7 inverter cooling hose.


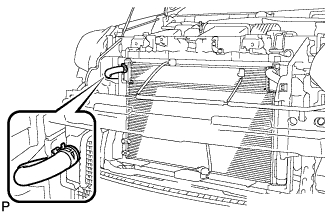
6. CONNECT NO. 5 INVERTER COOLING HOSE


    E189072
  1. Using pliers, grip the claws of the clip and slide the clip to connect the No. 5 inverter cooling hose.


7. CONNECT AIR CONDITIONING TUBE AND ACCESSORY ASSEMBLY
  1. Remove the attached vinyl tape from the pipe and the connecting part of the cooler condenser assembly.

  1. Sufficiently apply compressor oil to a new O-ring and the fitting surface of the pipe joint.

    Compressor oil:
    ND-OIL 11 or equivalent

  1. Install the O-ring on the air conditioning tube and accessory assembly.
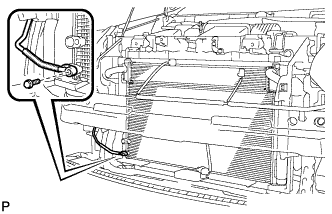
    NOTICE:
    1. Keep the O-ring and O-ring fitting surfaces clean from dirt or any foreign objects.
    2. Do not use any compressor oil other than ND-OIL 11 or equivalent. If any compressor oil other than ND-OIL 11 or equivalent is used, compressor motor insulation performance may decrease, resulting in a leakage of electric power.


    E189071
  1. Install the air conditioning tube and accessory assembly on the cooler condenser assembly with the bolt.

    Torque:
    5.4 N*m{ 55 kgf*cm , 48 in.*lbf }


8. CONNECT DISCHARGE HOSE SUB-ASSEMBLY
  1. Remove the attached vinyl tape from the hose and the connecting part of the cooler condenser assembly.

  1. Sufficiently apply compressor oil to a new O-ring and the fitting surface of the hose joint.

    Compressor oil:
    ND-OIL 11 or equivalent

  1. Install the O-ring on the discharge hose sub-assembly.
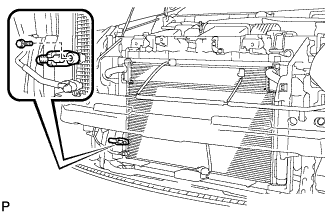
    NOTICE:
    1. Keep the O-ring and O-ring fitting surfaces clean from dirt or any foreign objects.
    2. Do not use any compressor oil other than ND-OIL 11 or equivalent. If any compressor oil other than ND-OIL 11 or equivalent is used, compressor motor insulation performance may decrease, resulting in a leakage of electric power.


    E189070
  1. Install the discharge hose sub-assembly on the cooler condenser assembly with the bolt.

    Torque:
    5.4 N*m{ 55 kgf*cm , 48 in.*lbf }


9. INSTALL MILLIMETER WAVE RADAR SENSOR BRACKET (w/ Dynamic Radar Cruise Control System)


    E189068
  1. Install the millimeter wave radar sensor bracket with the bolt.

    Torque:
    6.2 N*m{ 63 kgf*cm , 55 in.*lbf }


10. INSTALL MILLIMETER WAVE RADAR SENSOR ASSEMBLY (w/ Dynamic Radar Cruise Control System)


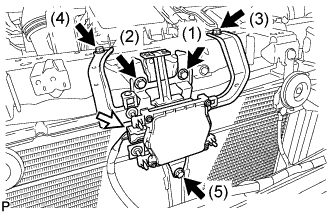
    E186309E01
  1. Tighten the 5 bolts on the millimeter wave radar sensor assembly.

    Torque:
    6.2 N*m{ 63 kgf*cm , 55 in.*lbf }

    HINT:
    Tighten the bolts in the order indicated in the illustration.

  1. Connect the connector.


11. INSTALL FRONT BUMPER ASSEMBLY
(Click here)


12. CONNECT CABLE TO AUXILIARY BATTERY NEGATIVE TERMINAL

NOTICE:
When disconnecting the cable, some systems need to be initialized after the cable is reconnected (Click here).


13. INSTALL REAR NO. 3 FLOOR BOARD


    B227791
  1. Engage the 2 guides to install the rear No. 3 floor board.


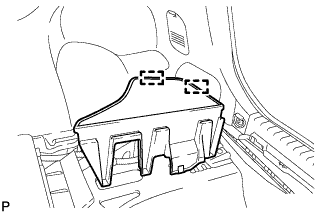
14. INSTALL REAR DECK FLOOR BOX
  1. Install the rear deck floor box.


15. INSTALL REAR NO. 2 FLOOR BOARD (for Separate Type)


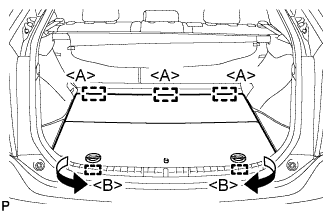
    B227788E01
  1. Engage the 3 guides <A>.

  1. Engage the 2 guides <B> and install the rear No. 2 floor board as shown in the illustration.


16. CHARGE WITH REFRIGERANT
  1. Perform vacuum purging using a vacuum pump.


  1. Charge with refrigerant HFC-134a (R134a).
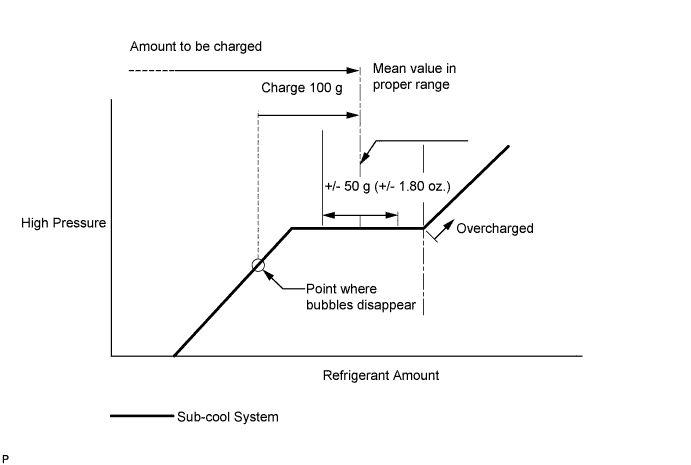

    E143108E05

    Standard:
    470 g (16.6 oz.)

    SST
    09985-20010   (09985-02010, 09985-02050, 09985-02060, 09985-02070, 09985-02080, 09985-02090, 09985-02110, 09985-02130, 09985-02140, 09985-02150)

    NOTICE:
    1. Do not turn the A/C on before charging with refrigerant. Doing so will cause the compressor to work without refrigerant, resulting in overheating of the cooler compressor.
    2. Approximately 100 g (3.53 oz.) of refrigerant may need to be charged after bubbles disappear. The refrigerant amount should be checked by quantity, not with the sight glass.
    3. Avoid using the gauge manifold set that had been used for vehicles with conventional compressor oil (ND-OIL8 or equivalent) as much as possible. This will cause compressor oil remaining in the manifold to enter the vehicle, resulting in insulation performance deterioration. A gauge manifold set that had been used 3 times or less can be reused if an appropriate one is not available.

    HINT:
    Ensure that sufficient refrigerant is available to recharge the system when using a refrigerant recovery unit. Refrigerant recovery units are not always able to recover 100% of the refrigerant from an A/C system.


17. ADD COOLANT (for Inverter)

NOTICE:
  1. Do not reuse the drained coolant because it may contain foreign matter.
  2. If the vehicle is driven with air in the inverter cooling system, damage may occur and the following DTCs may be set.

    DTC Code
    Detection Item
    P0A01-726
    Motor Electronics Coolant Temperature Sensor Circuit Range / Performance
    P0A04-725
    Motor Electronics Coolant Temperature Sensor Circuit Intermittent
    P0A08-264
    DC / DC Converter Status Circuit
    P0A78-284
    Drive Motor "A" Inverter Performance
    P0A78-286
    Drive Motor "A" Inverter Performance
    P0A7A-322
    Generator Inverter Performance
    P0A7A-324
    Generator Inverter Performance
    P0A93-346
    Inverter Cooling System Performance
    P0A94-553
    DC / DC Converter Performance
    P0A94-557
    DC / DC Converter Performance
    P0AEE-277
    Motor Inverter Temperature Sensor "A" Circuit Range / Performance
    P0AF1-276
    Drive Motor Inverter Temperature Sensor "A" Circuit Intermittent / Erratic
    P0BCD-315
    Generator Inverter Temperature Sensor Circuit Range / Performance
    P0BD0-314
    Generator Inverter Temperature Sensor Circuit Intermittent / Erratic
    P0C39-626
    DC / DC Converter Temperature Sensor "A" Range / Performance
    P0C3C-625
    DC / DC Converter Temperature Sensor "A" Intermittent / Erratic
    P0C3E-628
    DC / DC Converter Temperature Sensor "B" Range / Performance
    P0C41-627
    DC / DC Converter Temperature Sensor "B" Intermittent / Erratic
    P0C73-776
    Motor Electronics Coolant Pump "A" Control Performance


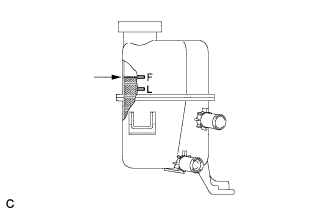
    A214673
  1. Slowly pour coolant into the reserve tank until it reaches the F line.

    Coolant quantity:
    2.1 liters (2.2 US qts, 1.8 Imp. qts.)

  1. When using the Techstream:

    1. Connect the Techstream to the DLC3.

    2. Turn the power switch on (IG).

    3. On the Techstream, enter the following menus: Powertrain / Hybrid Control / Active Test / Activate the Water Pump.

    4. Keep the coolant at the F line in the reserve tank to compensate for the drop in coolant level when the air bleeds.

      Standard:
      Air bleeding from the inverter cooling system is completed when the noise made by the water pump becomes smaller and the circulation of coolant in the reserve tank improves.

      HINT:
      Loud noise made by the water pump and poor circulation of coolant in the reserve tank indicates that there is air in the cooling system.

  1. When not using the Techstream:

    1. Turn the power switch on (READY). [*1]

    2. Turn the power switch off and add coolant to the F line because the coolant level drops as the air bleeds. [*2]

      NOTICE:
      1. Be sure to turn the power switch off before adding SLLC.
      2. Do not work on the components in the engine compartment while the vehicle is in the READY-on state because the engine is in intermittent operation.

    3. Repeat steps [*1] and [*2] until air bleeding from the cooling system is completed.

      Standard:
      Air bleeding from the inverter cooling system is completed when the noise made by the water pump becomes smaller and the circulation of coolant in the reserve tank improves.

      HINT:
      Loud noise made by the water pump and poor circulation of coolant in the reserve tank indicates that there is air in the cooling system.

  1. After the air is completely bled from the cooling system, tighten the reserve tank cap.


    A214673
  1. Add coolant to the F line of the reserve tank.


18. WARM UP COMPRESSOR
  1. Keep the A/C switch on for at least 2 minutes to warm up the compressor.

    NOTICE:
    Be sure to warm up the compressor when turning the A/C on after removing and installing the cooler refrigerant lines (including the compressor), to prevent damage to the compressor.


19. INSPECT FOR REFRIGERANT LEAK
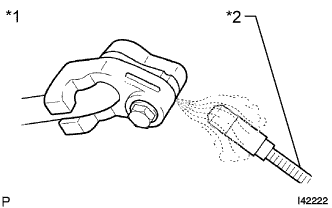
  1. After recharging with refrigerant, inspect for refrigerant leaks using a halogen leak detector.

  1. Carry out the test under the following conditions:
    1. Turn the power switch off.
    2. Secure good ventilation (the halogen leak detector may react to volatile gases which are not refrigerant, such as evaporated gasoline and exhaust gas).
    3. Repeat the test 2 or 3 times.
    4. Make sure that there is some refrigerant remaining in the refrigeration system.
      When the compressor is off: approx. 392 to 588 kPa (4.0 to 6.0 kgf/cm2, 57 to 85 psi)


    I042222E31
  1. Using a halogen leak detector, inspect for refrigerant leaks from the refrigerant lines.
    Text in Illustration 
    *1
    Inspect for Leak
    *2
    Halogen Leak Detector


    N014519E08
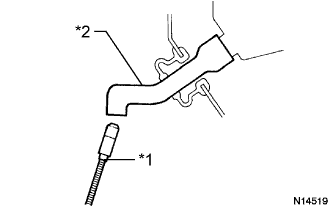
  1. Bring the halogen leak detector close to the drain hose with the detector's power off, and then turn the detector on.
    Text in Illustration 
    *1
    Halogen Leak Detector
    *2
    Drain Hose

    HINT:
    1. After the blower motor has stopped, let the cooling unit stand for more than 15 minutes.
    2. Bring the halogen leak detector sensor under the drain hose.
    3. When bringing the halogen leak detector close to the drain hose, make sure that the halogen leak detector does not react to volatile gases. If it is not possible to avoid interference from volatile gases, the vehicle should be lifted up to allow testing.

  1. If a refrigerant leak is not detected from the drain hose, remove the blower motor control from the cooling unit. Insert the halogen leak detector sensor into the unit and perform the test.

  1. Disconnect the pressure switch connector and leave it for approximately 20 minutes. Bring the halogen leak detector close to the pressure switch and perform the test.


20. INSPECT FOR COOLANT LEAK (for Inverter)
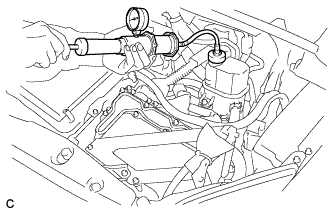
  1. Remove the reserve tank cap.

    CAUTION:
    To avoid the danger of being burned, do not remove the reserve tank cap while the coolant for the inverter is still hot.


    A214668
  1. Install the radiator cap tester.

  1. Pump the radiator cap tester to 122 kPa (1.2 kgf/ cm2, 17.7 psi), and then check that the pressure does not drop.

    HINT:
    If the pressure drops, check the hoses, radiator, water pump, inverter with converter, and hybrid vehicle transaxle assembly for leaks.

  1. Reinstall the reserve tank cap.


21. ADJUST HOOD SUB-ASSEMBLY
(Click here)


22. ADJUST MILLIMETER WAVE RADAR SENSOR ASSEMBLY (w/ Dynamic Radar Cruise Control System)


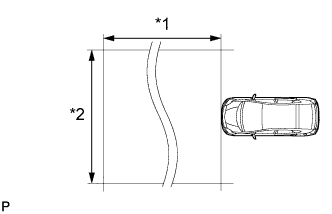
E186310E01
Text in Illustration 
*1
Approx. 10 m
*2
Approx. 14 m

CAUTION:
Radiofrequency radiation exposure information:
  1. This equipment complies with FCC radiation exposure limits set forth for an uncontrolled environment.
  2. This equipment should be kept with minimum distance of 20 cm (7.87 in.) between the radiator (antenna) and your body at all times during adjustment.
  3. This transmitter must not be co-located or operating in conjunction with any other antenna or transmitter.

NOTICE:
  1. Perform measurements on a level surface.
  2. Make sure that no large pieces of metal are within a 10 m (32.8 ft.) x 14 m (45.9 ft.) area in front of the vehicle. If possible, the surrounding area should also be free of large metal objects.

  1. Before adjusting the radar beam axis, prepare the vehicle as follows.

    1. Check the tire pressure and adjust it if necessary.

    2. Remove all excess weight from the vehicle (luggage, heavy objects, etc.).
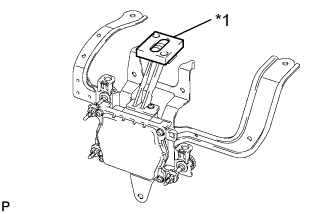


    E186311E01
  1. Check and adjust the vertical direction of the radar sensor.
    Text in Illustration 
    *1
    Level

    1. Remove dust, oil and foreign matter from the radar sensor's level rack.

    2. Set a level on the radar sensor's level rack.
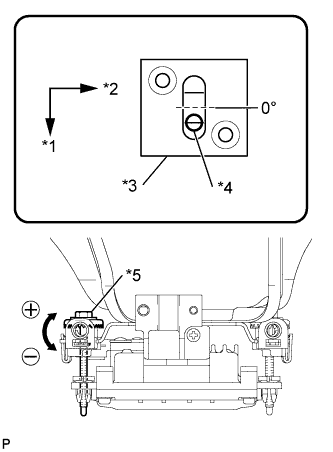


    3. E179691E01
    4. Check that the level's air bubble is within the red frame.
      Text in Illustration 
      *1
      Fr
      *2
      LH
      *3
      Level
      *4
      Air Bubble
      *5
      Bolt A

      OK:
      Level's air bubble is within the red frame.

      If the bubble is not within the red frame, use a screwdriver to adjust the bolt A until the air bubble is within the red frame.

      HINT:
      1. The adjustable range within the level's red frame is +/-0.2°.
      2. The target angle is +0.2° (upward angle of 0.2°).

        Result:
        Adjustment Direction
        Adjustment Procedure
        Adjustment Angle
        Vertical adjustment
        Upward direction: Turn bolt A to negative (-) side
        For every 1.4 rotations of adjustment bolt, sensor moves about 1°
        Downward direction: Turn bolt A to positive (+) side


    E245151E01
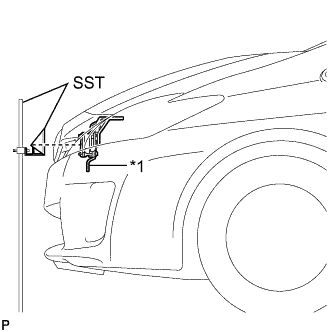
  1. Adjust the reflector height.
    Text in Illustration 
    *1
    Millimeter Wave Radar Sensor

    1. Adjust the reflector so that the center of SST reflector is the same height as the millimeter wave radar sensor.
      SST
      09870-60000   (09870-60010)
      09870-60040  

      HINT:
      Prepare a 10 m (32.8 ft.) string, string with a sharp-pointed weight (plumb bob), and 5 m (16.4 ft.) tape measure.


    E179693E01
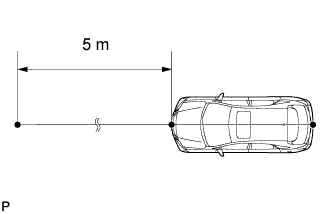
  1. Place the reflector.

    1. Hang the string (with weight) from the center of the vehicle's rear emblem. Mark the vehicle's rear center point on the ground. Repeat for the front of the vehicle.
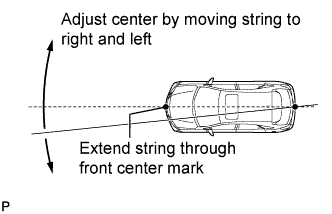


    2. E179695E01
    3. Set one end of the 10 m (32.8 ft.) string on the vehicle's rear center point. Run the string over the vehicle's front center point to a position 5 m (16.4 ft.) beyond the vehicle's front center point, as shown in the illustration. Mark the 5 m (16.4 ft.) position.


    4. Using a tape measure, measure 15.7 mm (0.618 in.) to the right of the 5 m (16.4 ft.) position. Place the reflector at that position.
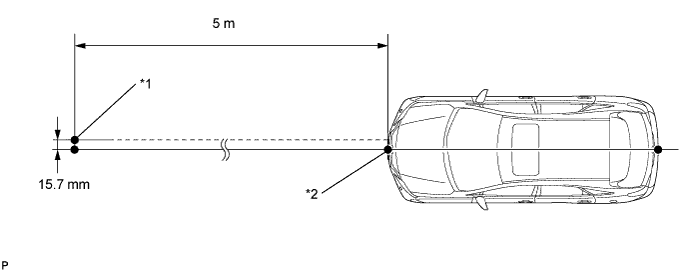
      NOTICE:
      Perform the operation as precisely as possible.


      E179696E02


      Text in Illustration 
      *1
      Reflector Placement Point
      *2
      Millimeter Wave Radar Sensor Position

  1. Check the radar beam axis.

    1. When using the Techstream:

      1. Connect the Techstream to the DLC3.
      2. Turn the power switch on (IG).
      3. Turn the Techstream on, and turn the cruise control main switch on.
      4. Select "Connect to Vehicle".
      5. Select each item on the display screen and proceed to the next screen.
      6. Under "System Selection Menu", select "Radar Cruise".
      7. Select "Utility".
      8. Select "Beam Axis Adjustment" and proceed to the next screen.

        HINT:
        A buzzer will sound for 1 second.

      9. Follow the Techstream display, and continue with the adjustment.

        CAUTION:
        Do not come within 20 cm (7.87 in.) of the radar sensor.

        NOTICE:
        1. Turn the cruise control main switch on before pressing "Next".
        2. Make sure there is at least 20 cm (7.87 in.) between the radar sensor and any nearby individuals.

    2. Check the following items on the laser cruise divergence data screen.

      NOTICE:
      While using the Techstream beam axis adjustment mode, the actual direction and angle of the radar sensor may be different from the Techstream data. In such a case, the deviation is displayed on the combination meter's multi-information display.

      1. Confirm that the distance value is approximately 5 m (16.4 ft.).

        HINT:
        1. A value between 0.0 m (0.0 ft.) and 6.3 m (20.7 ft.) should be indicated.
        2. If the distance is 0.0 m (0.0 ft.), the sensor cannot detect the target. Reconfirm that there is no metal in the specified area in front of the vehicle (refer to the Notice at the beginning of this adjustment procedure).

      2. Confirm that the left/right side value is between 0.0 m (0.0 ft.) and 6.3 m (20.7 ft.).

        HINT:
        If the distance is 0.0 m (0.0 ft.), the sensor cannot detect the target. Reconfirm that there is no metal in the specified area in front of the vehicle (refer to the Notice at the beginning of this adjustment procedure).


  1. Check and adjust the horizontal direction of the radar sensor.

    1. Check that the divergence of the radar beam axis is 0°.
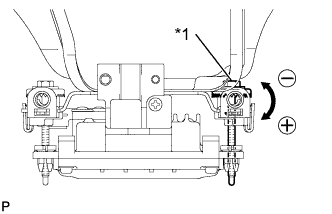
      Standard:
      0° (Both right and left)

      If the axis is not as specified, use a screwdriver to adjust the bolt B until the divergence of the radar beam axis is 0°.


    2. E179698E01
    3. Based on the measured divergence of the beam axis, turn and adjust the bolt B for horizontal adjustment of the millimeter wave radar sensor using a screwdriver.
      Text in Illustration 
      *1
      Bolt B

      Result:
      Adjustment Direction
      Adjustment Procedure
      Adjustment Angle
      Horizontal adjustment
      Right direction: Turn bolt B to positive (+) side.
      For every 2.5 rotations of adjustment bolt, sensor moves about 1°
      Left direction: Turn bolt B to negative (-) side.

      HINT:
      1. If "LEFT SIDE: 1.0°" is displayed, the divergence is 1.0° in the left direction. Turn the bolt B approximately 2.5 turns to the negative (-) side.
      2. If the value does not change to 0°, it is possible that the sensor is aiming at something different. Reconfirm that there are no reflective materials in the surrounding area.

    4. Select "Next". The driving learning value is automatically reset.

      HINT:
      A buzzer will sound for 10 seconds or more.

    5. Disconnect the Techstream from the DLC3.


  1. Recheck and readjust the vertical direction of the radar sensor.


      E186311E01
    1. Set a level on the radar sensor's level rack.
      Text in Illustration 
      *1
      Level


    2. E179691E01
    3. Check that the level's air bubble is within the red frame.
      Text in Illustration 
      *1
      Fr
      *2
      LH
      *3
      Level
      *4
      Air Bubble
      *5
      Bolt A

      OK:
      Level's air bubble is within the red frame.

      If the bubble is not within the red frame, use a screwdriver to adjust the bolt A until the level's air bubble is within the red frame.

      HINT:
      1. The adjustable range within the red frame is +/-0.2°.
      2. The target angle is +0.2° (upward angle of 0.2°).

        Result:
        Adjustment Direction
        Adjustment Procedure
        Adjustment Angle
        Vertical adjustment
        Upward direction: Turn bolt A to negative (-) side
        For every 1.4 rotations of adjustment bolt, sensor moves about 1°
        Downward direction: Turn bolt A to positive (+) side